What Tools Do I Need?
Your bike is unique. What specific tools do *you* need for its regular maintenance? The answer is both simpler and more complex than you might think.
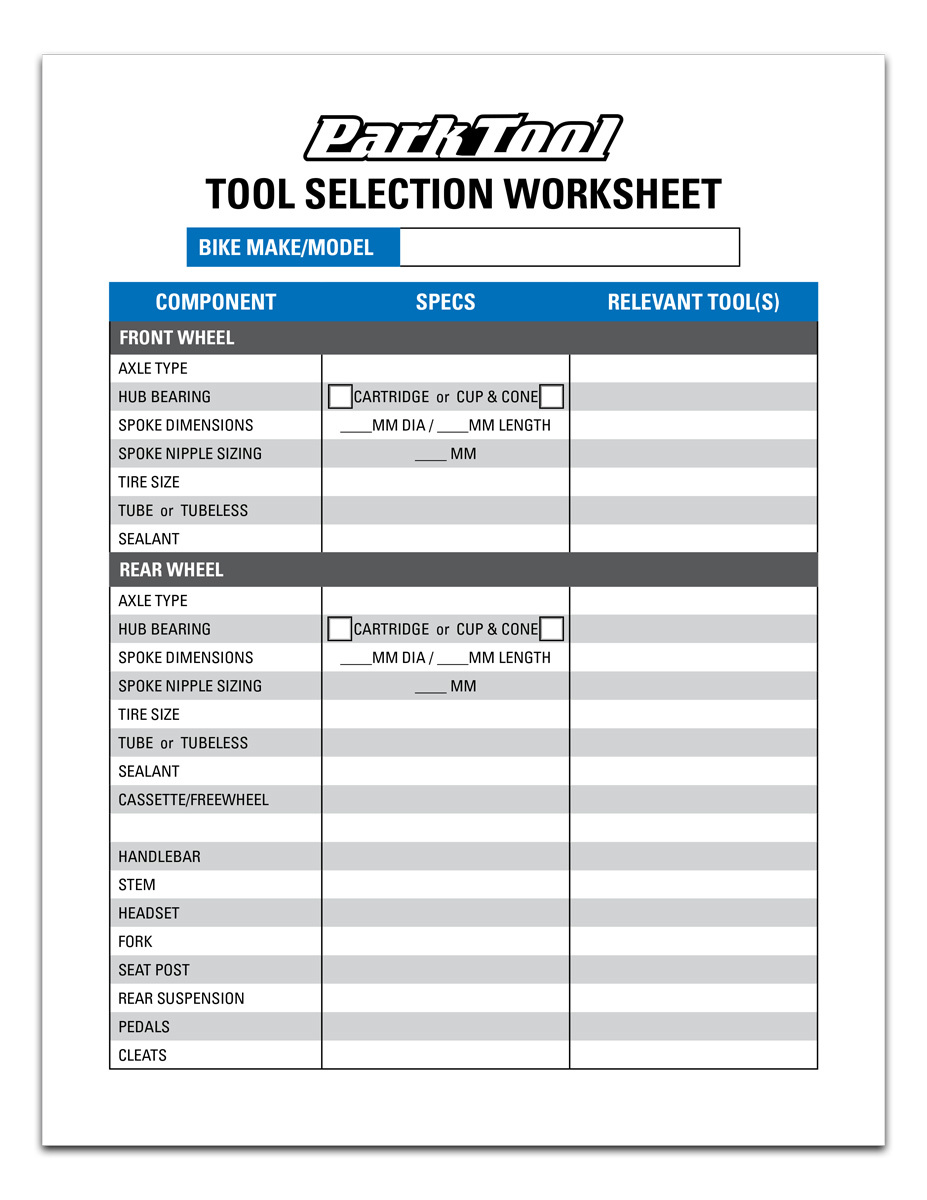
Tool Selection Worksheet
To answer this question, you must begin by inspecting your bike. To help organize this process, we’ve prepared a worksheet with some simple questions, as featured in the above Tech Tuesday video “What Tools Do I Need?” Download and print the worksheet to help determine the tools you need for your bike.
DOWNLOAD PDF
The idea behind this worksheet is to assist you in working your way through the bike and make you consider the specific tools you might need. These should be the tools that are bicycle specific, and beyond those included in the “Essential Tools” listed on the back of the worksheet.
There are many permutations on how bicycles are spec’d. It often means you as the bike owner will need to look at your bike and research the specialty tools required. As you consider these tools, also consider your level of skill and your comfort level on any given repair. For example, your “Essential Tools” will allow you to make basic adjustments on a hydraulic disc brake, but for bleeding you will need a bleed kit. If you are not comfortable bleeding or if it doesn’t make sense for you, use a local bicycle retailer to provide this service, and do not record this specialty tool.
You can also use this as a reference for your bike’s parts spec. This may be useful to you if you ever break a part, are thinking of upgrading, or you need to service a specific component.
Component Checklist
AXLE TYPE: Here you might record axle type, such as thru, quick release, or solid axle. Even front thru hubs come in three standards. Record any specific tools beyond a normal hex key. It might also be good to note the frames spacing, 142x12 etc.
HUB BEARING (CARTRIDGE / CUP & CONE): Circle the type you have. Cartridge hubs will require different tools for service, including cone wrenches. Measure the wrench flats to know the specific cone wrenches. Many cartridge-style hubs require these wrenches as well.
SPOKE DIMENSION: The spoke diameter is useful to know, especially if you are using a tension meter. The length is just handy should you ever break a spoke.
SPOKE NIPPLE SIZING: There are many different sized spoke wrenches possible. The size of spoke does not determine the size of the spoke wrench. Measure across the square nipple wrench flats. For round splined shaped nipples, measure the outside diameter and count the number of splines. See our article on Spoke Wrench Selection for more information.
TIRE SIZING: Record the tire size, such as 29x2.1, or 700c x 32.
TUBE OR TUBELESS: Also record either tubed or tubeless. Relevant tools might be steel levers for known tight beads. For tubeless setups, consider a valve core tool such as the VC-1 and a sealant injector such as the TSI-1. For a tubed system, get a patch kit.
SEALANT: Tire sealant is basically a component part of the bike. Record the brand used, such as Stan’s®, Orange®, etc. You can also record how much you installed as this could be useful information down the road.
CASSETTE/FREEWHEEL: Cassettes really have just two choices in lockring design. The common Shimano®/SRAM®/etc.-compatible lockring style, and the Campagnolo® style.
However, screw-on freewheels have many tool options. Inspect the tool fitting, measure the width, and count the number of notches or splines.
HANDLEBAR: Record bar width and style, plus bar center dimension. Useful to know for replacement purposes. If you trimmed the bars, it’s also good to know the new width.
STEM: Length and angle are good to know. Some stem brands also use unusual sized fasteners, such as T20 Torx®-compatible bolts.
HEADSET: For normal service, your base-level tools will work fine. If you plan on removal and installation, you may need a specialized tool such as the HHP-3, RT-1, etc.
FORK: This will be useful if you bring the fork in for service or you are going to service the fork and have a collection of tools for that specific fork. For service of suspension, consider a lever to remove the wiper, and a seal driver tool. For new fork upgrades, you will need a hacksaw, star nut installer, saw guide, etc.
SEAT POST: For a typical post, the essential set of hex wrenches will be sufficient. In terms of specialty tools, if you have a dropper that is cable actuated, a cable cutter is commonly needed. For hydraulic models, add the manufacturer’s bleed kit.
REAR SUSPENSION: If you intend to pull the bearing pivots, knowing the bearing size will get you the right tool when replacing bearings.
PEDALS: Pedals may have a 15 mm external wrench flat. Others have an internal fitting on the inner side, often being a 6 mm or 8 mm hex fitting. Record this, and get the proper tool.
CLEATS: If cleated shoes are used, record the type of cleat, such as Crank Brothers®, SPD, etc. Additionally record if float or non-float used.
CRANK: Besides the make/model, record if any unique tools are needed to tighten the crank, such as a 10 mm or 8 mm hex wrench, T40 Torx®-compatible, or a 15 mm hex-headed bolt.
CHAINRING: This is not just size, but also the mounting system. Some double-chainring bikes use T30 Torx®-compatible wrenches . For example, a 1x system might use a BBT-32 to secure the ring to the arm. Others require the use of the CNW-2 and 5 mm hex.
BOTTOM BRACKET: This might be a press fit, but record what standard (BB30, PF41, PF46, etc.) This is needed for the eventual replacement service. If threading is involved, record thread standard. Record the specialty tools needed. Begin by measuring the nominal outside diameter and count the number of tool fittings or splines.
CHAIN: Record the number of speeds on the cassette as well as an special notes that you feel apply. Does it use a master link or a connecting rivet? Contact your chain manufacturer to see a particular style of chain tool is required.
DERAILLEUR SYSTEM: Assume here “system” means everything from your shifters all the way back to the derailleur pulleys. Are there special tools needed? Cable cutters? Chargers for electronic shifting?
DERAILLEUR HANGER: It is good practice to have a spare on hand. It’s also good to have the part number on hand in case you need to order a new one or call local shops to looking for one. This is not just the bike year and model, but the exact replacement part number.
BRAKE SYSTEM: Again, consider everything from the lever all the way to the caliper. It can be useful to know if you may benefit from a fourth hand tool, a bleed kit, or other specialty tools.
BRAKE ROTOR: Rotors come in multiple configurations and it is wise to record this. It may be a 6-bolt or a centerlock. Your rotors also come in different sizes. If looking for a replacement it’s wise to find the same one. You may also benefit from tools like the DT-2 or DT-3.
By looking at your bike before you need the specialty tools, you will be saving yourself time and headaches. Again, consider what you feel comfortable servicing and what makes sense for your situation. Each person has a unique relationship to their bike, and by putting pen to paper you will be in a better position to address your maintenance issues.
Essentials
Regardless of the type of bike you are working on, you are likely to find it useful to have most, if not all, of these tools on hand. These will enable you to do a wide variety of common bike maintenance procedures. Many of these may be tools you already own; however, we recommend keeping a set of tools separate from your general household tools so that you always have them available for bike work.
Tools
- Tape measure
- Calipers (digital)
- Hex tools (2 mm to 10 mm)
- Torx®-compatible tools (T10, T25, T30)
- Screwdriver (#2 cross tip & 3 mm straight blade)
- Torque wrench with bits
- Hammer with mallet side
- Adjustable wrench
- Needlenose pliers
- Scissors
- Chain tool
- Flashlight/headlamp
- Floor pump
- Repair stand
Materials
- Grease (bicycle specific)
- Chain lubricant
- Electrician’s tape
- Zip ties (mixed sizes and colors)
- Clean cotton rags
- Nitrile mechanic’s gloves
Related articles
Bottom Bracket Identification View Article
Bottom Bracket Standards and Terminology View Article
Determining Cassette / Freewheel Type View Article
Spoke Wrench Selection View Article
Tire, Wheel and Inner Tube Fit Standards View Article