How to Bleed Shimano® Drop Bar Hydraulic Brakes
This article will review the procedures to bleed Shimano Drop Bars hydraulic brakes using the Park Tool BKM-1.2 or BKM-1 Bleed Kit.
Preliminary Information
- BKM-1.2 Hydraulic Brake Bleed Kit (Mineral)
- Appropriate mineral oil for the system
- Hex wrenches
- PS-1 Pad Spreader, PP-1.2 Piston Press, tire lever or cone wrench
- Clean rags
- Isopropyl alcohol
- Angle finder
- 7 mm wrench
- Toe strap or zip ties
- Spent fluid container, such as a bottle or bag
- Safety glasses and gloves
Hydraulic braking systems require that there is no air in between the caliper pistons and the primary piston. Air bubbles will compress and cause the brake to feel soft when the lever is pulled with force. Additionally, the fluid can become dirty with use and should be changed.
With any brake bleeding work, consider the following:
Brake bleeding is considered an advanced service procedure, and requires a thorough technical knowledge of the braking system. If in doubt, or if this procedure is not working, contact the brake manufacturer for model-specific information.
It is important to always use the appropriate brake fluid for the brake being serviced. Never use DOT brake fluid in brakes designed for mineral oil, or vice versa. Never share bleed kits between DOT fluid and mineral oil systems. Mixing fluids can cause damage to components and lead to brake failure, which is dangerous.
Anticipate any inadvertent fluid drips or spills on the floor by putting down a cover. Dispose of any fluid in accordance with your local waste disposal authorities. If in doubt or if your procedure is not working, contact the brake manufacturer’s website for their model specific information.
The procedures for Shimano drop bar lever systems vary somewhat between the model of lever, but all share the same basic steps:
- Lever position is rotated to permit fluid injection from the caliper upward to the bleed funnel.
- Fluid is drained down by gravity down from bleed funnel and out the caliper
- Fluid pressure is built up by applying the lever and then fluid is ejected under force.
- Lever is tilted to specific “burp Ppositions” to evacuate an air from the lever body.
- Lever rotated so bleed funnel is vertical. Bleed funnel removed and bleed screw replaced.
This article will use the Shimano SL-RX810 (a Top Port Generation 2 style lever) as an example for most steps of this procedure. Illustrations of the proper angles to set the funnel for all styles are also provided. If you are unable to find your brake lever style below, see si.shimano.com for technical information.
Basic Lever Styles
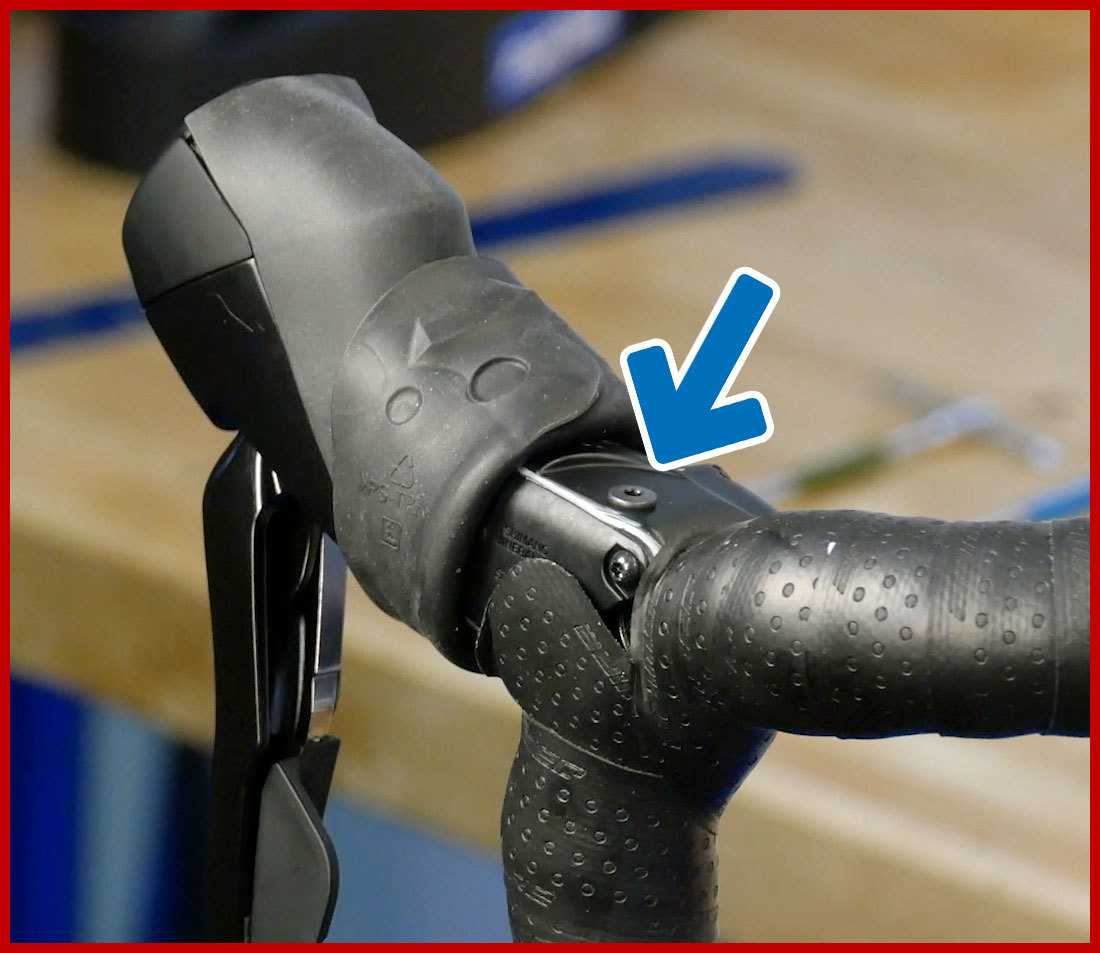
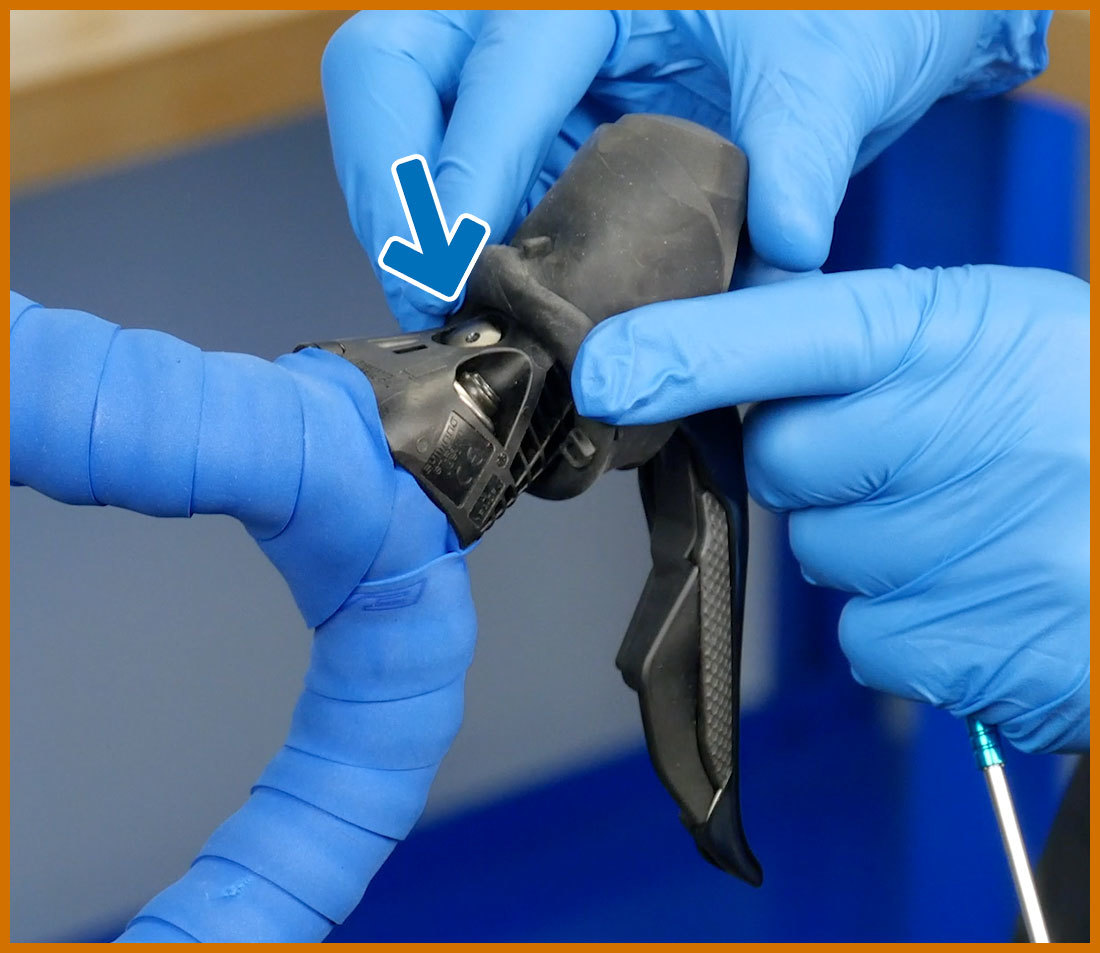
The first step is to identify the type of drop bar brake lever. These are described here by location of the bleed port. Look under the rubber hood to find the bleed port screw, which will is removed with either a 2mm or 2.5mm hex wrench.
These images are color coded for easy reference - at each step, angle the bars and lever at the appropriate position for your color.
Back Port style
Port screw is close to handlebars. Port threads are M5.
Middle Port style
Port threads are M7.
Front Port style
Port screw is hidden below plastic cover. Port thread is M5.
Top Port Style - Generation 1
Port screw at top of peak in lever. Port thread is M5. Notice integrated metal tubing.
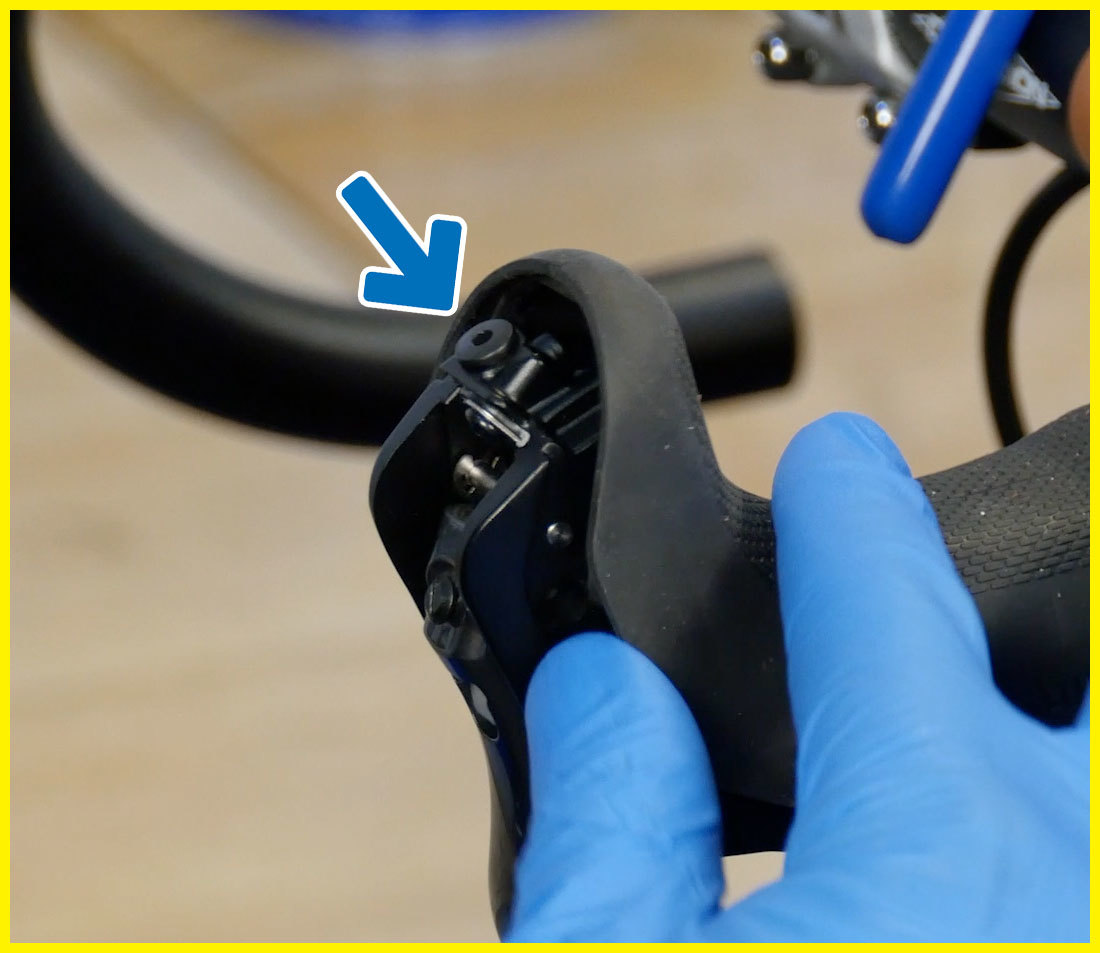
Top Port Style - Generation 2
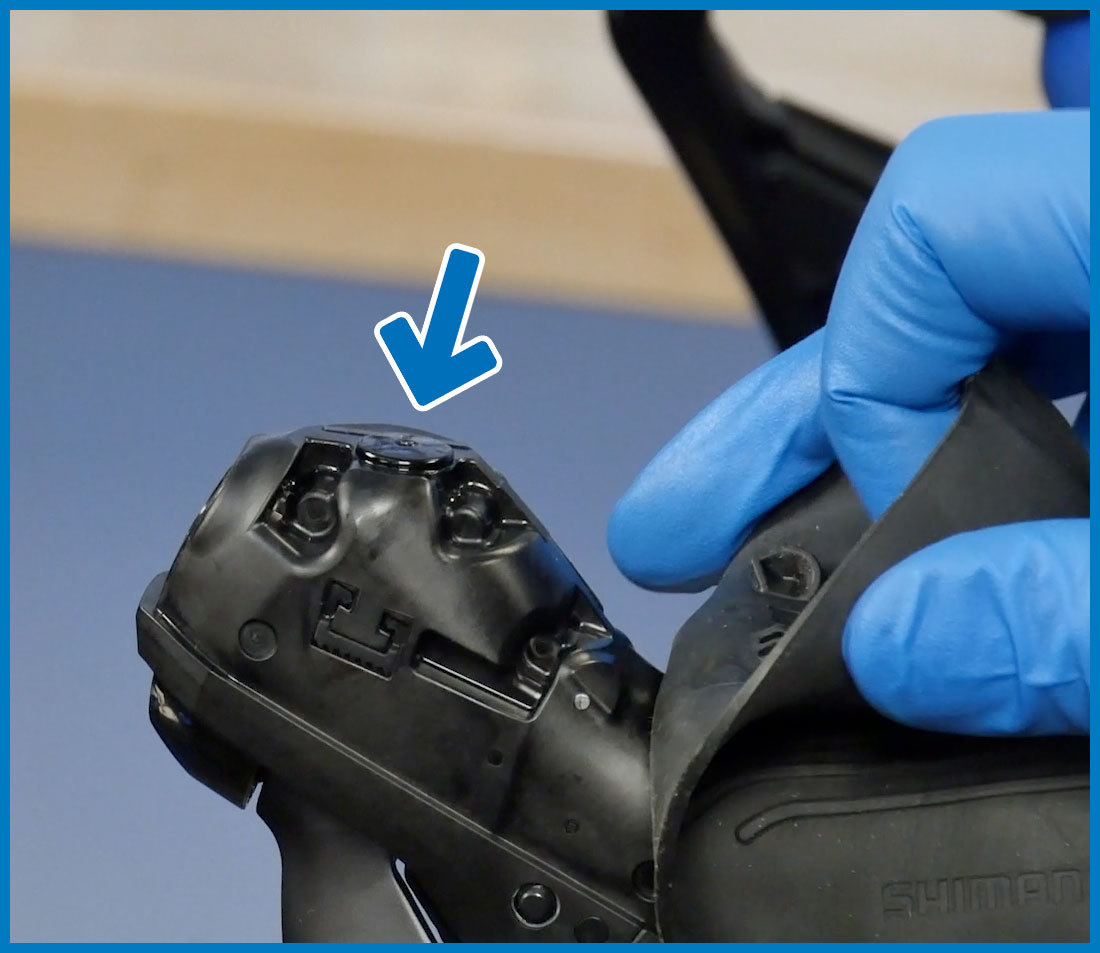
Port screw at top peak of lever body. Note lack of external tubing on Generation 2.
Regardless of lever type, read the process below.
Bicycle prep
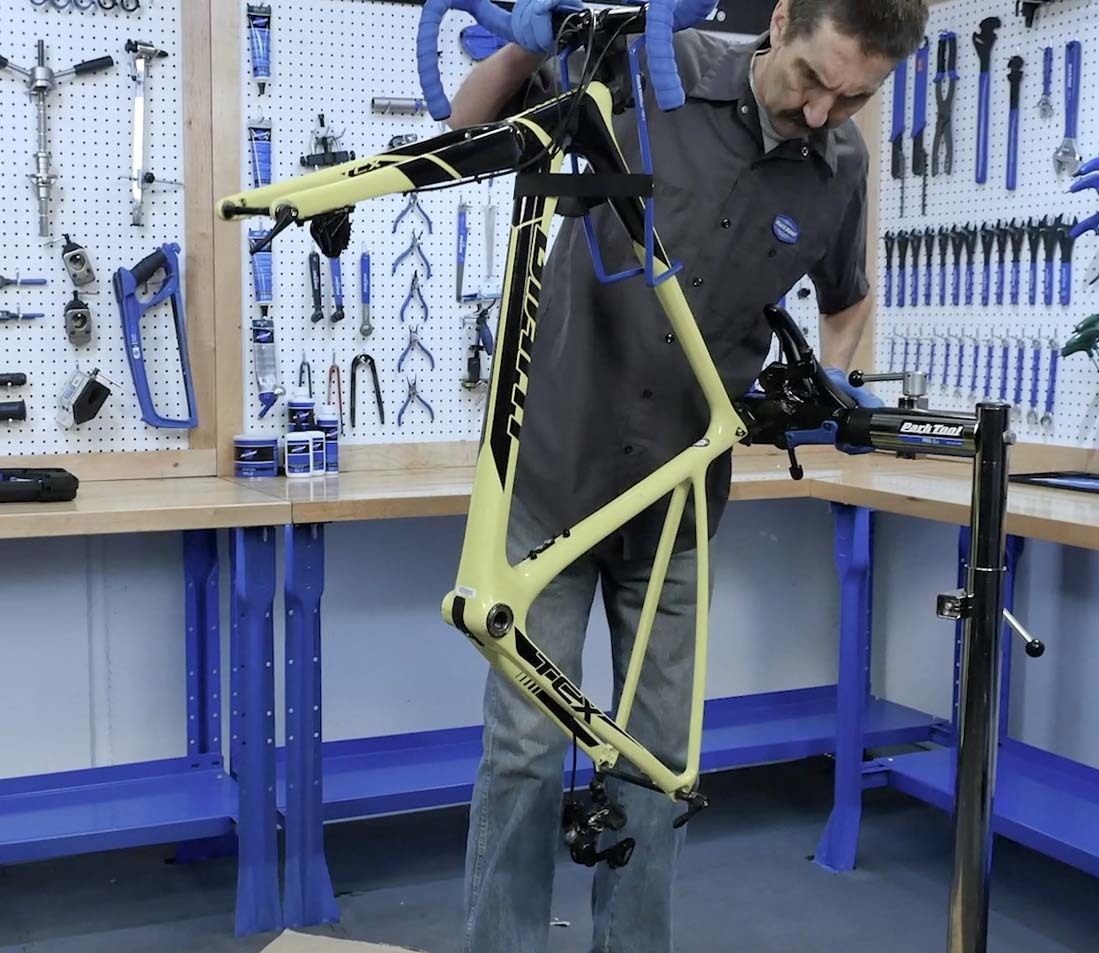
Remove the wheel. Rotate the bike as necessary so there is consistent uphill travel from the caliper to the lever. It it sometimes easier to remove the brake from the bike.
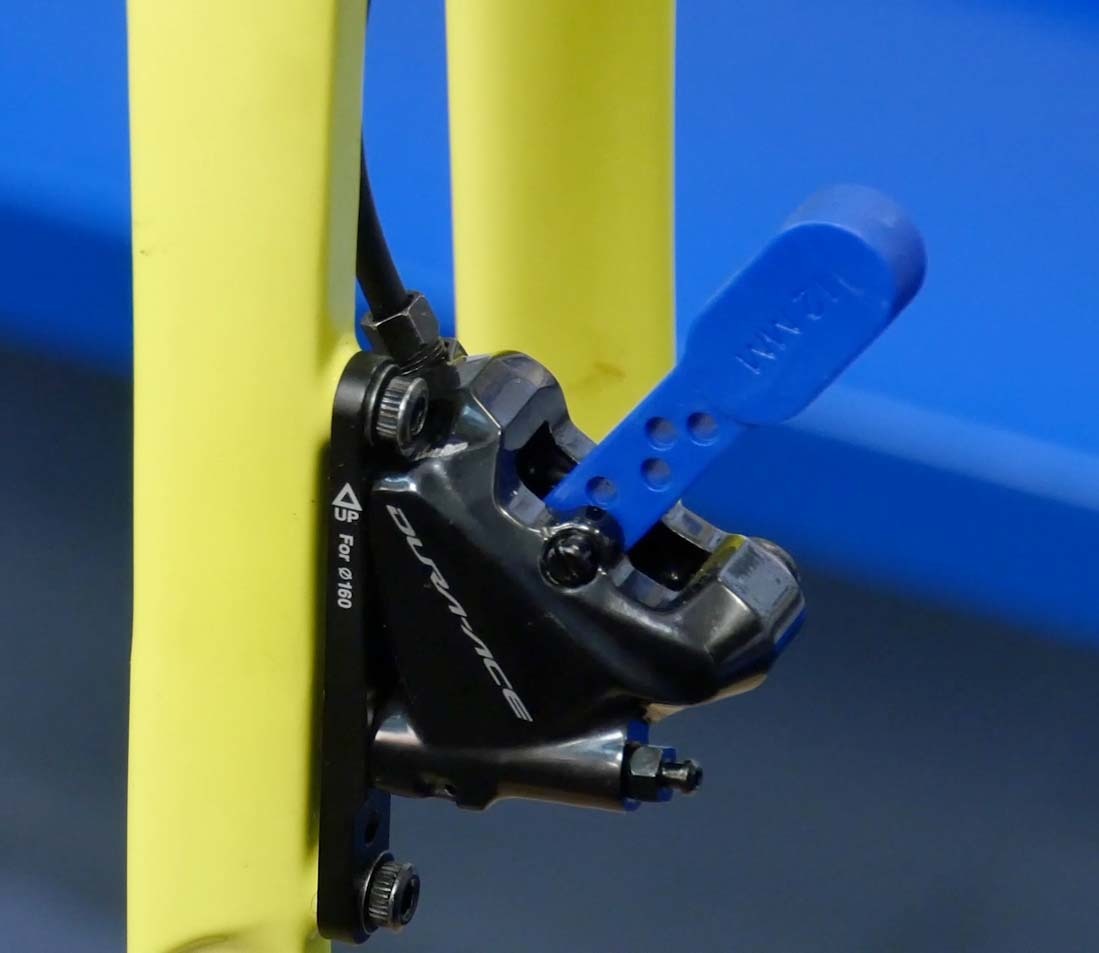
Remove the brake pads from the caliper. Reset the pistons back into the caliper body. Install brake bleed blocks between the pistons. Hold the blocks in place using the brake pad screw from the caliper.
Now prepare the BKM-1.2 kit. Find the hose with one open end and one threaded end (part #2593). Thread this onto the syringe and snug it. Slide the hose compression sleeve (part #2588) over the open end on the hose. Fill this syringe about 2/3 full with the appropriate brake fluid.
Get any air bubbles out of the syringe. Hold it upright and slowly and carefully push the plunger until fluid comes up to end of tubing. Place the syringe in the syringe holder.
Locate and remove the bleed port screw. Note the the thread size of the screw. It can be either an M5 or M7. For M5 threads, select the green adapter (part #2625A) and thread it onto the bleed funnel. For M7 threads, use the silver extension (part #2586). Carefully thread the funnel and extension assembly into the brake lever bleed port.
Rotate Levers
Shimano hydraulic brake levers are designed with internal channels to the fluid reservoirs. To ensure air is fully removed - or “burped” - from the lever, it is necessary to rotate the lever to specific angles. The amount of rotation depends on the model of lever. Shimano provides reference marks to help align the bleed port position.
NOTE: When rotating bars, always be careful not to damage any internally routed wires.
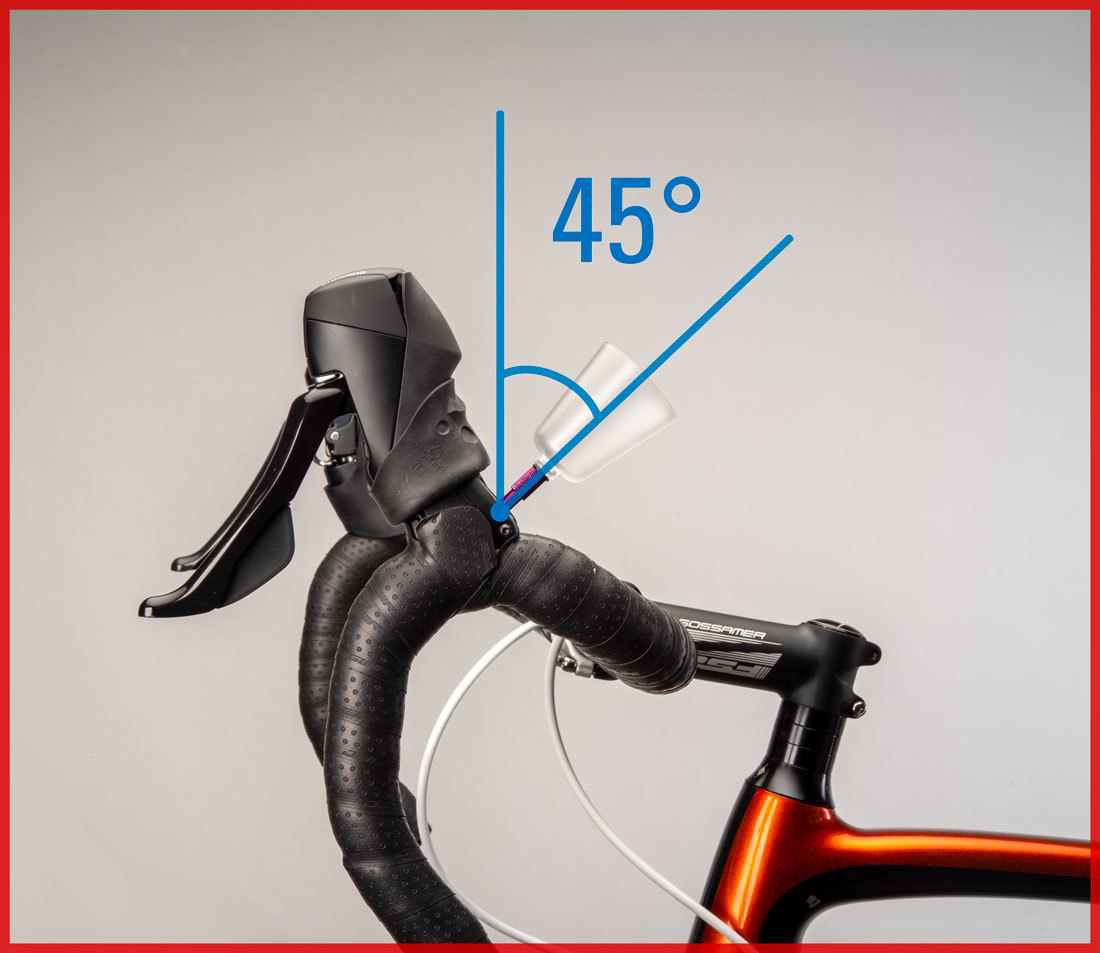
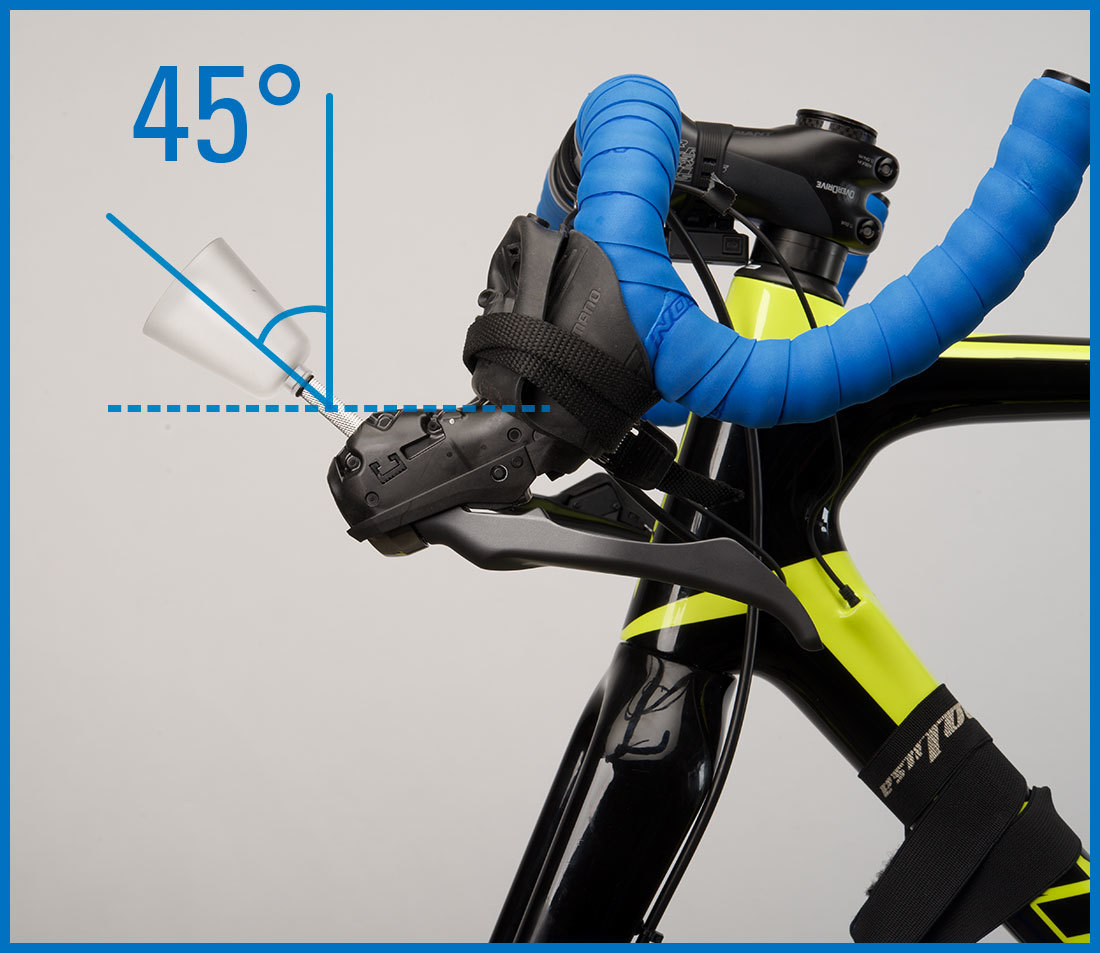
BACK PORT
Lever is rotated so bleed funnel is rotated 45º back from vertical.
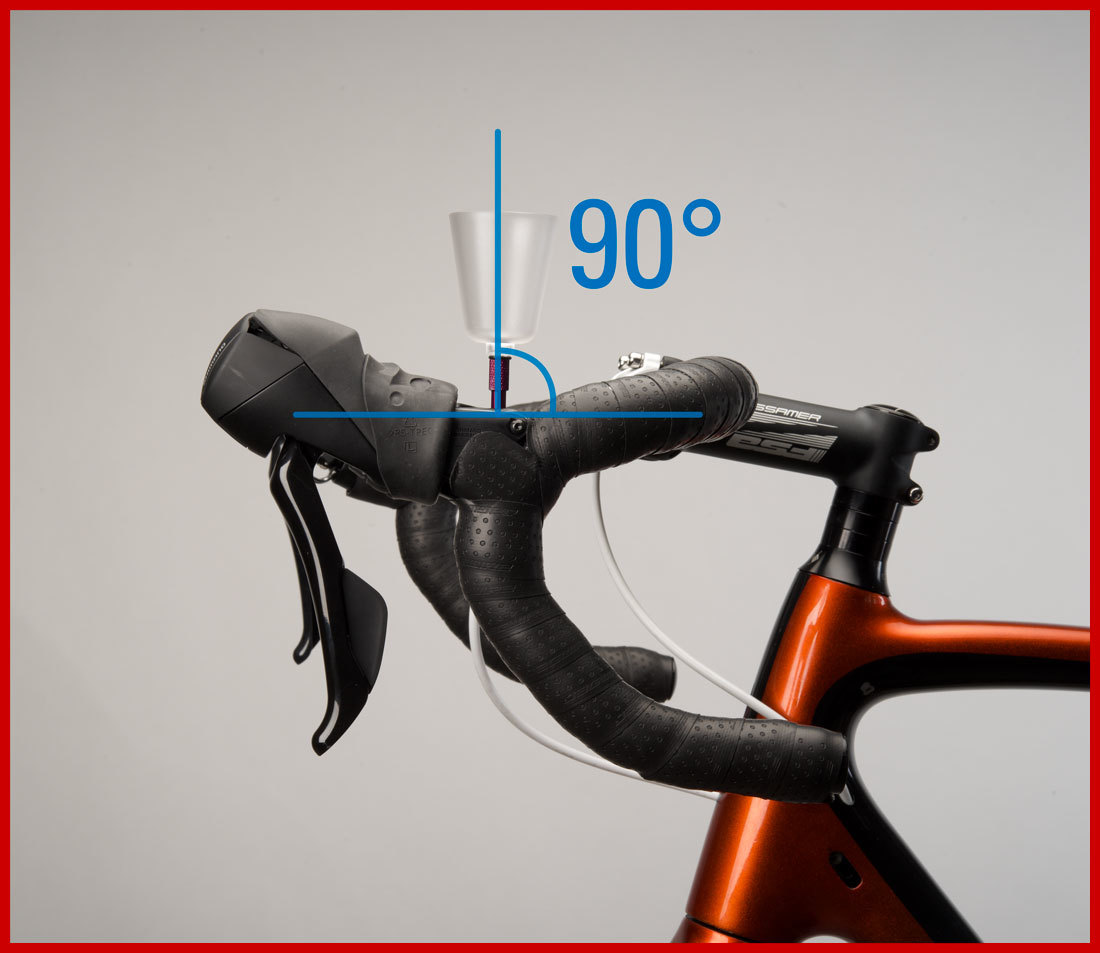
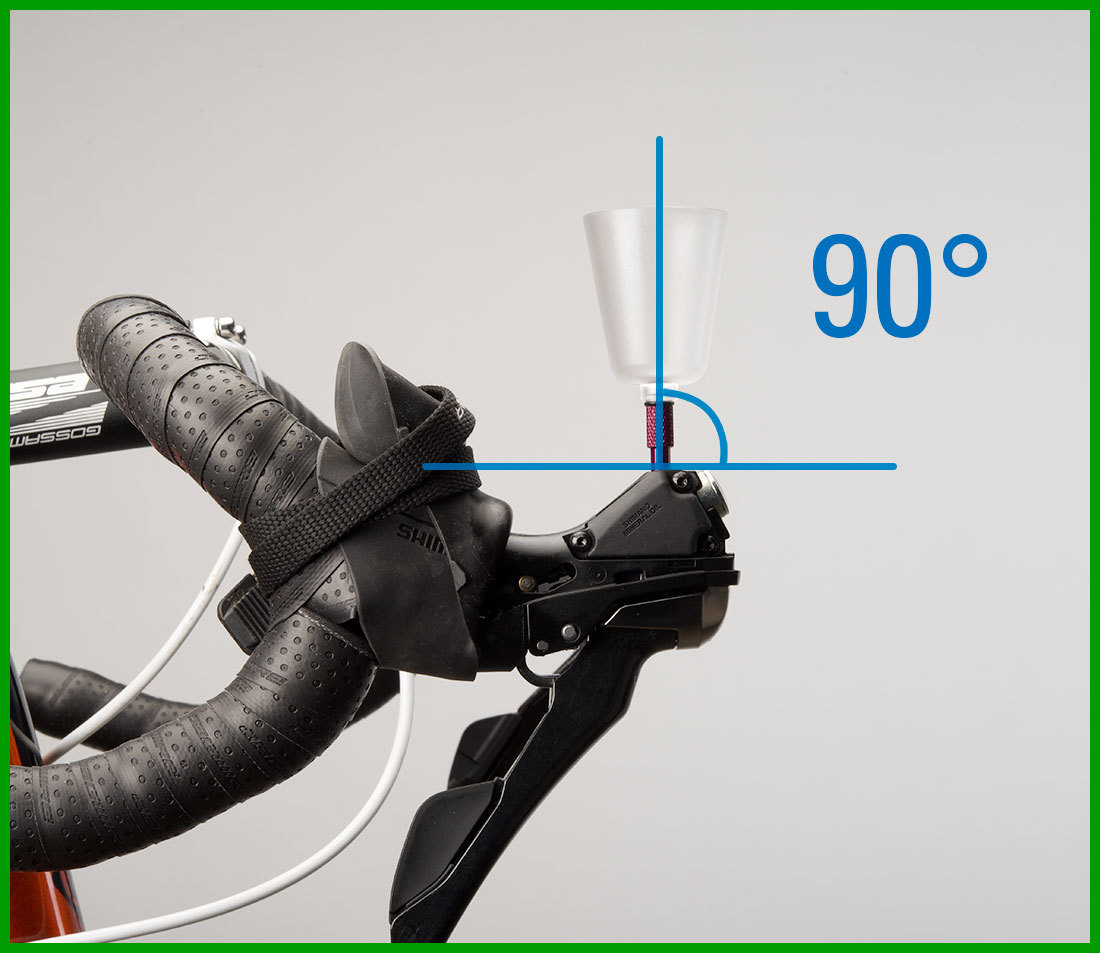
MIDDLE PORT & Front Port
Lever is rotated so bleed funnel is vertical.
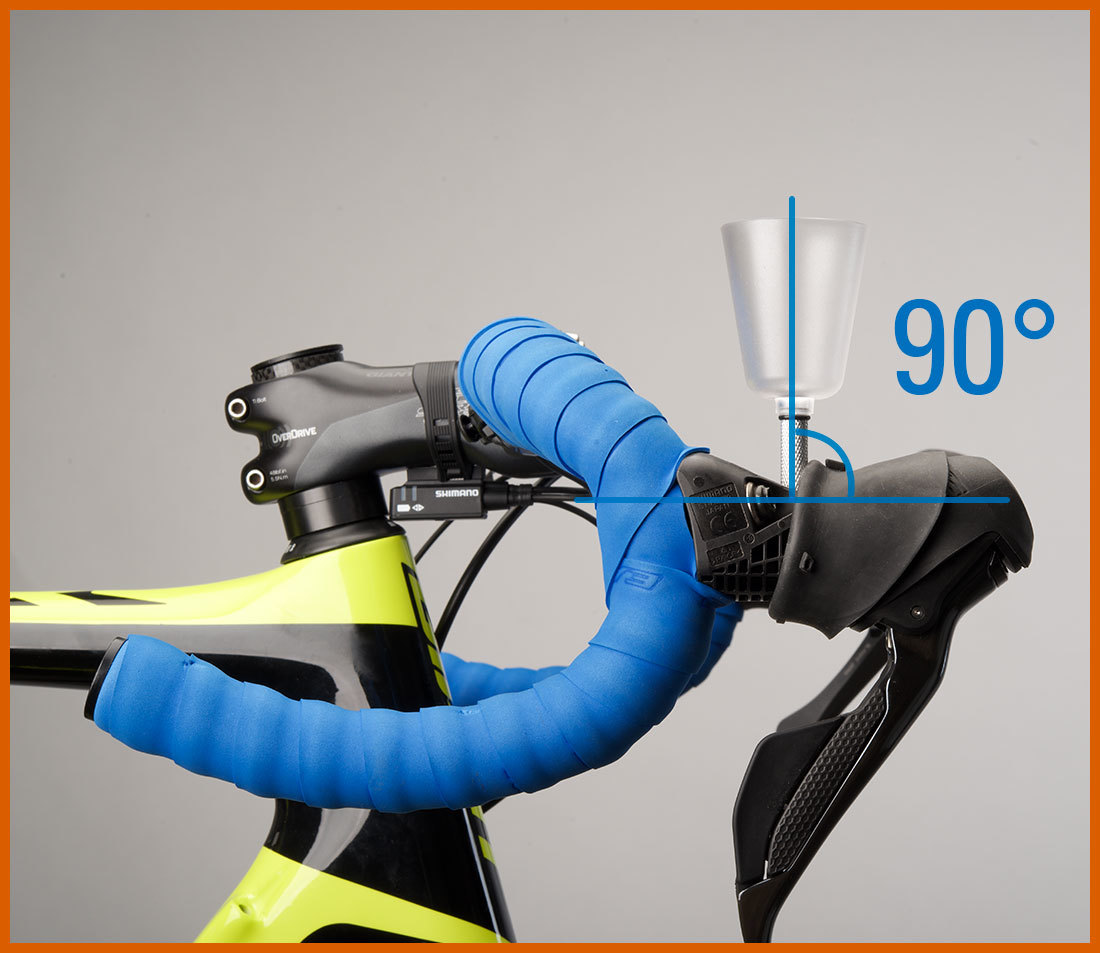
middle port style lever at 90°
front port style lever at 90°
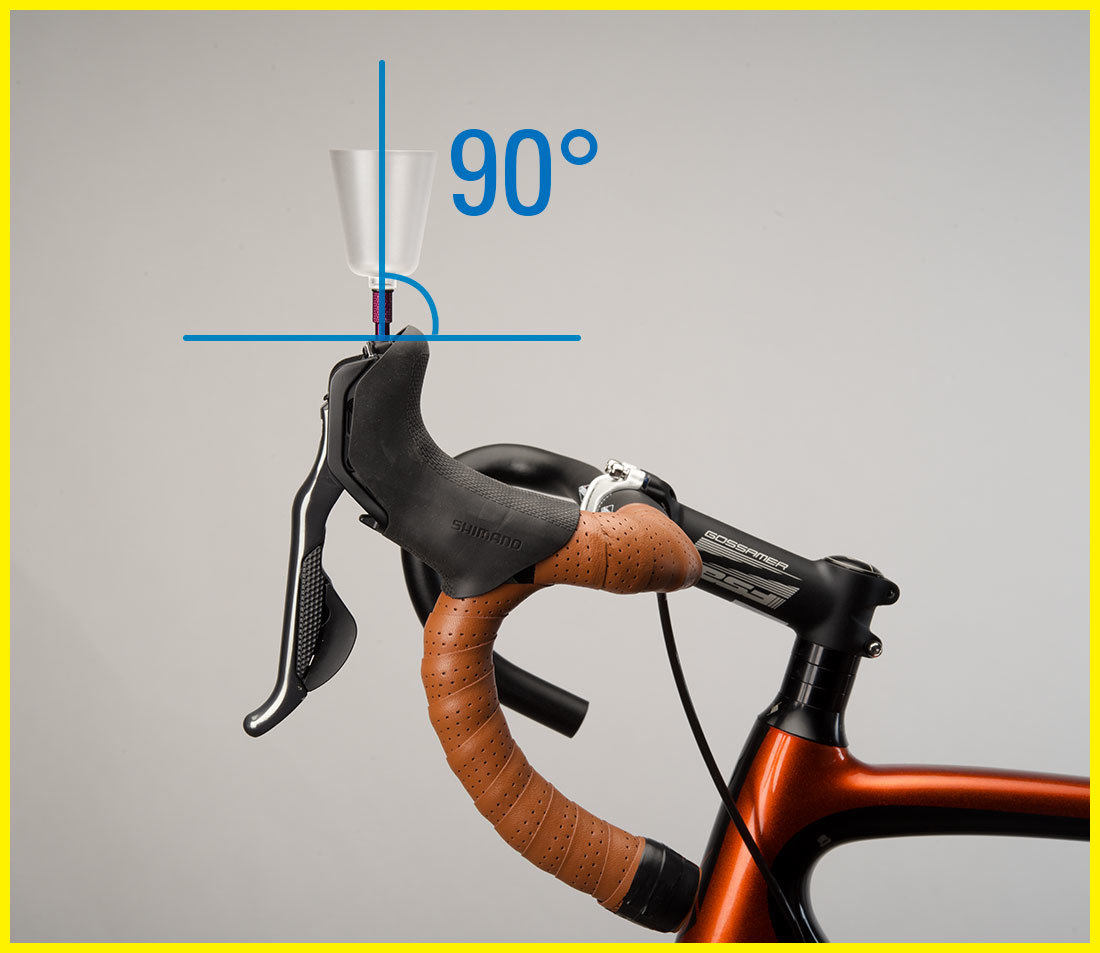
Top Port - Generation 1
Lever is rotated with lever reference line horizontal to ground. Bleed funnel will be 45º forward from vertical.
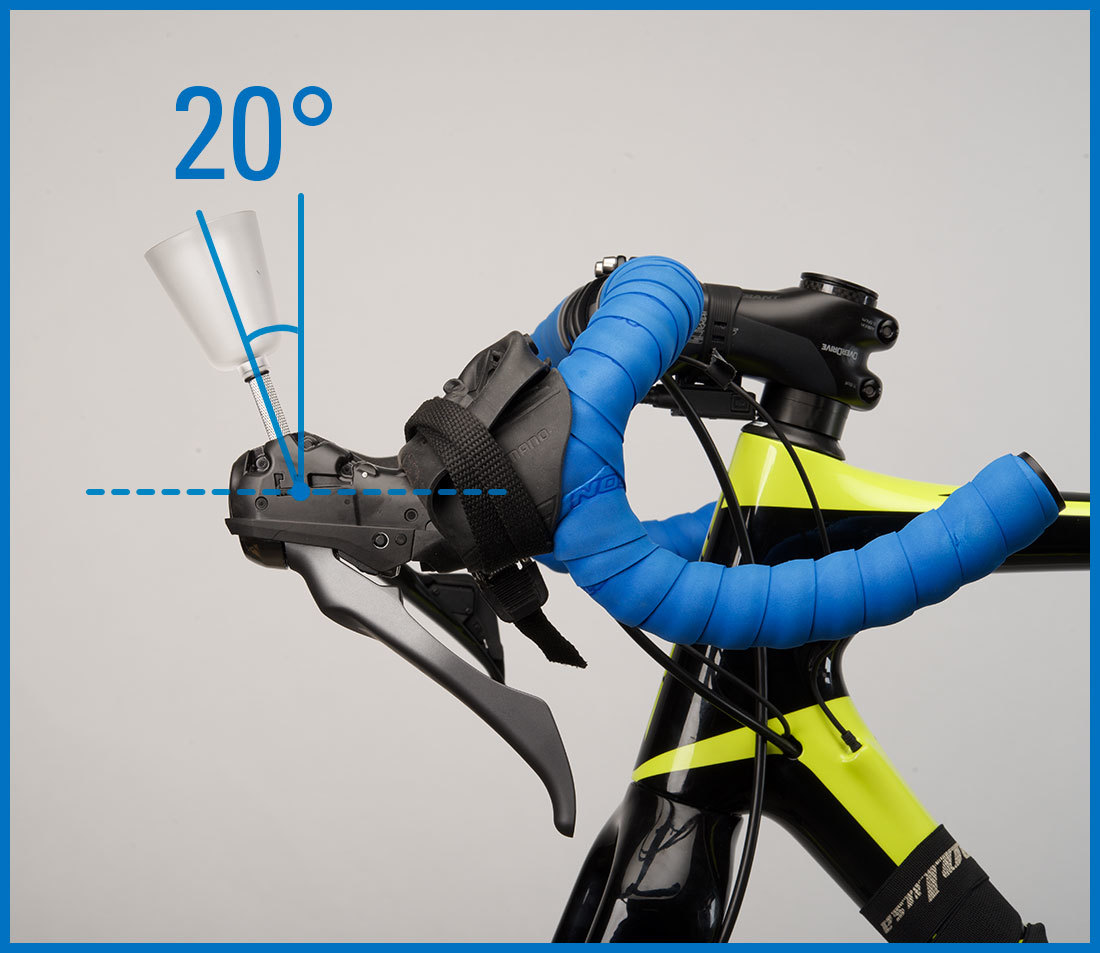
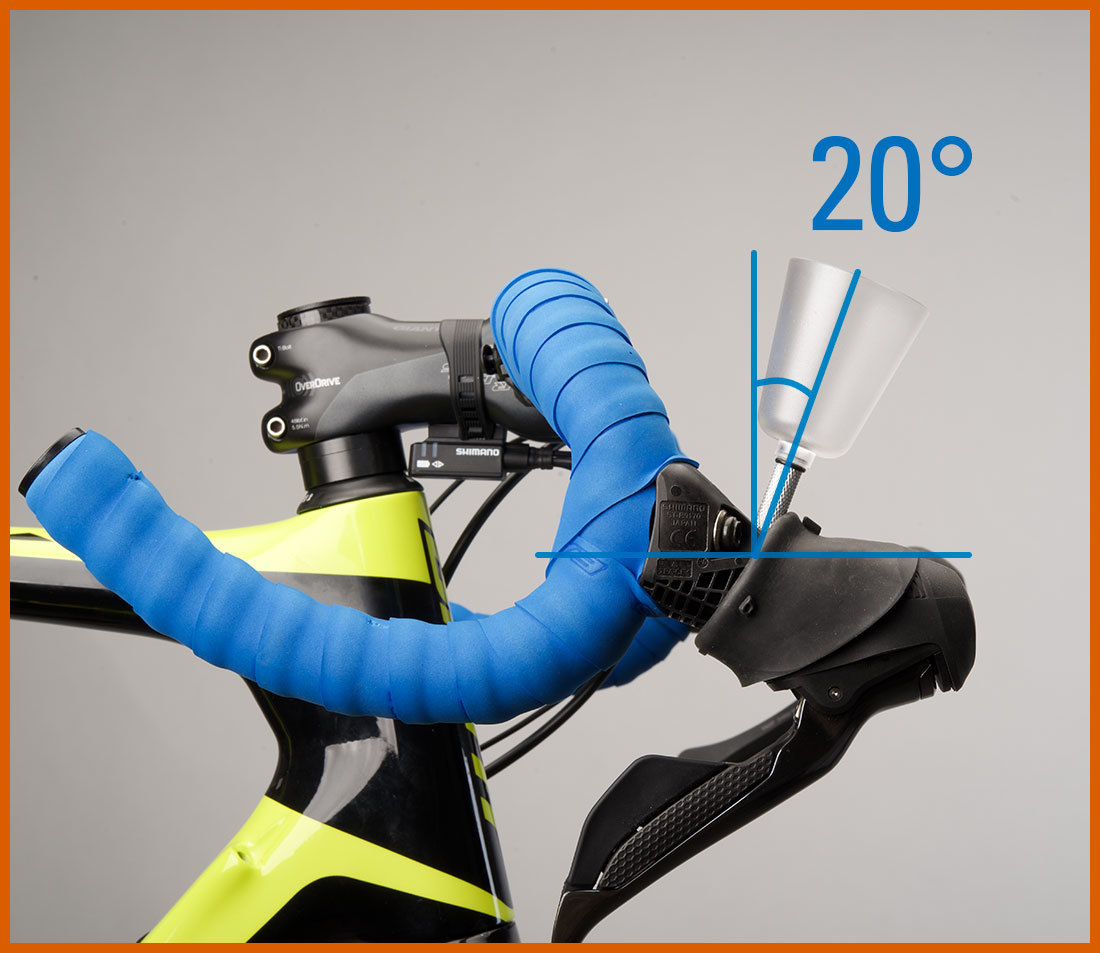
Top Port - Generation 2
Inspect outside of lever body for a recessed pocket that acts as a reference line. To inject fluid, lever is rotated so body reference line is parallel to ground. Bleed funnel will be 20º forward of vertical.
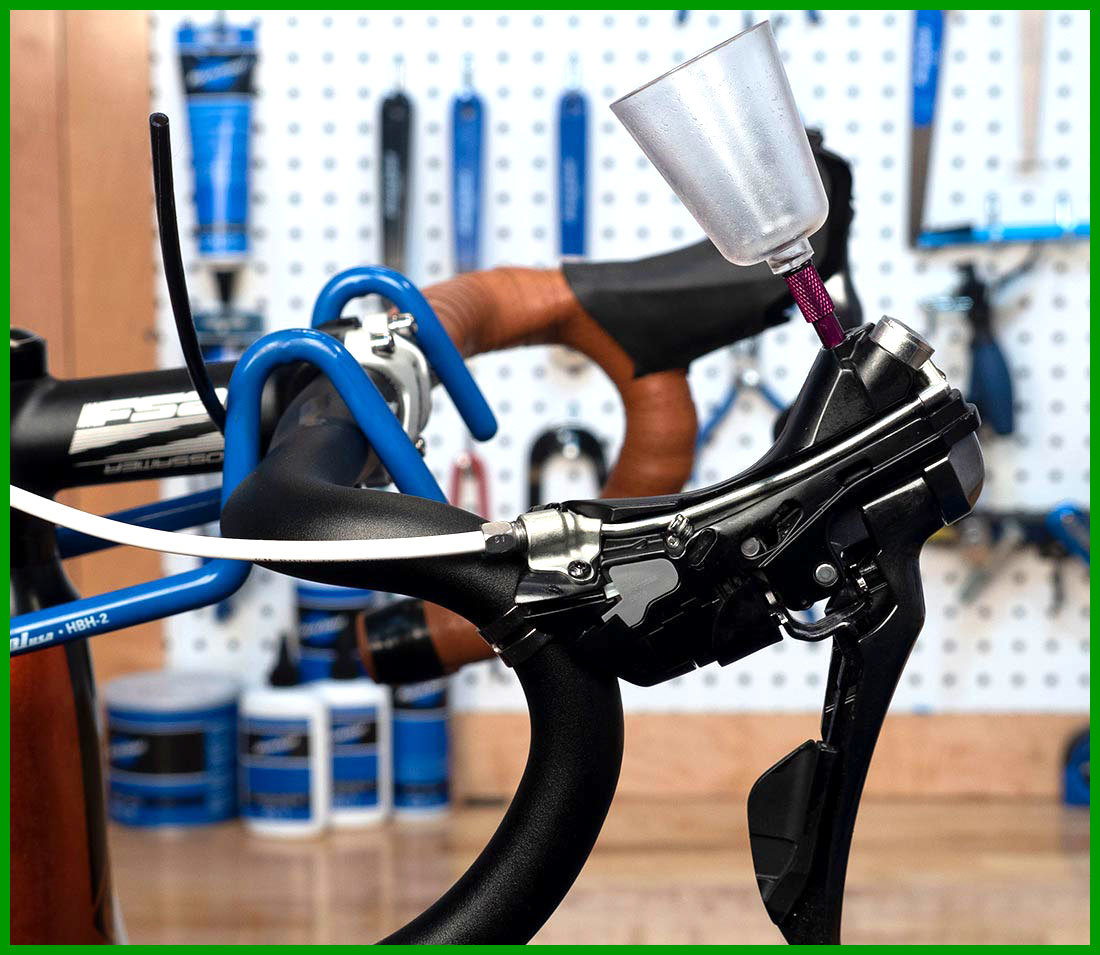
Inject Fluid
Place a 7mm box end wrench over the caliper bleed nipple, then secure the hose over the nipple. The compression sleeve helps secure the hose.
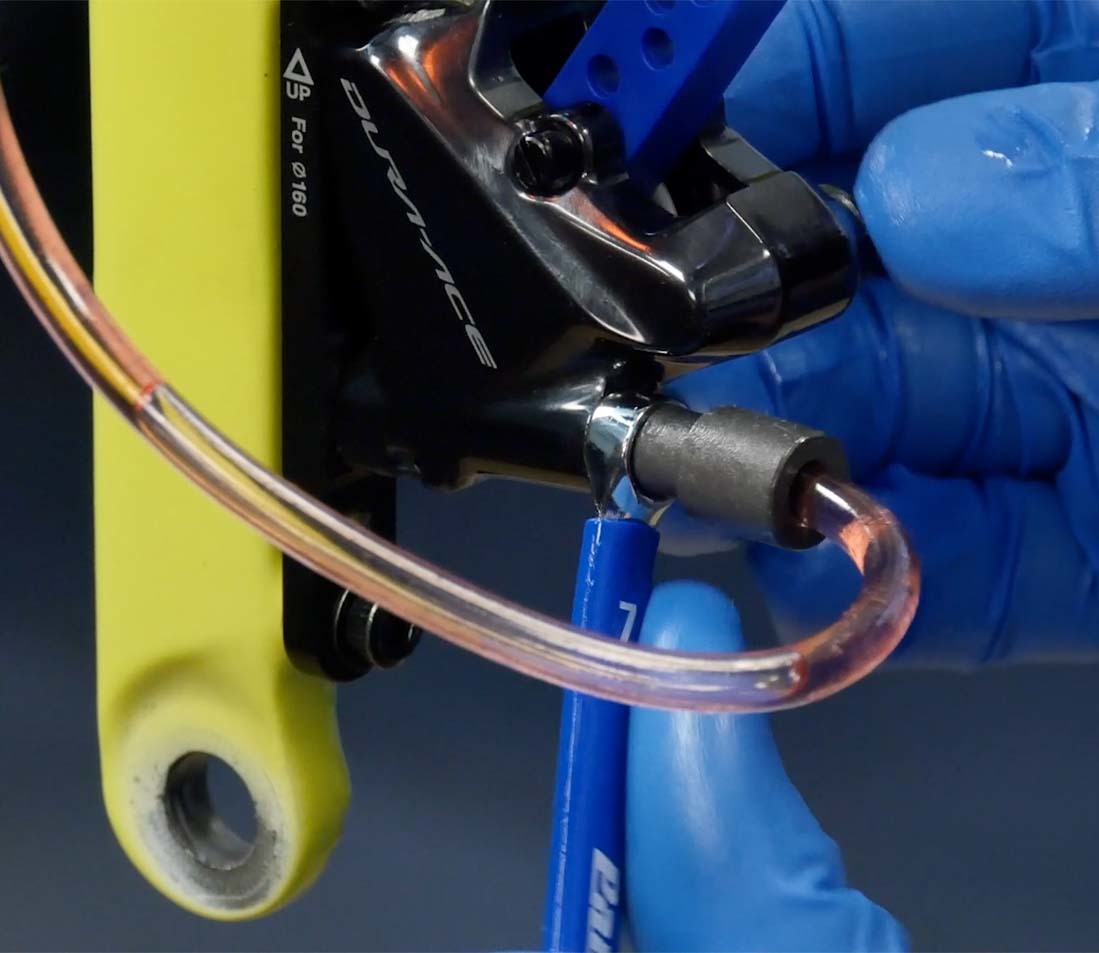
Use the wrench to open nipple 1/4 to 1/2 turn and push almost - but not all - the fluid into the caliper through the system and up into the bleed funnel. Close the bleed nipple and remove the syringe.
NOTE: If the fluid comes out dirty and contaminated, it should be changed. Plug the funnel. Remove the funnel and dispose of the fluid. Re-install the funnel to the lever.
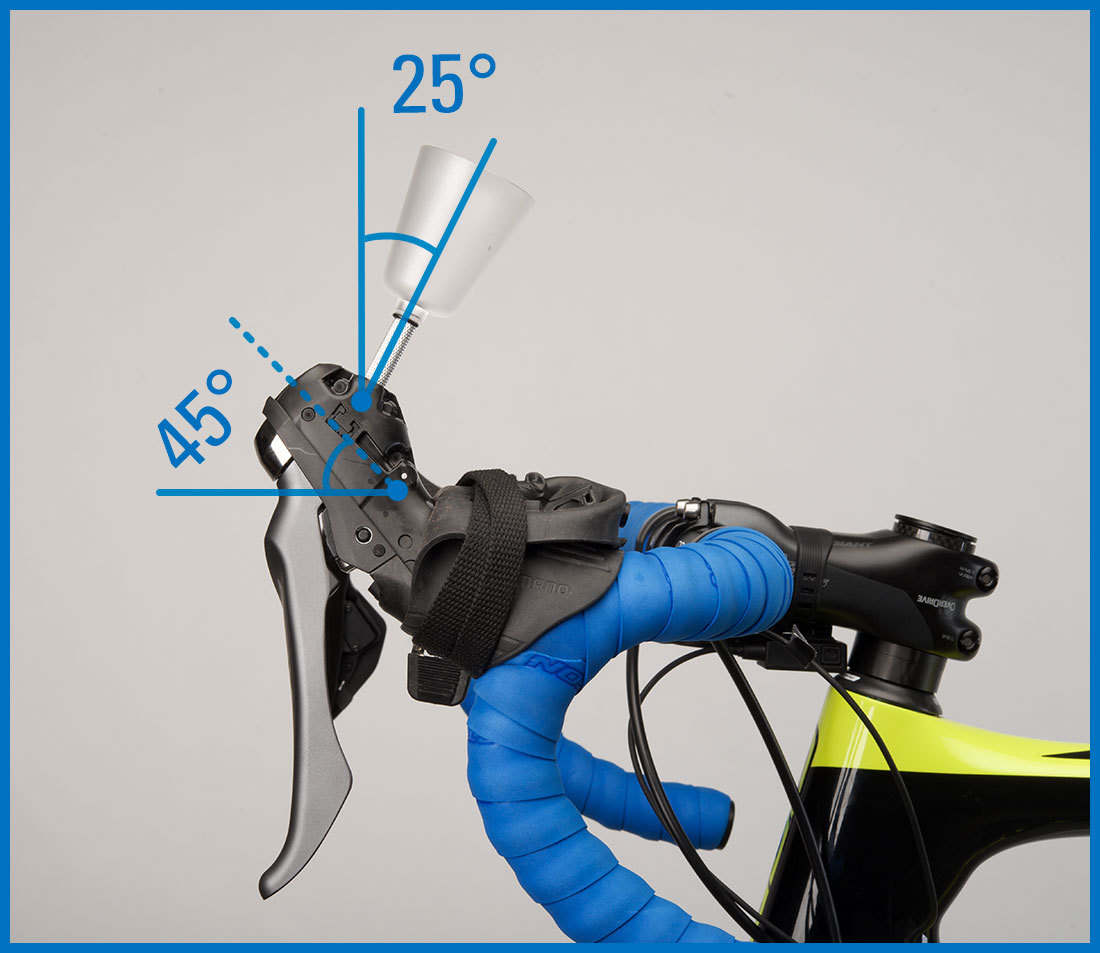
Rotate Levers (Top Port Gen 2 Only)
For Top Port - Generation 2 levers, the lever is rotated again before beginning the fluid draining process. Rotate so lever reference line is 45º upward. (Bleed funnel is 25º back from vertical.) Fluid is drained back down to exit at caliper.
All other lever styles remain in the same position for the next step.
Drain Fluid
Place a 7mm box end wrench over bleed nipple. Use the compression sleeve and attach the hose to the caliper bleed nipple. Loosen caliper bleed nipple or screw 1/2 turn. Squeeze the lever gently to start the fluid flow from the Bleed funnel down and out the caliper and through the waste hose.
Tap along the length of hydraulic hose and caliper to encourage any bubbles to dislodge. Keep an eye on the bleed funnel and do not allow it to run out of fluid. Add fluid as necessary to avoid allowing air to enter the brake lever port.
When no more bubbles appear in the drain hose, close the caliper bleed nipple. Leave the funnel in place. If funnel is near empty, add fluid to about 1/4 full.
Pressurize System
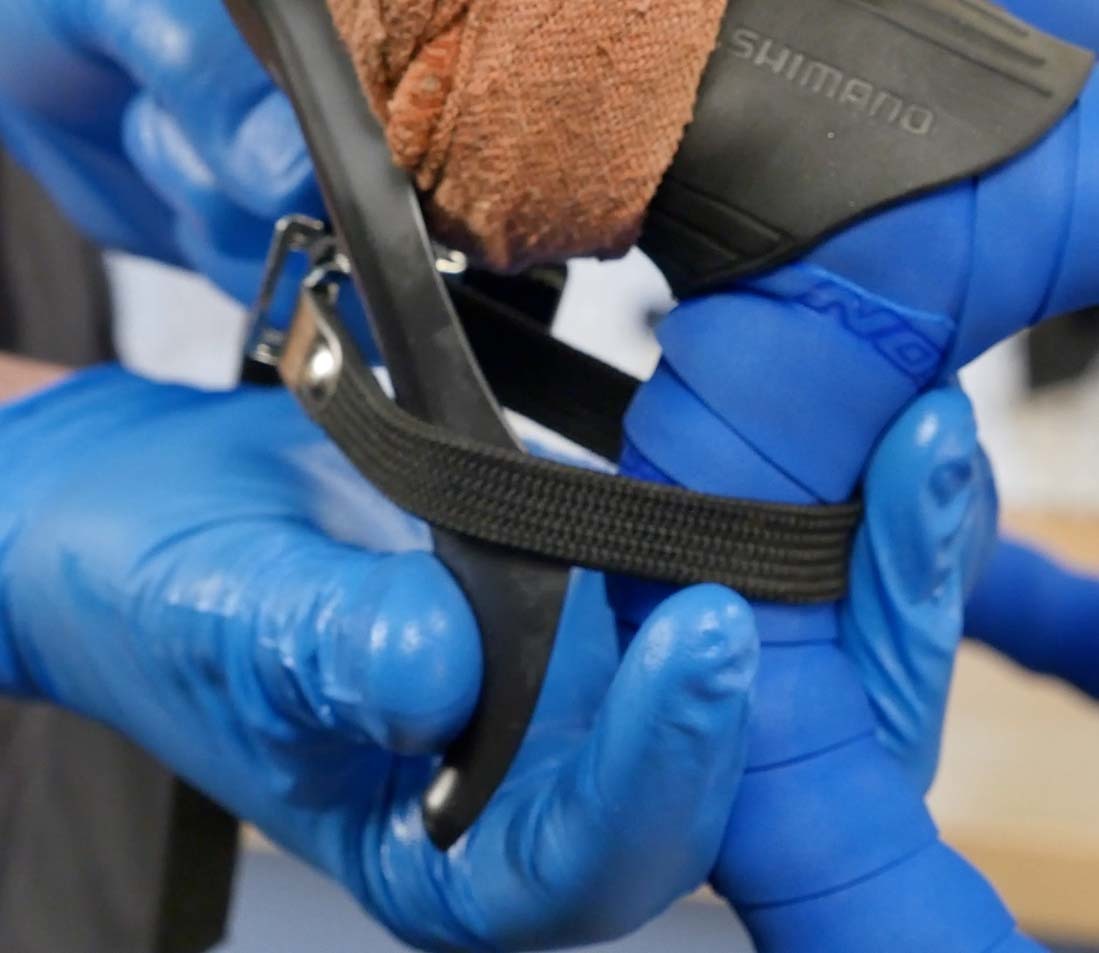
Pull the lever to maintain pressure on the pistons. Hold the lever to the handlebars with a strap or zip tie, or have someone hold it for you.
Quickly open and close caliper bleed nipple once. Fluid under pressure will come out the nipple, moving any air with it. Pressure will be lost at the lever. Remove strap and re-pump the lever until it feels firm again. Repeat one more cycle of opening and the closing caliper bleed nipple. Re-install the caliper bleed cover. Remove strap from lever.
Check that the caliper and brake line is free of air by repeatedly squeezing the lever. It should feel firm.
Burping
Even if the caliper and brake are clear of air, there can still be air inside the lever, which will require “burping”. The exact process for burping varies depending on lever style, but the basic process is to move the lever to a specific angle and squeeze the lever a few times while inspecting inside funnel for any bubbles.
BACK PORT
Rotate bars so that bleed funnel is vertical. Squeeze the lever a few times and inspect for bubbles.
Middle Port
Lever has model number stamping on outside of body, under the hood. Using that text as a reference line, rotate so this is parallel to ground. Funnel will be tilted forward 20°. Squeeze the lever a few times and inspect for bubbles.
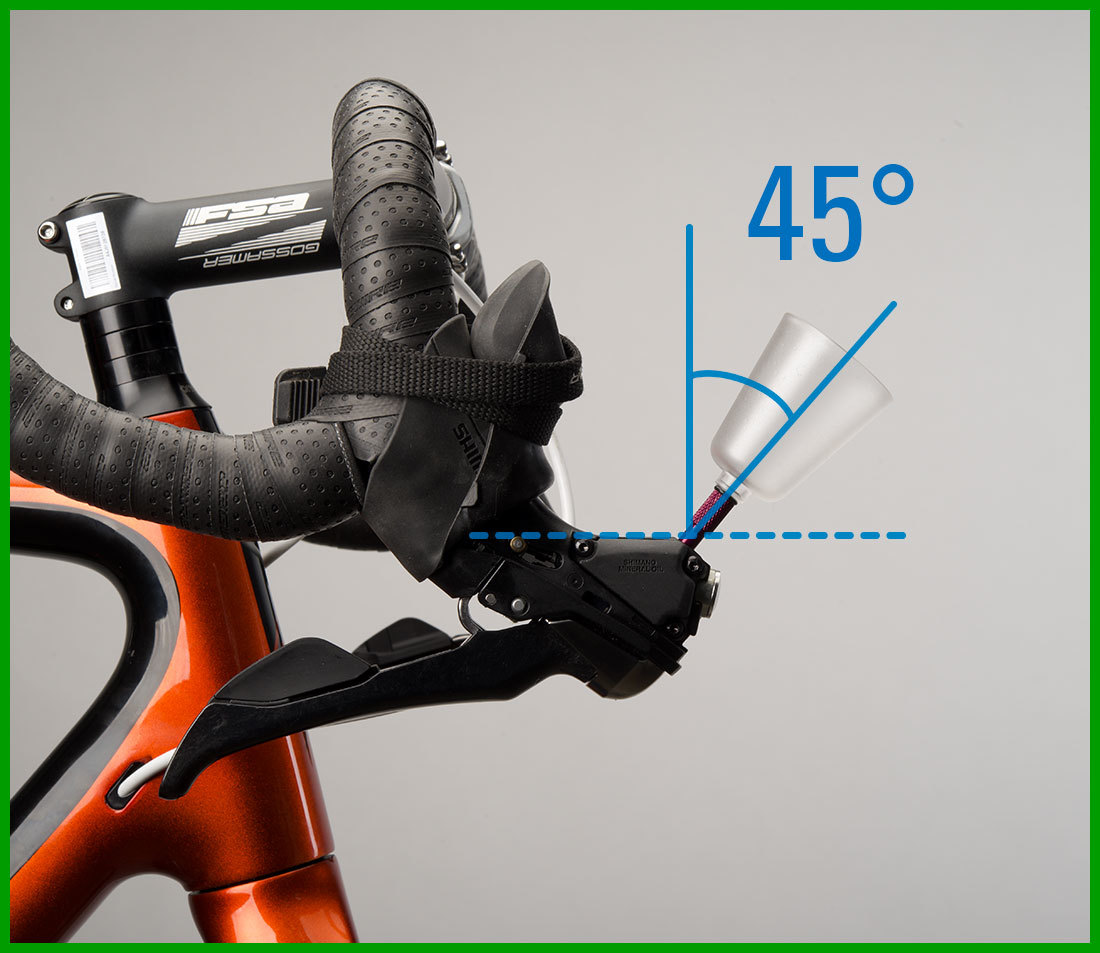
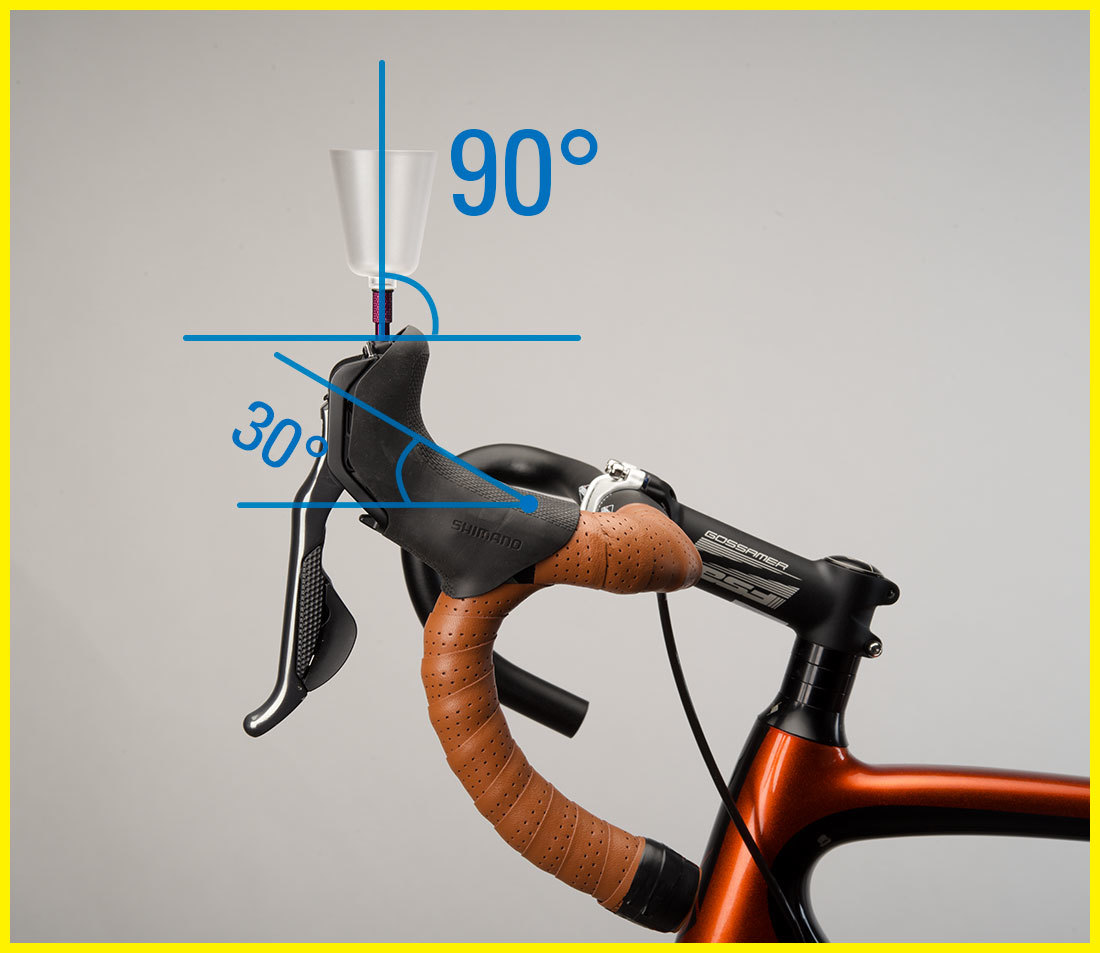
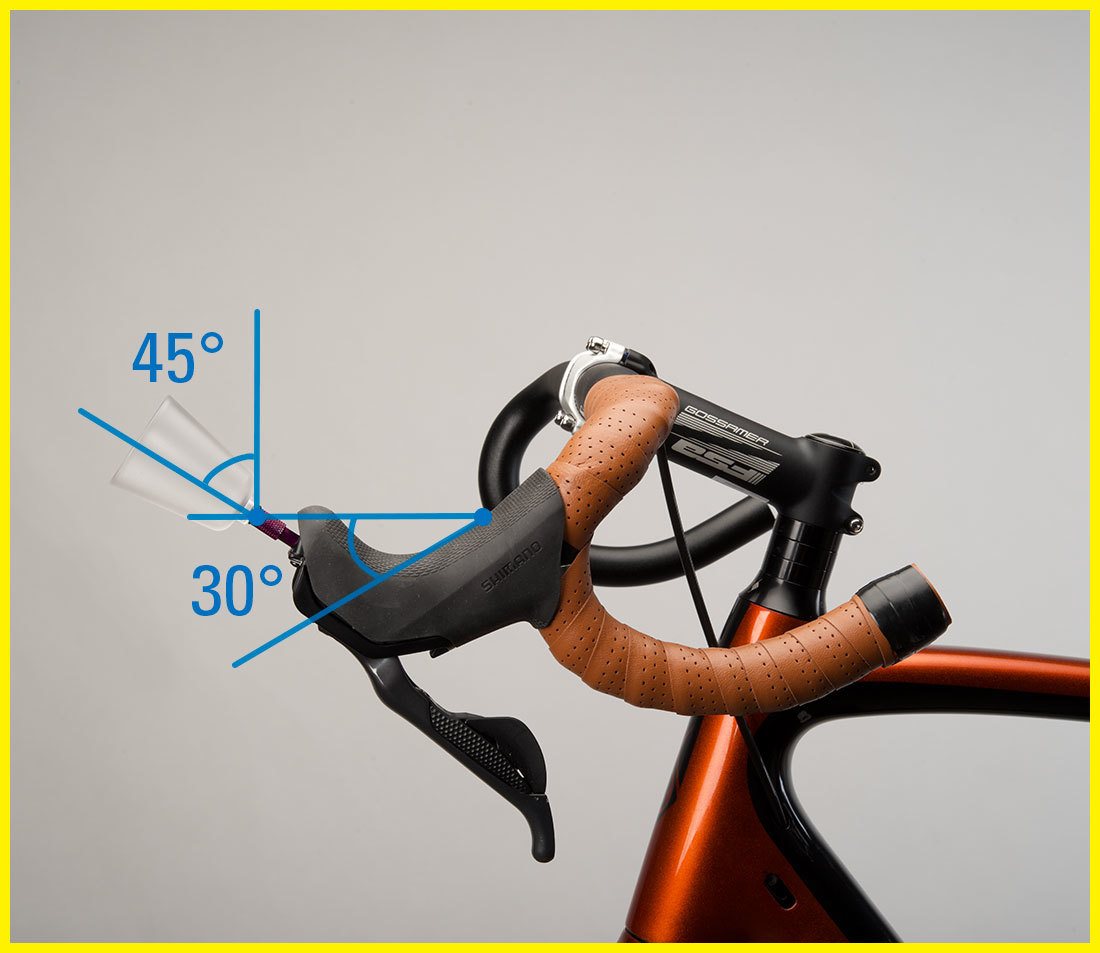
Front Port
First rotate so top of lever body is 30º upward - the funnel will be level. Squeeze the lever a few times and inspect for bubbles. Then rotate 30º downward - the funnel will be tilted 45 degrees fore. Squeeze the lever a few times and inspect for bubbles.
Top Port - Generation 1
Rotate so bleed funnel is vertical. Squeeze the lever a few times and inspect for bubbles.
Top Port - Generation 2
Rotate the bars so the lever surface behind the port is level to the ground. This places the funnel 45 degrees forward from vertical. Squeeze lever a few times while inspecting inside funnel for any bubbles. Then, tilt the bars so this reference line is 45 degrees upward - this places the funnel 25 degrees back from vertical. Squeeze the lever a few times and inspect for bubbles.
Reassembly
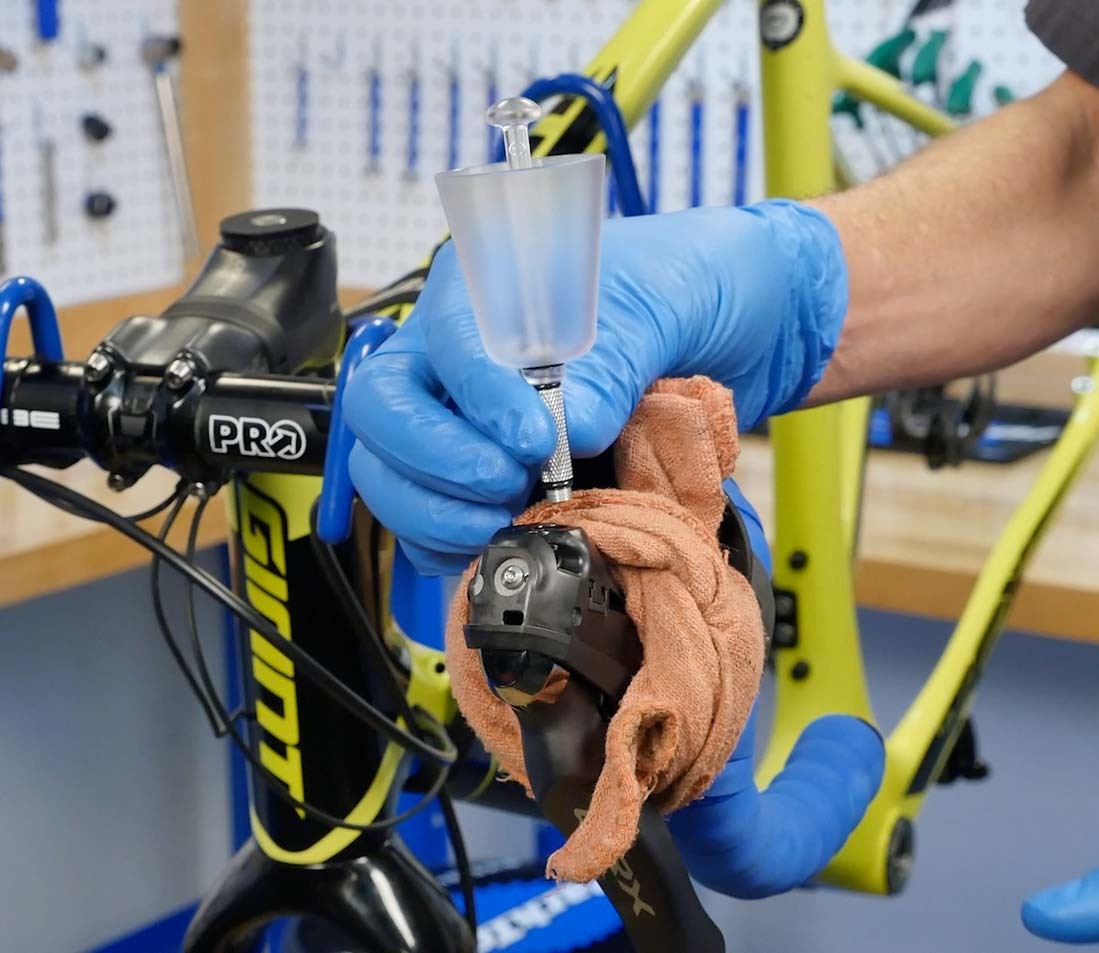
If the handlebar is not already rotated so that the bleed funnel is vertical, do so now. Plug funnel and remove from lever, checking that funnel O-ring is with funnel. Install lever bleed screw with O-ring and secure. Clean the lever of any mineral fluid.
Return lever and bars to riding position and secure bar binder bolts of stem. Remove brake block and clean caliper with alcohol. Install brake pads, retaining pin, any retaining pin clip, and wheel. Pull lever repeatedly to bring pads to rotor. Re-center brakes if necessary.
Related articles
Brake Bleeding for SRAM® Hydraulic Brakes View Article
Brake Bleeding for SRAM® Bleeding Edge Hydraulic Brakes View Article
Hydraulic Disc Brake Alignment View Article
Disc Brake Pad Removal & Installation View Article