Written by Calvin on August 26, 2008/Calvin's Corner
Thinking About Your Ride
The optic of this article will be on the relationship of the human body with the bicycle. There is both an art and science to placing and positioning the human body on a bicycle for maximum performance. This article addresses you as a casual cyclist rather than as the elite level cyclist, who must concentrate on maximum performance. It asks you to think about how you sit on a bike. You will enjoy riding more by using common sense, paying attention to how you feel, and by using trial and error in your positioning.
It will be educational and informative for your own riding to spend some time in the park or along a bike trail. Find a place to watch other people ride. Watch how people sit on the bike, how they pedal, and ask yourself if they look comfortable. We will observe some examples in this article. In the interest of privacy, all cyclists here will be wearing the guise of Calvin.
SADDLE HEIGHT
Probably the most critical aspect of having a bicycle adjusted to you is saddle height, because our legs do the most of the work during a ride. In Figure 1 we can observe two related modes of transportation, cycling and walking. Humans are primarily bipedal, as we walk on two legs. Notice the leg extension of the two pedestrians in the background. Consider as well your own leg extension when you walk. The cyclist in Figure 1 is showing adequate leg extension, similar to the bend in the legs of the walkers in the background.
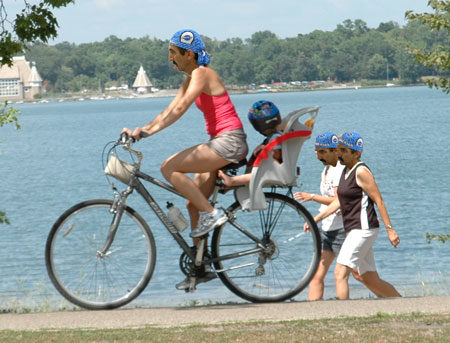
Figure 1. There is adequate leg extension on the cyclist which is similar to walking extension of pedestrians
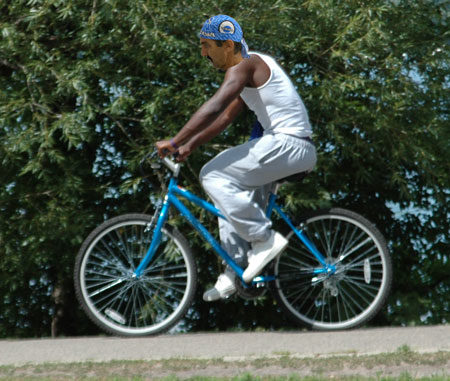
Figure 2. An example of a low saddle height
There are of course exceptions to every rule. A relatively low saddle can make it easy to get on the bicycle, and in some cases it is appropriate. However, for most cyclists, especially most adult cyclists, the saddle height should allow good leg extension. Figure 2 shows Calvin with a saddle height that is too low. There is certainly room to raise this saddle, and Calvin would be more comfortable and efficient in doing so. To raise the saddle, inspect behind the frame where the seat post enters the seat tube. Look for a bolt to loosen and raise the post. Use care not to raise a post past the “Max” line, as post failure may result.
The power for leg extension, and our pedaling, comes from the muscle group called the quadriceps. These are the muscles on front of the leg, above the knee. When the leg is bent a great deal, as with a low saddle, and power is applied by the quadriceps, there is pressure and stress on the knee joint. In Figure 3, Calvin’s leg is at the power part of the pedal stroke, and this is stressing the knee joint.
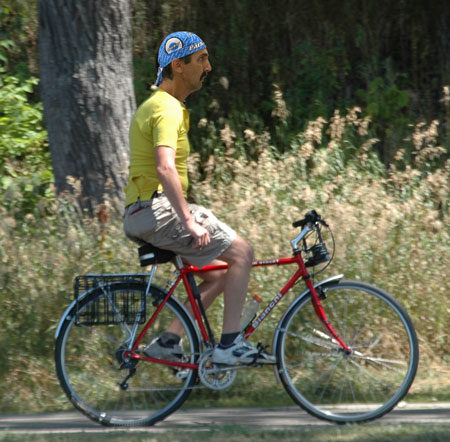
Figure 3. A low saddle height stressing the knee joint
Figure 4. This saddle might come down a bit
It is of course possible to have a saddle placement too high. In Figure 4, Calvin is probably at or even above what should be his maximum saddle height. The leg is nearly straight, and the foot is past the bottom dead center. Too high of a saddle will tend to pull the tendons at the back on the knee.
Children tend to grow. Figure 5 shows a saddle that once, probably, was set at a good height. However, Calvin appears to have been growing, and it may be time to raise the saddle slightly. Here again, common sense must apply. If the child is having a difficult time getting on the bike, a relatively lower saddle height is acceptable.
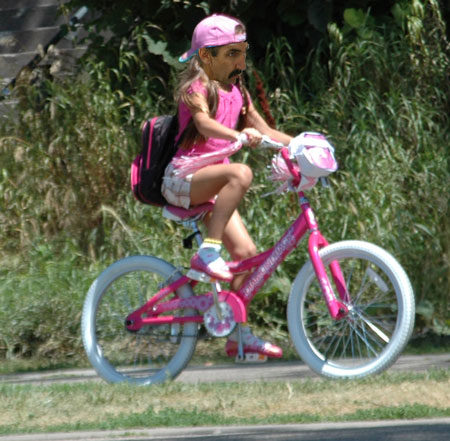
Figure 5. Very bent knees resulting from a low saddle height
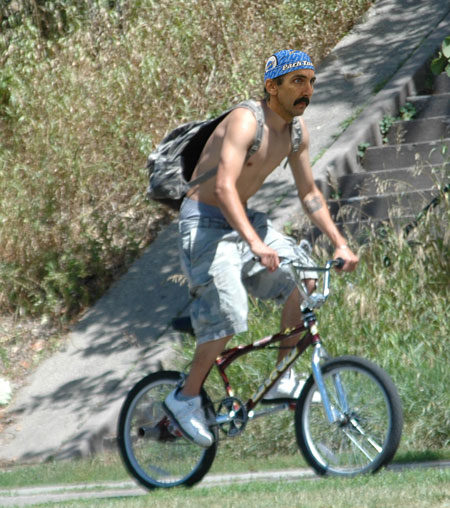
Figure 6. The BMX bike on the bike path with typical rider posture
Another exception of the rule-of-thumb is the BMX and Freestyle bikes, which are special purpose bicycles. In Figure 6, Calvin displays the typical “pedal, pedal, coast” technique for these bikes. Sitting down and pedaling such a small bike any distance is quite difficult. Hence, we tend to stand for distances, and simply coast for a while.
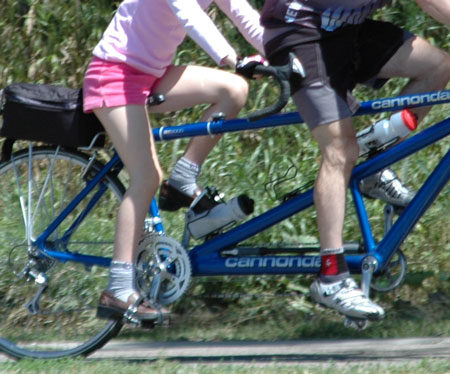 Figure 7. Stoker and captain at the bottom of the pedal stroke.
Saddle height is again a basic ingredient of positioning. However, there are other aspects to the issue of positioning. Figure 7 shows a tandem, both captain (the front rider) and the stoker (the back rider) look to have acceptable saddle height. Both cranks appear to be the same length. However, we can see the result of using a relatively long crank in Figure 8. The shorter legs of the stoker must articulate or bend much more then the taller captain. This is not an extreme case shown here, but it is useful in highlighting the issue of crank length. Using longer cranks can, for some cyclists especially, stress the knees. Height is set for the bottom of stroke, but your leg and foot travel a greater arc with the longer crank. An extreme case of this is seen in Figure 9, with the very short stoker using relatively long cranks.

Figure 8. The stoker's leg articulates more at the same position
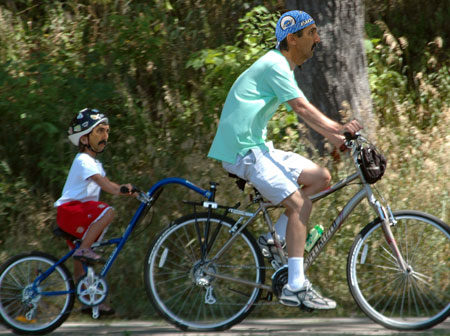
Figure 9. An extreme example of leg articulation on the stoker
HANDLEBAR PLACEMENT
Another important aspect of bike positioning is the handlebar placement. Figure 10 is shows two Calvin’s with different styles. As the lead rider, Calvin has a very upright position. The back and spine are leaning only slightly forward. As the trailing rider with drop bars, Calvin is in a road bike posture, with the back bent over even more. This is considered a potentially faster position. While there is some saving in regards to aerodynamics, this posture provides more power by using the muscle mass of the lower back and gluteal muscles. As the lead rider, with an upright posture, Calvin is primarily using the quadriceps, but not much more.
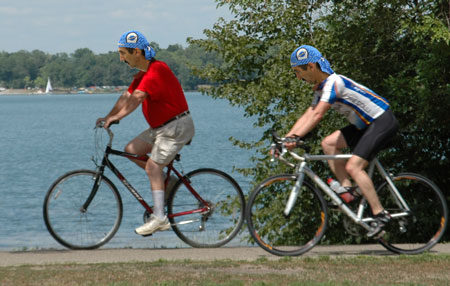
Figure 10. Two common styles seen on many trails
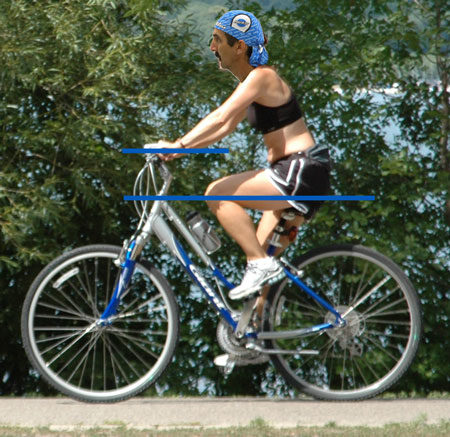
Figure 11. Comfort type posture
As the handlebars are raised higher and higher, the upper body moves up and back. What is important here is the relative difference between the saddle height and hand position. Saddle height should be adequately set first, and then the handlebars placed as desired. Figure 11 is considered more of a “comfort” position, with the hands well above the saddle. A bike may be designed for this by using a tall front end and tall stem.
It is possible to add accessories, such as bar ends, to also add the option of a higher posture. However, in Figure 12, Calvin might be better off with a taller front end, because he is far from the brake and shift levers.
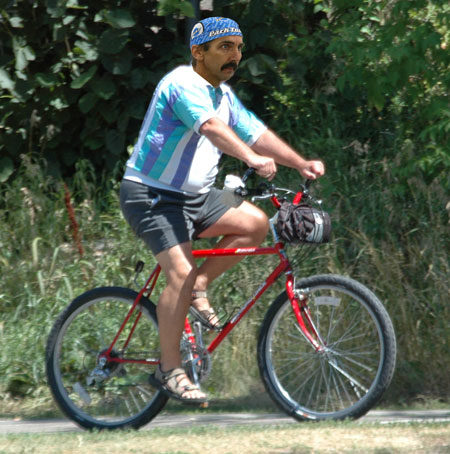
Figure 12. Bars ends may be used to raise the rider even farther
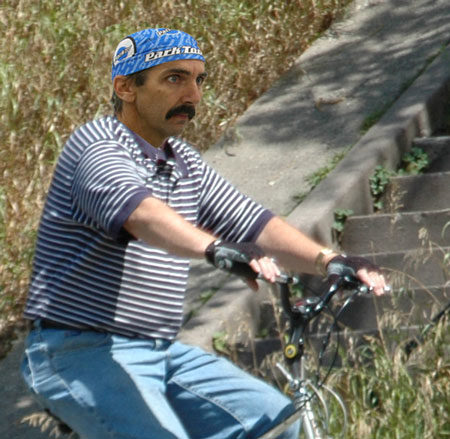
Figure 13. Notice my hands here. I need to simply loosen the bar binder bolt and roll the bars back for an easier reach.
The racing posture again tends to be a more forward type position. With either a MTB racing posture or a drop bar posture, the basic position is the same, as seen with a double Calvin in Figure 14. The floating Calvin is actually cut from a mountain bike, but still has the forward posture, similar to the road Calvin on the right.
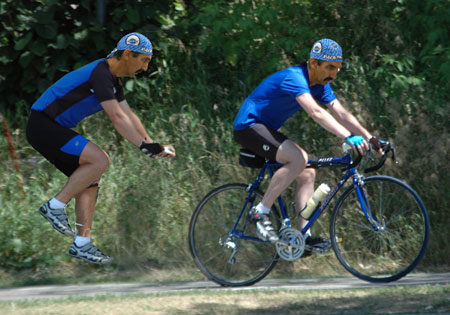
Figure 14. The posture that is on the left, cut from a MTB racing position, parallels the road bike posture on the right
Figure 15. Drop bars but not really a low "racing" posture. The saddle and hand height appear approximately at the same level.
Figure 16. A classic forward reach of the road cyclist. Arms have a slight bend, and I am riding comfortably on the brake lever hoods, which is overall good racing posture.
Figure 17. A tall stem raises the bars. Calvin is in a forward posture and has the option of lowering farther if he were to ride down on the "drops" (the lower section of the bars).
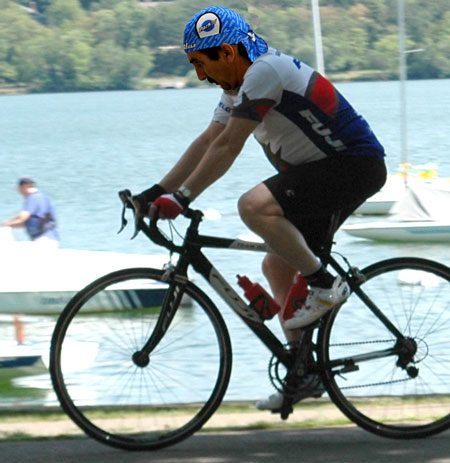 Figure 18. The arms are locked, shoulders hunched, and I am not looking too comfortable. Possibly a taller stem might help relieve stress on the arms.
Handlebars can be moved and positioned with different adjustments. Look for a binder bolt that allows you to pivot and rotate the bars. Some designs of stems allow changes in height, but modern threadless stems must typically be replaced to make any significant height changes.
PEDALS AND FEET
It is informative to look at all aspects of the body, and in this section we will observe the feet. The foot may be relatively flat or even pointed during the power stroke, which is the forward stroke. If the heel tends to drop lower than the toes, it may be the rider is under much stress, as going up a steep hill. However, it is more commonly a sign that the rider may be effectively “raising” their saddle by lowering the heel. Figure 19 is an example of a lowered heel in the left foot. Notice the toe is pointing upward during the left foot’s power stroke.

Figure 19. A dropped heel during the power stroke. This cyclist may need a higher saddle.
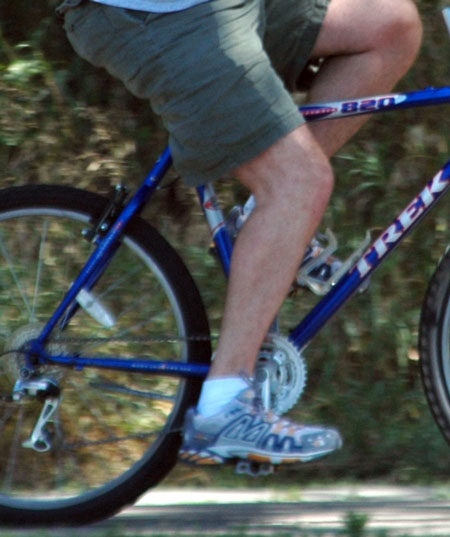
Figure 20. The foot here is very forward on the pedal. For this rider, move the foot back a bit, and raise the saddle.
Foot placement over the pedal can be an indicator of other issues. Figure 20 is a cyclist with a relatively low saddle. The foot is placed with the arch over the pedal spindle. This effectively uses up leg length. If the foot were moved back a bit, the saddle would appear even lower.
It is considered more efficient to place the foot a bit more forward on the pedal. Figure 21 and 22 show the foot more forward, but still with different styles.
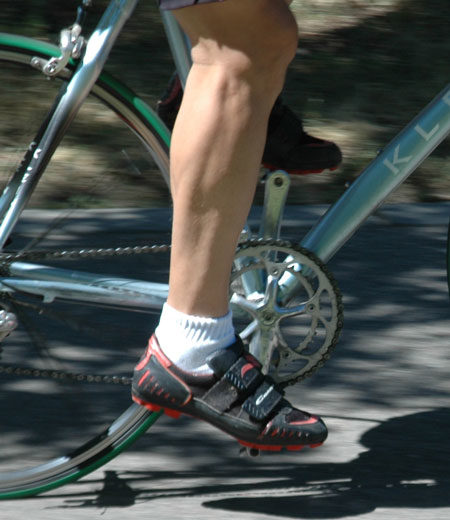
Figure 21. A slightly "toe down" style of pedaling. Notice also the ball of the foot is positioned over the pedal.
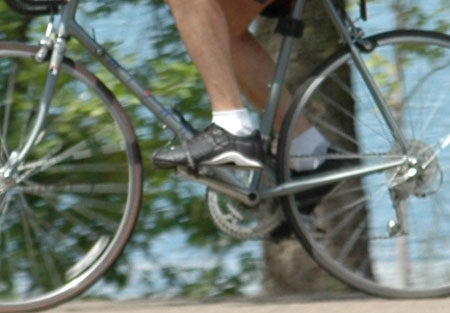
Figure 22. The rider here has developed a "flat foot" pedaling style, neither point down or up
The foot can be adjusted over the pedal by means of toe-clips or with the clipless pedal systems. If you are using a simple walking shoe and a platform pedal, you can make note of where you place your foot and then just ride. For more on feet placement on the pedal, see Pedal Retention System and Cleats.
KNEES
The front and rear views of the moving cyclist provide other insights. The cranks attach to the feet, which attach by linkage (our tibia, fibia, patella, and femur) to the hips and lower back. Generally, in machinery we prefer to see the linkage moving in a straight line. However, humans are not machines in this regard and it is common to find our legs asymmetrically placed from the center plane of the bike. Additionally, one leg may move or wiggle as it travels around a full revolution. This is not considered “ideal” or perfect, but it is very common and is not necessarily an issue.
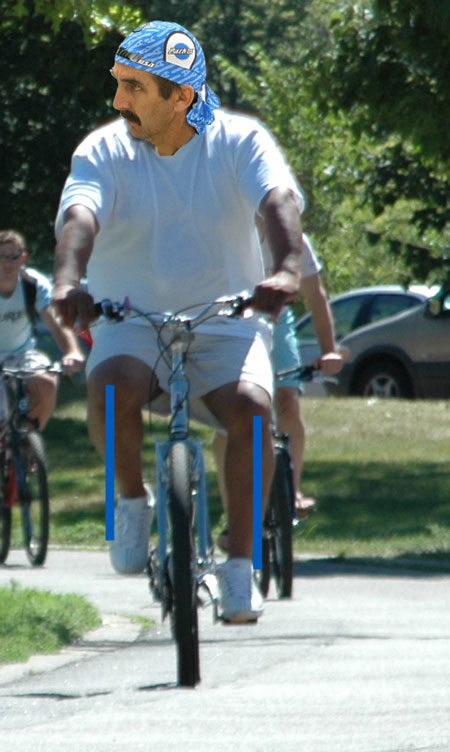
Figure 23. Both knees are quite a distance from the bike center, but are fairly symmetrical
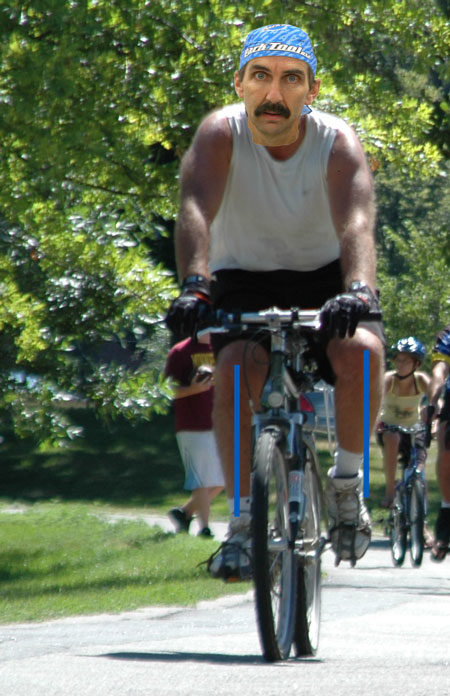
Figure 24. Calvin's left knee is tracking outward during the up stroke. He is most likely not even aware of it doing so.
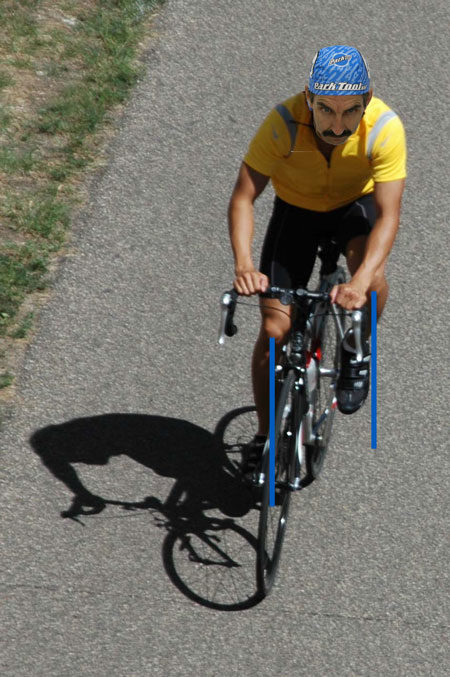
Figure 25. Although Calvin has changed bikes, and clothes, he brought with him the same habit of the left knee tracking outward
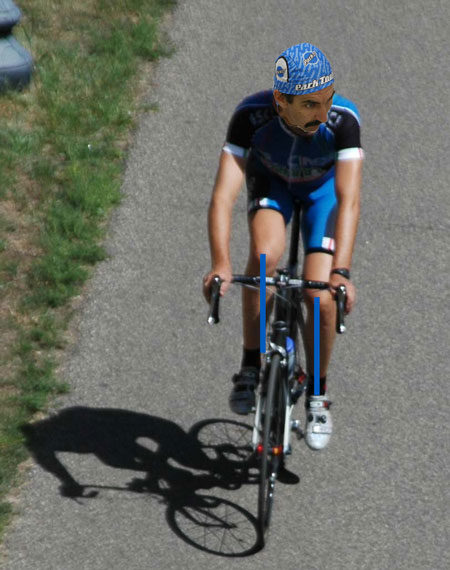
Figure 26. The classic straight and tight knees-to-top tube of the racing cyclist
MISC. BIKES
The recumbent is another specialty bicycle. Here the crankset is very forward of the hips. However, the concepts of muscle use and leg extension still apply.
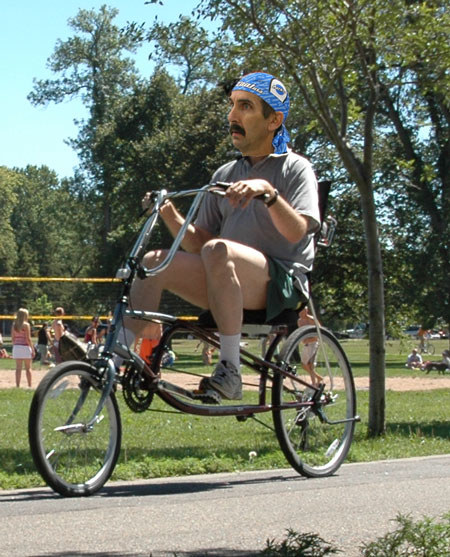
Figure 27. A "low" saddle on a recumbent bike. The seat should be moved back.
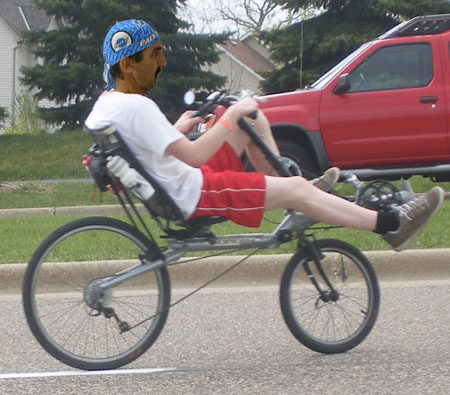
Figure 28. Calvin with acceptable leg extension and some nice red shorts
Cycles also include the “hand cycles.” But here again some basic physiological concepts apply, as muscle extension.
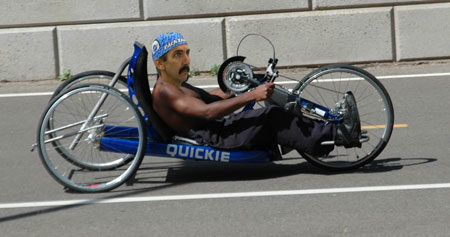
Figure 29. Good arm extension is provides power for Calvin's ride
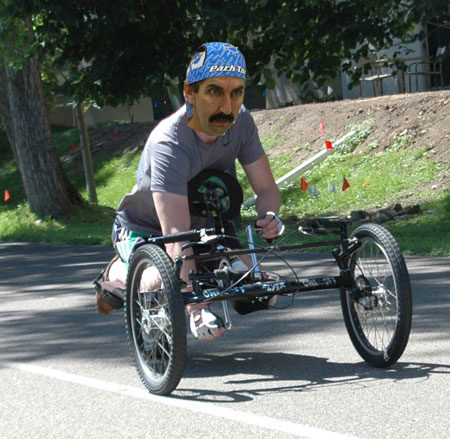
Figure 30. In this hand cycle design, the body weight is above the bottom bracket
CONCLUSION
It was the purpose of this article to provide some encouragement and inspiration for the casual rider to look at their own position on the bike. It is beyond the ken of this page to address the needs of the competitive and so-called “serious” cyclists, other than to state that basic principles of physiology apply to us all. If you would like to work with your position, it is recommended that you begin by first recording the measurements of your current bike, and then track changes as you make them. You may also wish to consult your local bicycle shop or local professional cycling coach.
For the road cyclists see: Road Position Chart
For the off-road or bike-path cyclist see: MTB Position Chart