Written by Calvin on October 4, 2011/Calvin's Corner
Bringing a Peugeot Mont-Cenis Back to Life
Reconditioning work on older vehicles such as hot rods, airplanes, tractors and bicycles can be a lot of fun. It is best to keep this in mind when taking on such a project. It should be fun. Just keep reminding yourself of this, no matter how frustrating and expensive it becomes. In almost all cases, the work should be done for the love of the machine and the love of the process. You will not have a chance to sell the vehicle at a huge profit. There is no one out there who’s just been waiting on eBay for this very bike you hauled out of the garbage/garage/yard sale. On the other hand, they say there is one born every minute...
This article will center on is the reconditioning of an 25 year old Peugeot Mont-Cenis 12-speed bike. Check the bottom of page for any new posting as the work progresses.
The bike lived in the San Francisco area and saw use as a commuter. Some searching on the Internet yielded an old catalog showing the very model. Black Modolo brakes, white saddle, Campagnolo Victory rear derailleur, and even the Philippe handlebars and stem. Oddly, there are reflectors on the wheels but not the front and back, and our bike here reflects this exactly.
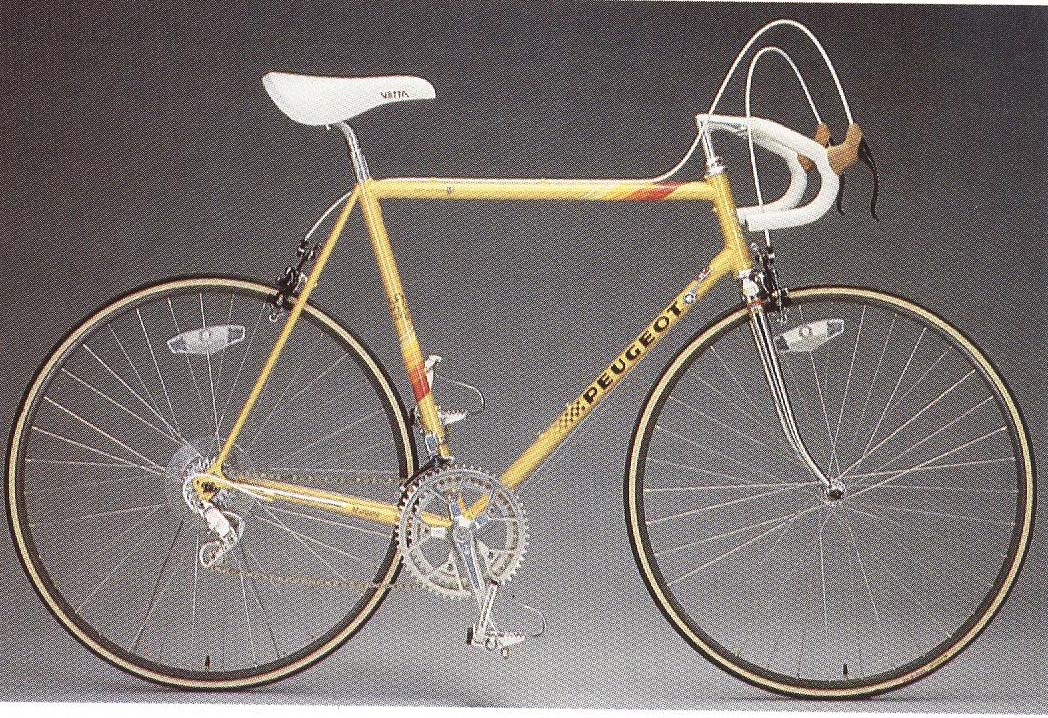 The model we will be working on is seen in this 1986 Peugeot catalog image. The Mont-Cenis came in under 22 pounds weight, light for its day. However, we will attempt keep the front housing loops under control in the rebuild here.
September 26, 2011
The box with the Mont-Cenis arrives. It is well packed, but the seat post is out and mauled. Sadly, the rear derailleur is bent, but worse it is missing the mounting bolt. It will be difficult to fake that part, we will need to source one out. This video reviews the bike as we got it:
September 27, 2011
Wheel work today, and we start at the hub, which is, of course, the center of the wheel. Cones and axles can be replaced, but damaged shells or hub cups are not repairable. In restoration work, it is best to keep the original hubs when possible. This Mont-Cenis came with Maillard Normandy Competition hubs, which had the better cones. The hub cups are fine, but the cones are badly pitted.
The rear hub is a Maillard Helicomatic. This is an interesting freewheel system that fits on multiple helical splines, not a single thread like most freewheels. This system was not a cassette-type. The ratcheting of the gears was still in the freewheel body. The hub shell right side is a stud with a spline, there is no ratcheting in the hub itself. It was held in place by a simple lockring and required the use of a proprietary tool from Maillard. Some of the thinking was that you could carry the tool on the road and be able to change a broken rear spoke because you could easily remove the cogs. Clever, but it never caught on.
The ring does not take much to keep the freewheel on and secure. About 10 pounds of pressure at the end of a 2″ wrench delivers about 20 inch pounds to the ring, and that is plenty.

Snugging the lockring is all it takes here
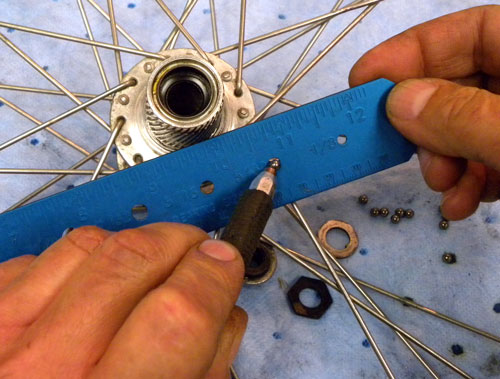
The rear hub used a small 5/32" ball bearing, not the traditional 1/4". Always check with a spoke bearing ruler if there is any doubt.
The rear cogs do look fairly worn. These are likely to skip. Fortunately, these cogs are symmetrical and without special shifting ramps or shapes. The outer two most cogs thread in place. However, we will flip the other cogs so the back side of the tooth now will take the load.
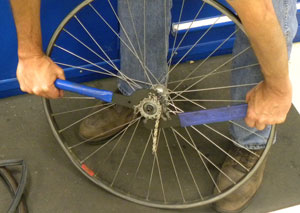
Two chain whips are used to remove the outer two cogs. These two cogs act as a lockring for the four other cogs that use a spline system.
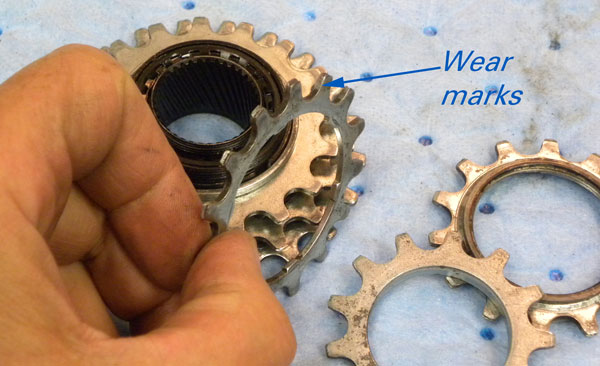
Heavy wear marks on the back of the cogs will probably cause issues when used
September 29, 2011
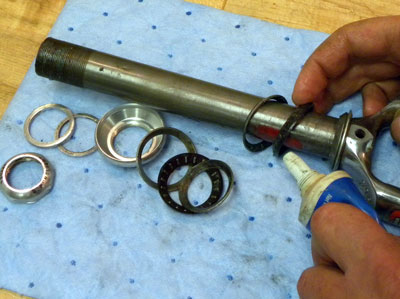
The bike has not seen any service for many years. Worse still, the bike has seen many years in San Francisco, a known source of moisture combined with fresh salty spray off the Pacific ocean. This led to issues of seizing in the Mont-Cenis. The Campagnolo cranks of this year used a “self extracting” system. Loosen the bolt, it backs into the retaining cap, and this pulls the arm off. Here, it was so tight you could feel the bolt deform. Further loosening would only lead to failure of the part and tool. The answer for this issue proved to be penetrating oil with heat from an air gun.
The bottom bracket left side lockring, the left side cup, and the right side fixed cup of the bottom bracket all were on very tight and required extra measures to remove.
October 4, 2011
The brakes are, of course, important to the safe use of the bike. The Mont-Cenis used the Modolo Speedy. The brake hardware is a bit rusty but overall the brakes seem in nice shape. However the brake pads are old, and have hardened. Normally we would want to replace the pads, but it is very unlikely we will find the exact replacement. An old technique is to sand the pad surface to de-glaze it. It will be important to test ride the bike and determine if the braking power is acceptable. If not, we will need to replace the pads regardless of whether or not they have the nice screening on the pads that state: MODOLO WORLD CHAMPION 1983. A review of the brake overall is below:
 This crack is right at the pocket of the modular Mavic MA40 and the sharp end of a spoke awaits the fragile inner tube
October 5, 2011
The wheels are a mixed bag. The front wheel was in good shape. The rim was not bent, and the true was very nice. The rear wheel, however, has problems. The rim has struck something and has a bad flat spot. The aluminum is not cracked but it is possible it may be felt during the ride. This is reviewed in the video below
An inspection inside yields an old Michelin rim strip. It was strong once, but over the years it has begun to fail and is now showing cracks. Both strips must be replaced.
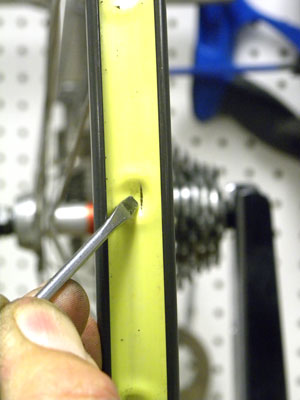
 The Mont-Cenis seat post wedge is rusted in place. Both sides are concave and there is no place to push or pull.
October 6, 2011
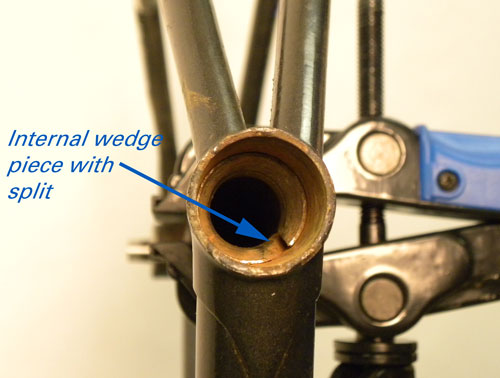
The seat tube of this Mont-Cenis is going to offer a real challenge. I have put this off, but that is a mistake. Do this work early, because it may end up meaning the frame must be trashed. Don’t do other work ahead of any potential bike-killer issues. If this will not come out, the bike will become wall art, or, alternatively, something to hold vines in the garden.
For several days, light lubricant was applied to the wedge inside, which is also called a compression plug. A similar system is used in threadless headsets. The plug was made with a single split to allow it to open. A tool was fabricated to stick inside the plug and rotate. After much effort, the plug began to turn, and eventually it was removed, as seen in the video below:
The post system will now be reusable, but there was still something wrong. The expected parts were not there. The compression plug slid out, and by turning the bike upside down the lower cone dropped out.
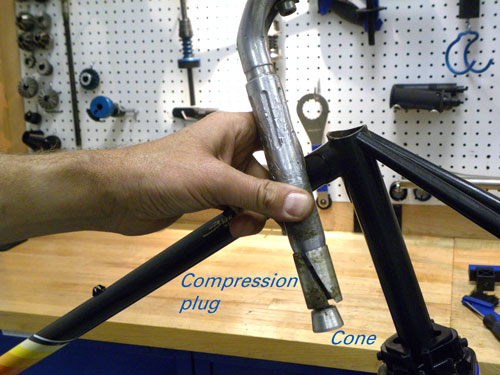 The seat post system of the Peugeot Mont-Cenis
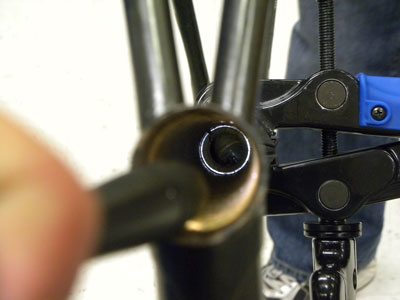
What was the mystery part in the frame?
The successful removal of the plug was made without damage to the bike or part, but it what followed was a humbling experience for me. There was still a mystery part rattling around in the seat tube. The bike is turned upside down, and to my surprise, nothing falls out. Inspecting inside, which I should have done in the first place, I get my surprise. There is a second plug about 30cm (12 inches) down the tube and another nut below that. I would guess that someone loosened the post one day and dropped the nut. Unable to remove the plug, they shoved it down and then installed a second plug and nut above it. This must have occurred years ago, as these parts are not easily available. Most likely, it was at the Peugeot dealer who would have had a chance of having the parts. These extra parts will now just live down there, about 18 inches down the seat tube.
 A second plug and nut are going to be staying down there in the seat tube as far as I am concerned
However, before I learned the entire truth of the matter, I believed that two water bolt cage bolts threaded into the seat tube were stopping the part from falling out. I thought, “Remove these bolts and out it will simply fall into my hand.” I pull one screw without issue. It was snug but that was to be expected. I turn the second and the head of the screw falls off, leaving the thread inside the frame. This mount was not being used for a cage, and the screw effectively ruined the fitting. It was seized, and was not an “easy out” after all. Not to be stopped by a mere M5 screw, I get out the angle hand drill and bore right into what is left of the screw. This was no help at all for the rattling part. I should have investigated further before proceeding. Oh well, the hole is now re-tapped to a M6 and will now accept the white bottle cage.
October 7, 2011
The work is going along well enough so far, with the exception of the second set of plug and cone stuck in the seat tube. Time to lay stuff out and consider the rest of the project:
October 10, 2011
The Campagnolo rear derailleur has a serious problem. The lower section of the cage is badly bent and must be re-bent to be usable. It is possible this repair will fail and the cage may break during the procedure. However if it survives this re-bending, it will survive the riding.
The cage is being held together by the pulley bolts. The lower bolt will be replaced only for the repair because it will be grabbed by vise-grip pliers. The cage will be twisted be into alignment as much as possible, and the lower bolt will be scarred. The original bolt will then be installed. The procedure is reviewed in the video below:
 Aluminum cups hold beveled steel washers that sandwich the needle bearings
At first viewing, the repair appears successful but we will only know for sure when the chain is installed and we can pedal and shift.
The headset is the French manufactured Stronglight Delta system. It is an EC30, “external cup,” using the SHIS Terminology, with a 30.0mm bore in the headtube. This model used needle bearings, not round ball bearings, and has proven to be a durable design.
October 12, 2011
Handlebar wrap for the Mont-Cenis. The customer’s choice was white, always a pain in the neck for the mechanic. It will be stunning and lovely for exactly one ride. It will be my job to keep my greasy little hands off the bars once they are wrapped in order to allow the customer this experience. Handlebar wrapping is reviewed in the video below:
October 13, 2011
The bars are wrapped and looking pretty. Time for the crisp white brake housing to go on. However, we have yet another problem. The top tube uses a brazed-on cable guide, and the center guide has been deformed. We can shove the housing through it but it will scar and scratch the housing and that would be just unacceptable to the owner. Here, a drift punch comes in handy as a mandrel to gently, oh so gently, pry open the guide.
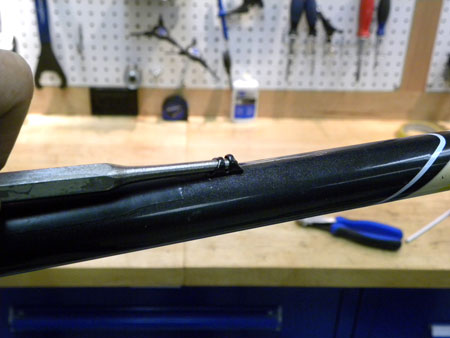
First, protect the paint with some tape, and then use a drift punch to gently pry up on the thin guide just enough to allow the housing to pass
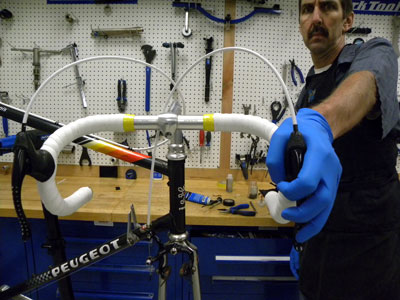
This housing is out of control
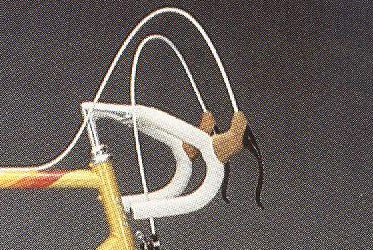
The brake levers are non-aero, with the housing come straight up from the top. The housing loops need to be long enough to enter the brake lever body in a straight line. The catalog shot is an example to housing loops that are too long. This only adds to flex in the brake system.
Consider your hand as a clearance gauge, you want enough loop to put your hand between loop and bar.
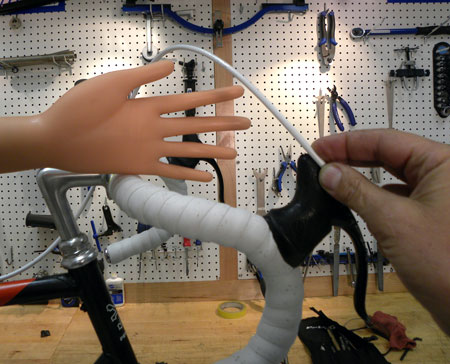
You don't need more housing than what fits your hand
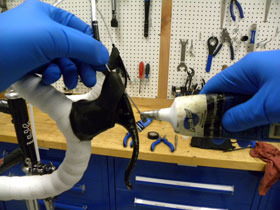
ASC-1 anti-seize is being spread over most everything, including the fittings on cable ends. This will help prevent San Franciscan weather from seizing the cable end into the lever. The cable itself will get grease.
 Note the long black housing end caps at the levers to help prevent kinking and damage to the old rubber covers. Work is done in MG-2 gloves to avoid any smudge to the precious white tape.
Modolo Speedy brakes were an early “safety pivot” type. These have a bolt head outside the arms and a nut in behind the spring to adjust tension. The locknut for the system is actually the mounting nut. Centering has to be done with thought or you will change the brake pivot adjustment.
October 14, 2011
We are starting to see a more complete bike. With wrapped bars, brakes hooked up, and both both wheels on, we can get a sense of the finished product to come.. Still, it was a shame to have not used the Atax stem and Philippe bars. They are from a time when there was a sense of taste and style that I admit I do miss. It was fortunate to have had the Cinelli as a good substitute.
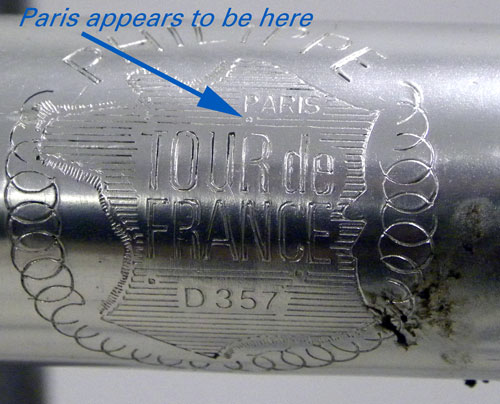
Not only can the Atax handlebars be used to find Paris, the entire coast of France is delineated in case you are looking to land by sea
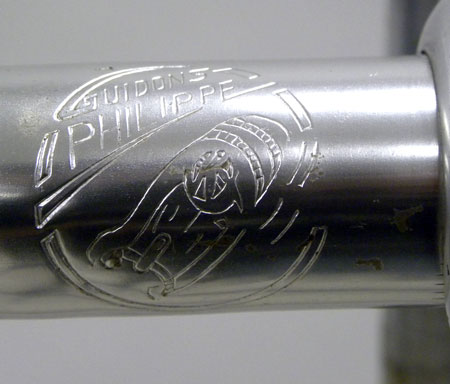
I assume this is Philippe himself, but with his head down in a full-on sprint, it is hard to say. Besides, who was this Philippe, anyway?
October 17, 2011
The drivetrain is in place, and it does shift, but we have issues. The cage needed some more bending. While pedaling there is an odd sensation and noise. Inspecting the chain, it can be seen that it is twisted in one section. This can also be felt by holding the chain as you pedal. The bad section of chain also looks different. It is my guess that the chain got twisted in the same incident that bent the derailleur cage. Someone attempted a repair this problem, but she/he did not do a very good job of it.
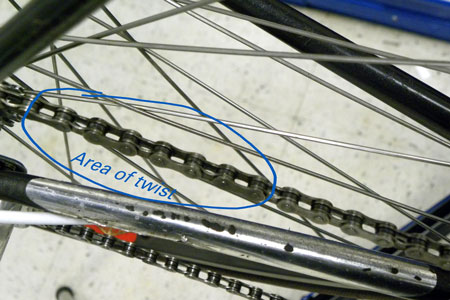
A twisted chain
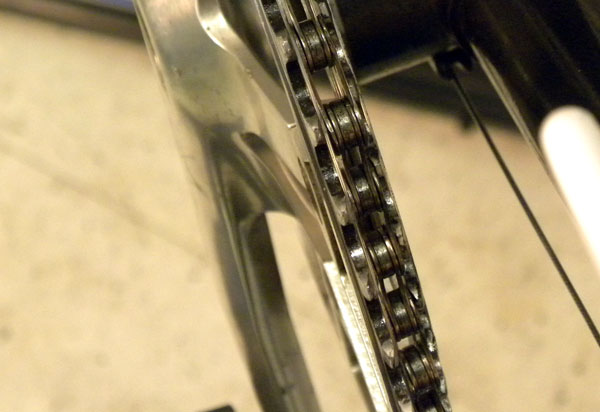
The narrow modern chain can cause issues on the older front chainring spacing
The chain was a Sedis Sport, a classic in its time. Modern 10-speed chains would fit the rear cogs fine and rear friction shifting works with any derailleur chain. However, not all chains are suitable for front shifting. The newer ultra-narrow chains can get stuck between older chainrings because of their wider spacing that accommodated the old chain width. We will look for a 7 speed chain and hope that is does not skip on the rear cogs.
The chain installation is reviewed in the video below:
It is now time to get the Mont-Cenis on the road and see what transpires.
October 18, 2011
Let’s get on the gloves and hit the road. Blue gloves, of course, to keep the white bar tape muy blanco. The first test ride is seen in this video:
The ride reveals two issues. First, both brakes squeal badly. This can be reduced or eliminated by “toeing” the arms. This is a procedure where the arms are slightly bent to allow the leading edge to contact the rim first. However, these are an older Italian brake, and we do not want to risk breaking an arm, so we will power sand the pads slightly to allow the same effect. This must be done with a light touch not to destroy the pads.
The second issue is the shifting, which, in a word, is horrible. It pedals smoothly once you are in a gear, but getting there is a very inconsistent experience. The Maillard teeth are cut square, without any of the modern shifting ramps you see on the indexing systems. The new chain is intended for a new cog system, and on this bike, the old and the new are not playing together well. The chain rides up as it moves from cog to cog and will slip over the cog until you pull the lever more, causing it to finally engage on the teeth. We will try to find a chain for the 5 and 6 speed systems.
October 26, 2011
The shifting continues to be an issue. Several chains were tried, and none are ideal or as good as the original Sedisport. The older cogs lack the shift ramps. As the cable pulls the derailleur, the cage and pulleys move the chain and literally derail the chain, lifting it up and off the cog. There is a period during a shift when there is engagement on one cog but not the next, and then there is no full engagement on either cog.
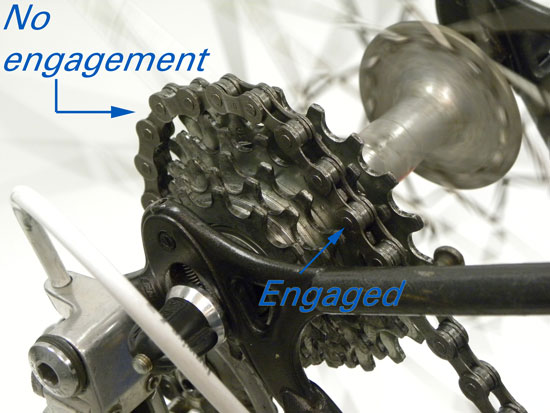
The older Maillard square cut cogs in the middle of a shift toward the larger cog
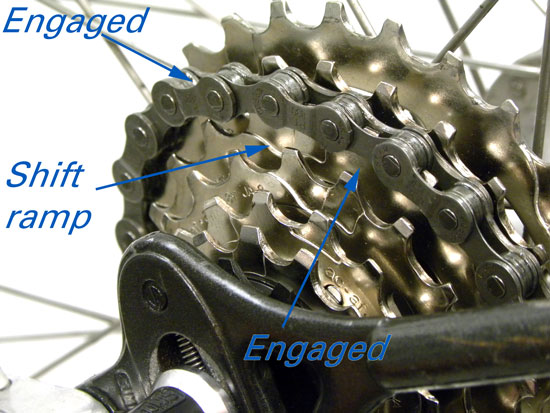
The modern indexing cog will engage both cogs as the chain moves
Modern indexing systems use specially designed teeth and “shifting ramps” that help to pull the chain to the next cog as it shifts. The chain can engage on both cogs and there is no chance of slipping. This works even with friction shifting systems we are using here.
The results of the chain testing are seen in the video below:
October 27, 2001
Conclusion
Time for another test ride:
The Peugeot Mont-Cenis turned out pretty well, but we must understand what we began with. Using the vernacular of the hot rodder, this is not a classic 1968 Shelby Cobra GT, rather, this is a Plymouth Duster. It is in good condition in some ways, but there are certain issues that persist. Consider the following:
- Frame: There is internal rust. There is no cure for this, but it is not always terminal. Approximately 1 teaspoon of rust fell out during the work. Inspect headtube and bottom bracket joints on the first day of each month it is used, for the rest of its life. Look for cracking in joints. If you find a crack, call me. Okay, I’ll just tell you now what to do: Hang it up and never ride it again. Put it in the garden to hold the pea vines. Put it on a wall as art. But get off the bike.
- Fork: The outer chrome shows signs of bubbling chrome, again a rust issue. Inspect the crown area each month with the frame.
- Bars: The bars and stem were replaced with Cinelli. Sadly, we lost our screened map of France (and not to mention Philippe-the-sprinting-head-down-rider). The Cinelli is an upgrade in quality, but still it is not orignial.
- Brake levers & calipers: The levers are in good shape as are the calipers. The hoods are molded to fit the hand, and are unique to Modolo. Do not crash on the hoods.
- Brake pads: These prove adequate after sanding. In a season or two, replace pads and pad holder.
- Seat post: This was a huge issue, and will be again if care is not taken. This seat post bolt can only be loosened two (2) complete rotations to move the post. You must not drop the cone off the seat post bolt.
- Front & rear wheels: There is rust inside the rims at the ferrules. Do not increase spoke tension. Rim braking surface is somewhat worn but certainly not a problem.
- Both hubs: The hubs do show some signs of wear on the bearing surfaces, but the cones are in good shape. No real issues here; they are good for many more kilometers.
- Rear wheel: Rear rim is permanently dented, deal with it, you cannot feel it, much.
- Rear freewheel & cogs: Freewheel bearing surfaces are worn and will make some rumbling noises when coasting, so don’t coast. Cogs are worn and once they begin skipping, a new hub/cassette will be needed. You will never find this, so expect to purchase a complete wheel as well as a cassette.
- Front derailleur: This cleaned up nicely: the pivots are smooth, and the spring is strong.
- Rear derailleur: Repaired well enough. Cage was once severely bent, and is now straight... enough. Shifts well. Will last many more years, but avoid doing the thing you did when you bent the cage the first time.
- Chain: It is new, but the shifting with the old cogs is not ideal. There is no good option. If skipping on the rear cogs when pressure is applied begins, it will mean a new wheel as you are unlikely to find cogs for that freewheel system.
- Bottom bracket: Turned out very nice once cleaned and overhauled, as almost all Campys of this era do.
- Cranks: Not so nice. Wear marks on right crank, but if used judiciously, they will last into your retirement and beyond.
- Chainrings: Not very worn, which is good because the chainring bolts are badly seized. These bolts can be drilled out, but for now, just ride the bike and be happy.
So, overall, we have a nice bike that deserves respect. I would ride this bike. However, its primary use should be, say, on nice Sundays and on a bike path. Do not rely on this bike for extended tours. Do not rely on this bike to get you to work. Do not convert this to a cyclo-cross bike. Do not convert this to a single speed, cycle speedway, or bike-polo bike. It will however prove to be an interesting secondary bike.
The cost of this project, you might ask? In parts we have: 2 front cones, ball bearings, 1 front axle, 2 rim strips, 1 chain, brake cable housing, 2 shift cables, 2 brake cables, handlebar tape, housing end caps, and 2 bottle cages. Total in parts probably exceeds $120 retail cost.
Now the fun part. A complete overhaul can run over $120-150 in labor, but here’s the rub: This does not include extra work like making a tool to extract the seat post, pulling the post, dealing with dented rim, rust removal, and spraying the inside of the tubes. This extra time is likely equal to the labor of second regular overhaul, but let us allow a 50% discount because we like France. We are now at a total expense for this bike somewhere over $300.
But wait, there’s more. I now owe at least a can of Mountain Dew to my friend Dan Garceau for borrowing his Helicomatic lockring wrench. I will also owe a huge debt of gratitude and some (huge) future favor to my friend Butch Balzano for getting me the mounting bolt and pulleys for the Campagnolo Victory rear derailleur. Cost? Priceless.