How to Build a Wheel
Wheel building is the process of attaching the rim to the hub using spokes and nipples as fasteners, and then bringing the entire structure up to proper tension.
Preliminary Info
- Spoke wrench to turn the nipple — see Spoke Wrench Selection
- Truing stand for truing and tensioning your wheel
- CSH-1 or BSH-4 Spoke Holder (optional)
- ND-1 Nipple Driver
- Toothpick with the tip cut off for installing nipples
- TM-1 Tension Meter (recommended)
- CL-1.2 Chain Lube or other light lubricant
- Painter's tape
This article begins with a compatible rim, hub and spokes. To determine spoke length, see this article: Determining Spoke Length for Wheel Building
Wheel building is the process of attaching the rim to the hub using spokes and nipples as fasteners, and then bringing the entire structure up to proper tension. As we build our wheel, we will be implementing many of the skills taught in our wheel truing series.
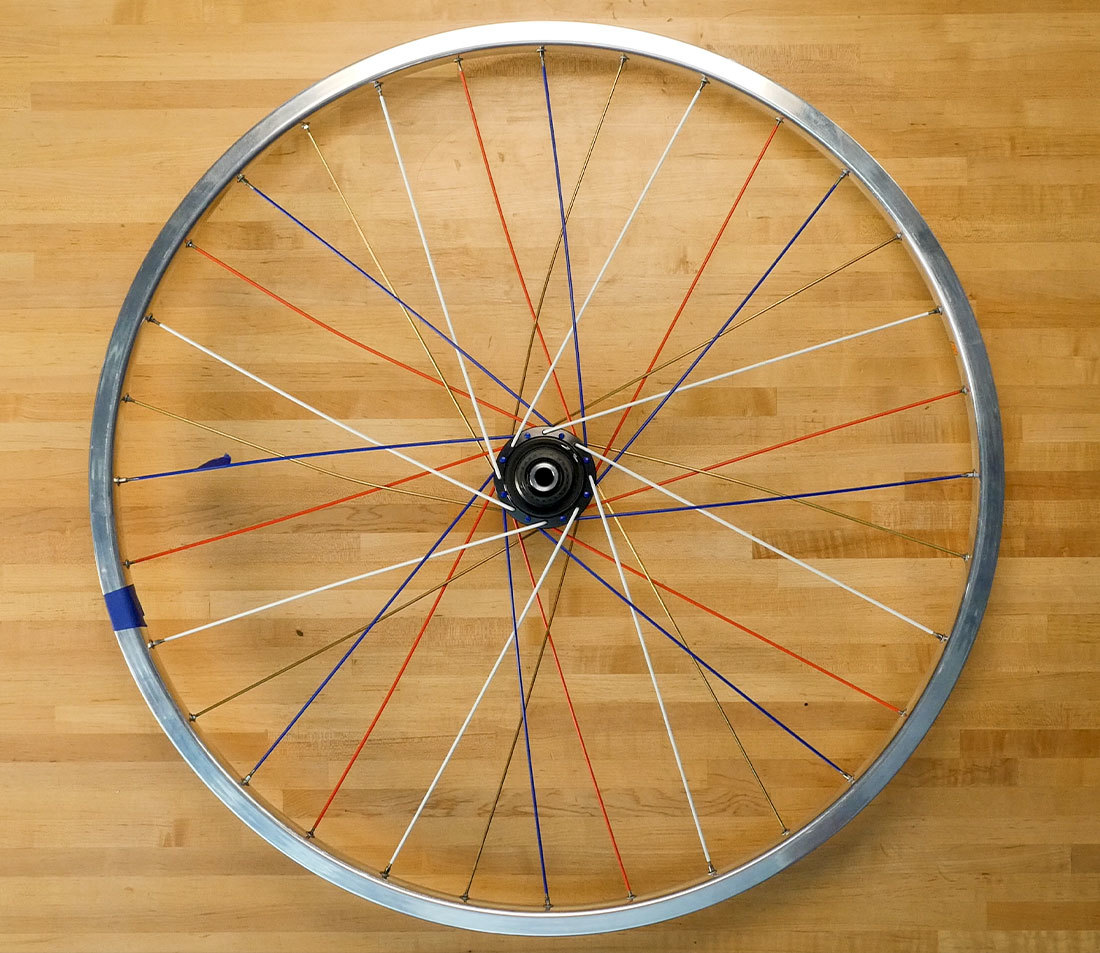
To better understand what our end goal is, let’s first look at a completed wheel.
- Notice how the spokes radiate at an angle from the hub — this helps transfer rotational force seen in acceleration and braking.
- Spoke heads that alternate direction on each flange — some facing in, some facing out.
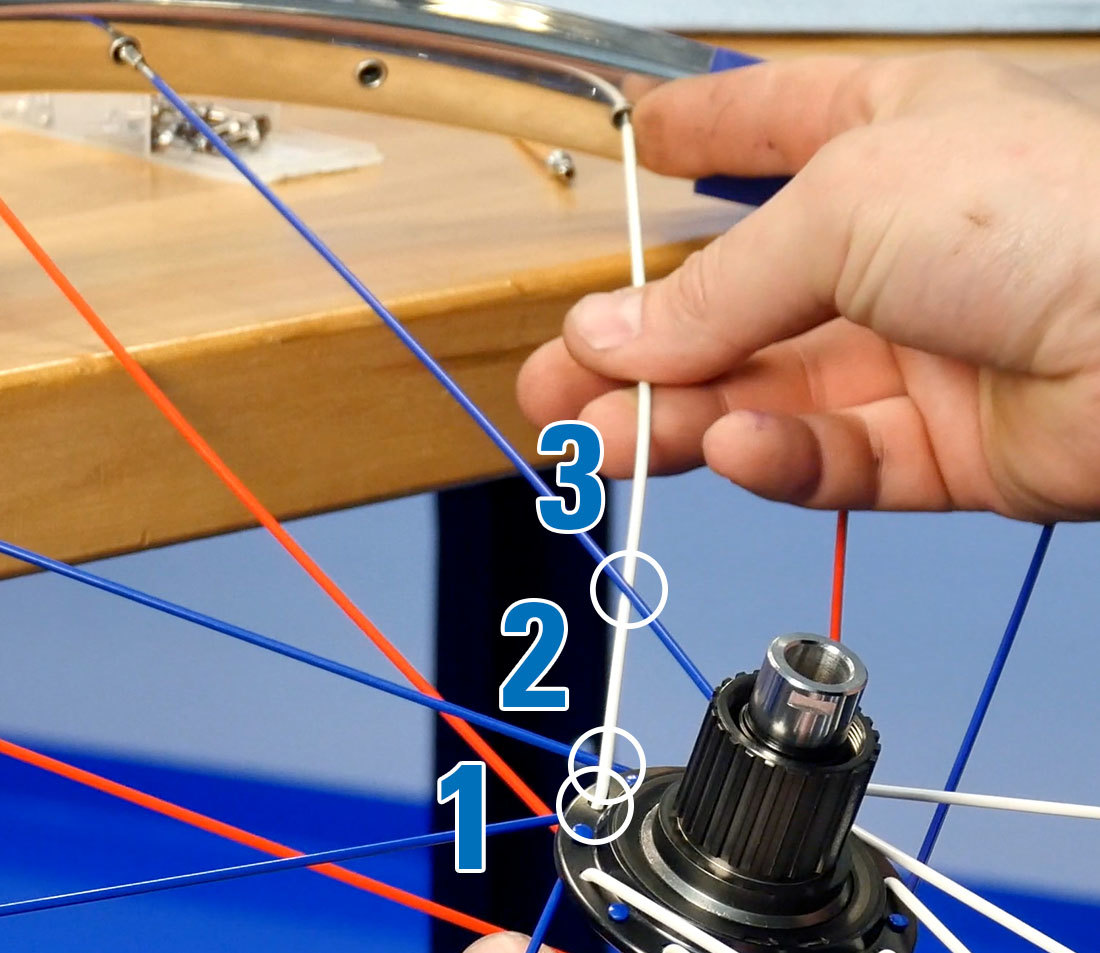
- Notice how many times our spokes cross one another: 1,2,3 times. A 3 cross. When talking about lacing cross patterns this is what we are refering to.
- Now find. Notice how the spokes on either side of the valve hole are parallel to one another. This allows the pump head to go on to the valve more easily.
These are just some observations that are going to help us understand what our overall goal is while we are lacing our wheel...
This article outlines the process for building a wheel with j-bend spokes, in a 3-cross pattern on a rim with 32 holes. This same lacing process can be used for many other configurations with small alterations.
Preparation & Process
Work Area
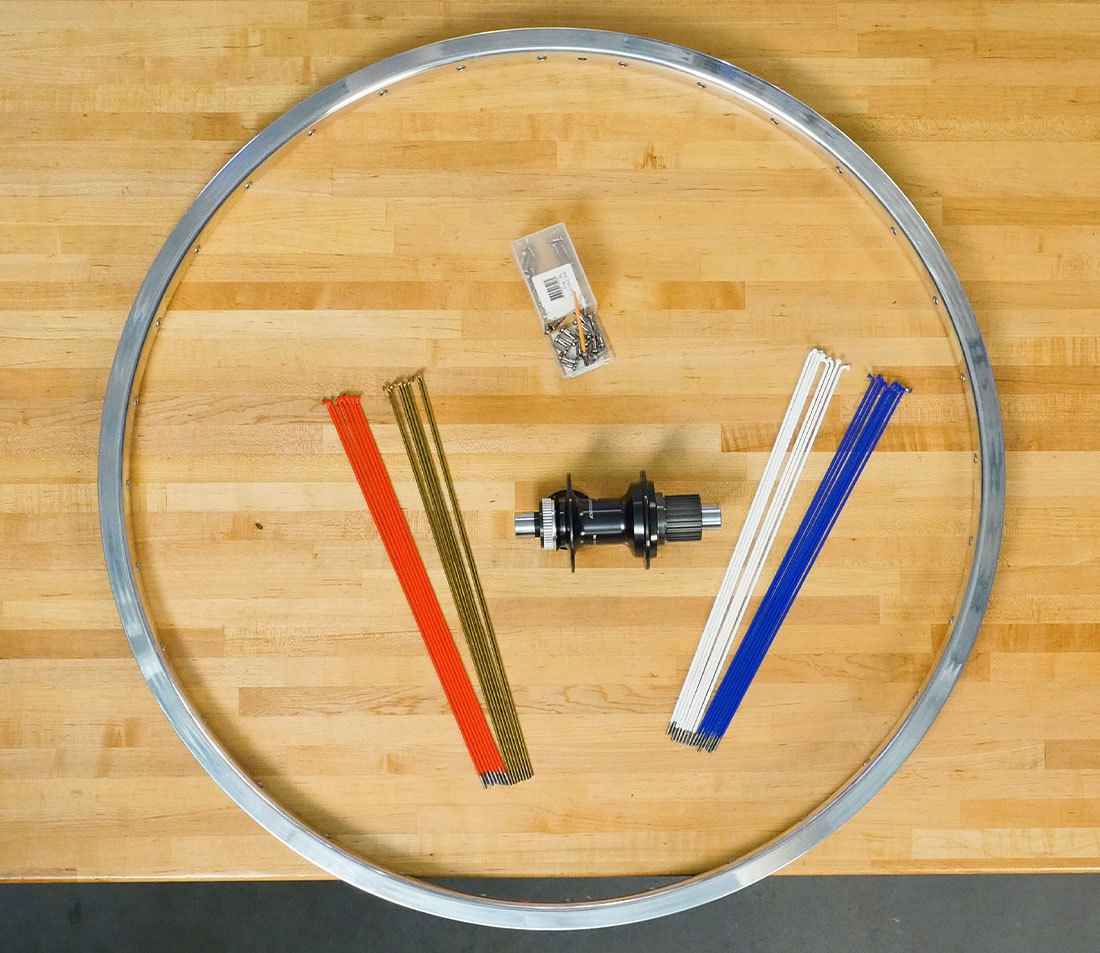
The lacing process for both front and rear wheels is the same. However, oftentimes rear wheels, and many front wheels that have a disc brake, require different spoke lengths from one side to the other. So differentiating spokes is important.
We will be lacing our spokes in 4 sets. To help show this, we will be using painted spokes: gold and red spokes on the non-drive side (left side) and blue and white spokes on the drive side (right side). The work area is laid out accordingly.
Spoke Prep
Before lacing, prep the threads of the spokes. On this wheel we’ll use a light oil as thread prep. Pick up a handful of spokes and dip the threads in the oil, clean off the excess and set aside. This process will be similar with other forms of thread prep as well.
Hub Prep
Set your hub in the middle of your rim along with the nipples.
Rim Prep
Place a piece of masking tape at the valve hole on your rim. This will help you locate it as a reference throughout the build.
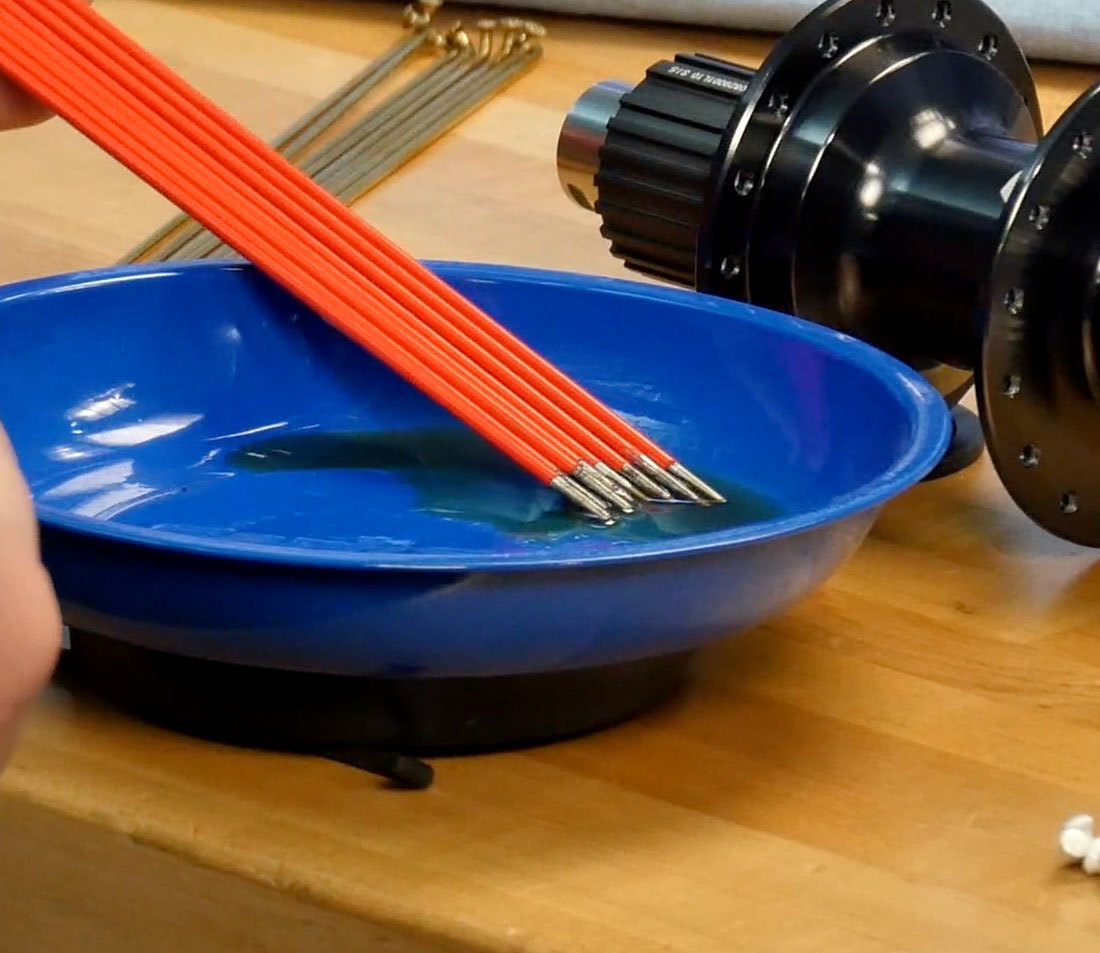
Lubricate all spoke threads before beginning the process
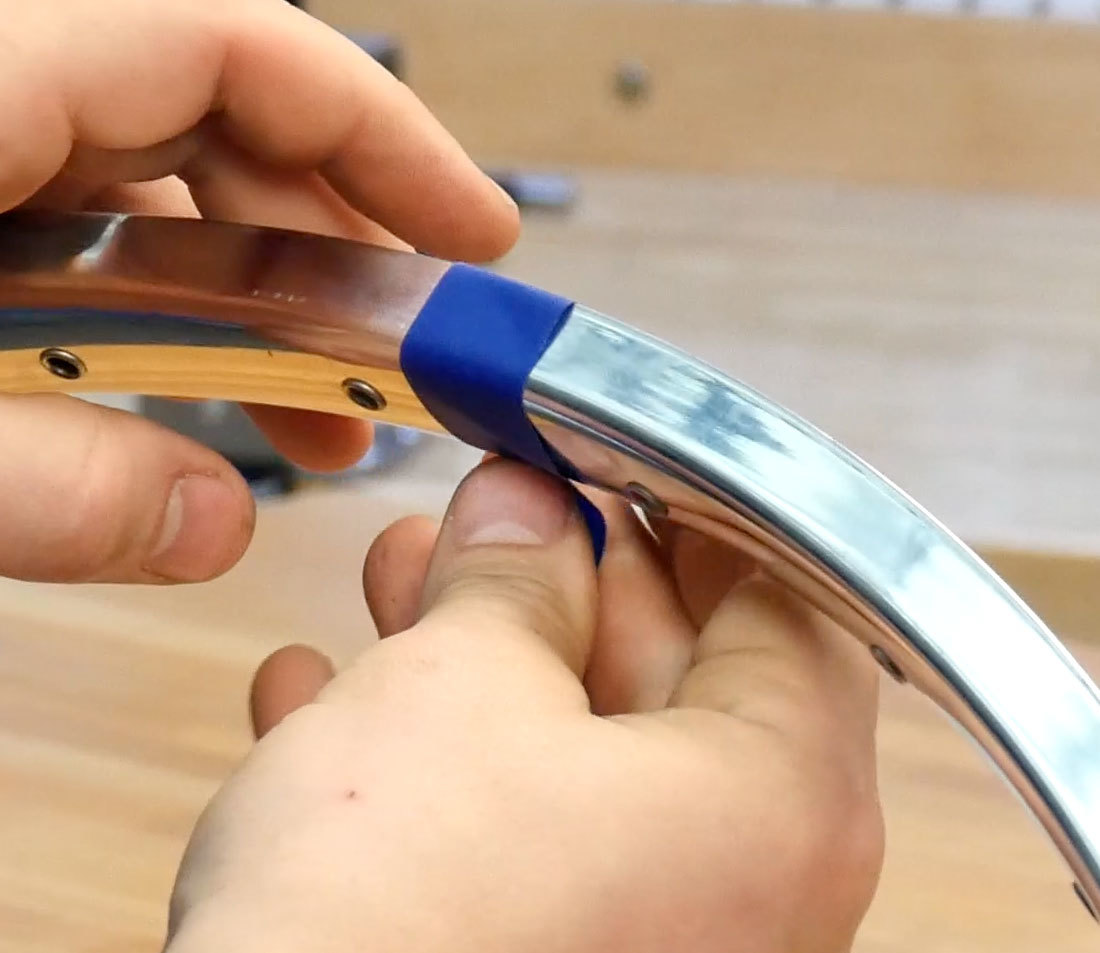
Marking the rim with tape will provide a handy visual reference
Set 1
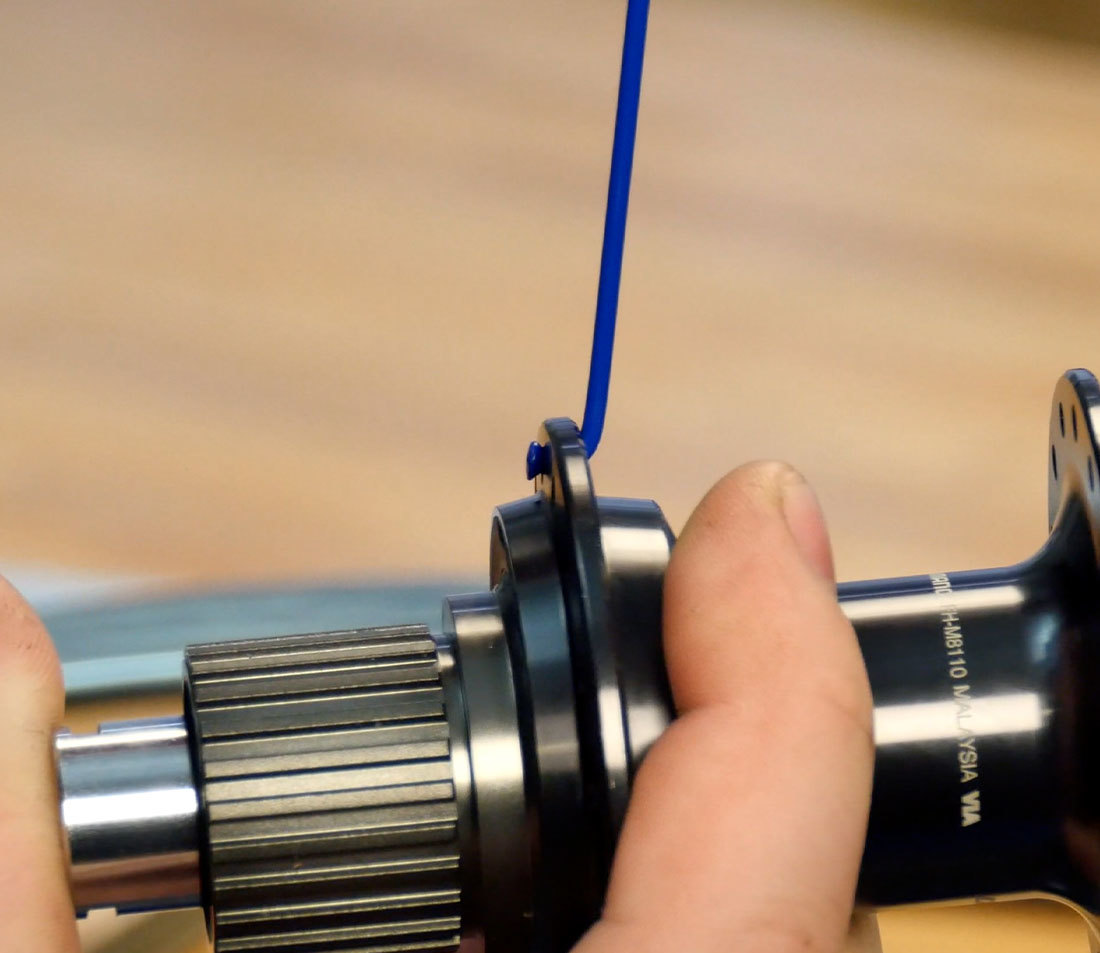
Pick up the hub with the drive side facing you. If building a front wheel, this will be the right side or the non disc side of the hub. If your front hub doesn’t have a disc side, the logo or label on the hub should be able to be read from the riders perspective.
Pick up one spoke from the pile on your right (drive side). Sighting the main logo of the hub, drop a spoke in about 1/4 to the right of the logo.
The head of the spoke should be facing outwards, and the spoke’s elbow facing inward. After installing the spoke, give it a little bend to reduce future stress in this area. Do this for the rest of the spokes as you move forward as well.
Now find the valve hole of your rim (remember the tape). Find the second spoke hole to the right of the valve. This is where we will install our first spoke.
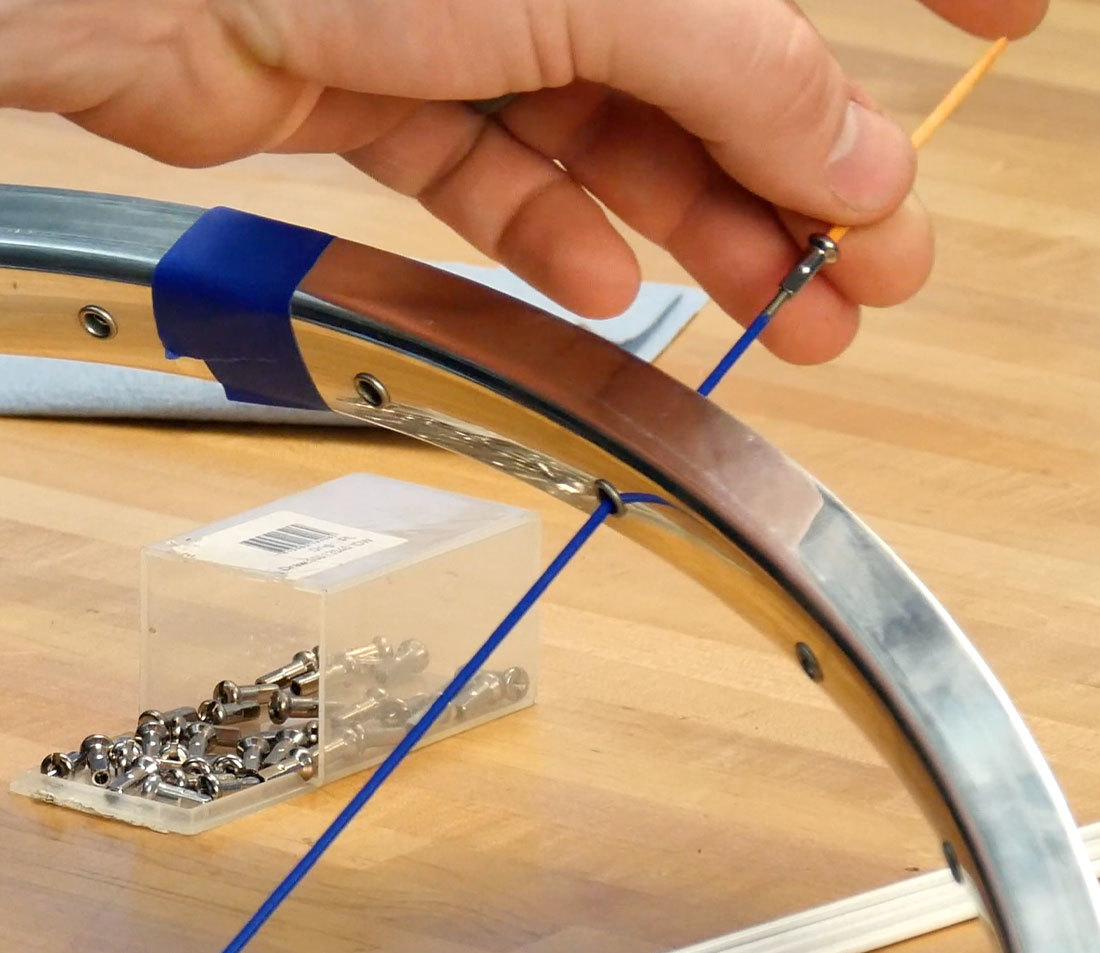
Fasten the nipple to the end of the spoke, threading it just enough to stay on — cover about half the threads with the nipple. This is your valve reference spoke, and it will be referred to throughout the rest of the video. It can be helpful to mark it with a piece of tape.
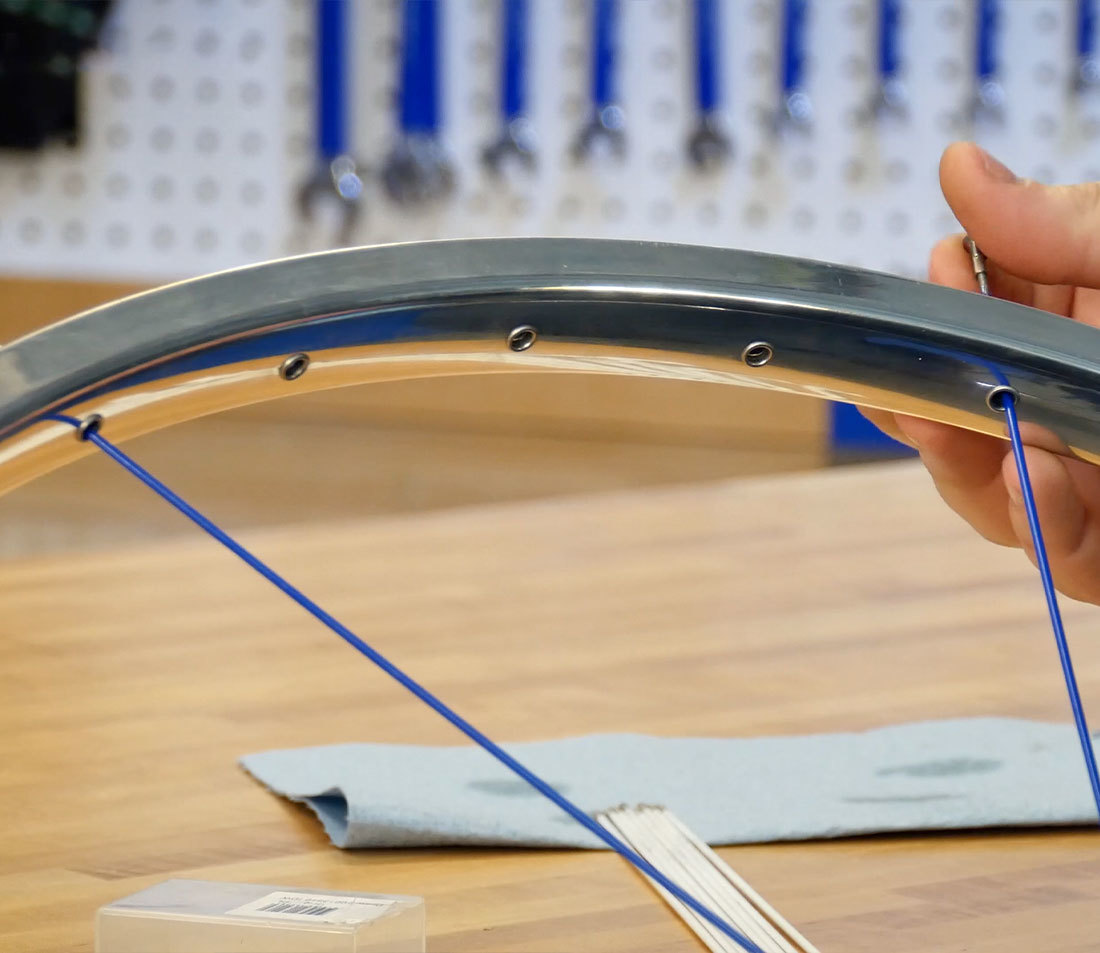
Now pick up seven more spokes from your right side pile and, working to the right, drop a spoke into every other hole, again from the outside of the flange.
At the flange, grab the spoke just to the right of the reference spoke. Up at the rim starting at the reference spoke, count four spoke holes to the right and install the spoke into the fourth hole.
Now move to the right at the flange and take the next spoke. Count again to the fourth hole and install another spoke. Repeat this process all the way around the wheel.
Before moving on, check to see that there are no errors:
- There are three empty rim holes between each installed spoke
- Every other spoke hole in the right flange has a spoke head facing out
- The second hole to the right of the valve has a spoke
If everything looks good, move on to the second set of spokes.
Set 2
Flip the wheel around, positioning the valve hole at the top once again. Locate your reference spoke — it should be in the second spoke hole to the left of the valve.
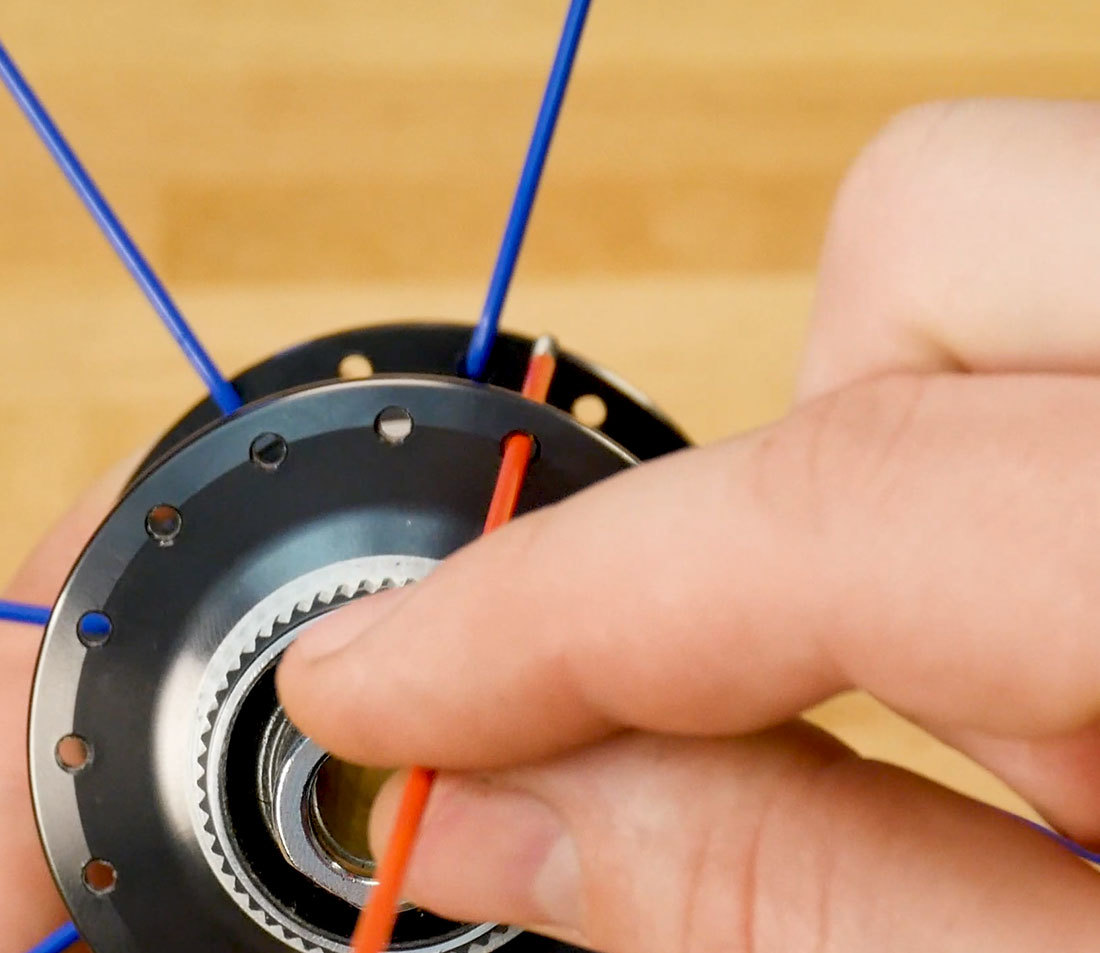
Looking at the flanges of your hub, you will notice the flange holes are slightly offset from each other. Find the hole on the non-drive side flange that will place the spoke just to the right of the reference spoke.
Drop a non-drive side spoke in and install it just to the right of the reference spoke. Next, drop seven more left side spokes into every other hole of the non-drive side flange of the hub, letting them fall just ahead of the opposite side spokes (this helps you remember where they will go).
Install these spokes one hole to the right of the first set of spokes.
Lacing is now halfway complete. Before moving on, check your work:
- The spoke heads are facing out from the left flange with the elbows inside the flange
- Every other hole is filled at the flange
- At the rim, there are two adjacent spoke holes filled, with two empty holes in between
- Sighting from the left flange, spokes do not visually cross the spokes from the right flange
Correct any errors if needed and move on the third set.
Set 3
Leave the wheel non-drive (left) side up. Drop a drive (right) side spoke into every open hole on the drive side flange.

Flip the wheel, being careful to lay the inserted spokes flat. The heads of the spokes just inserted should be on the inside of the flange with the elbow on the outside.
Grab the hub and twist it in a clockwise rotation. Notice the spokes now radiate from the hub to the left toward the rim. This new set of spokes will radiate to the right.
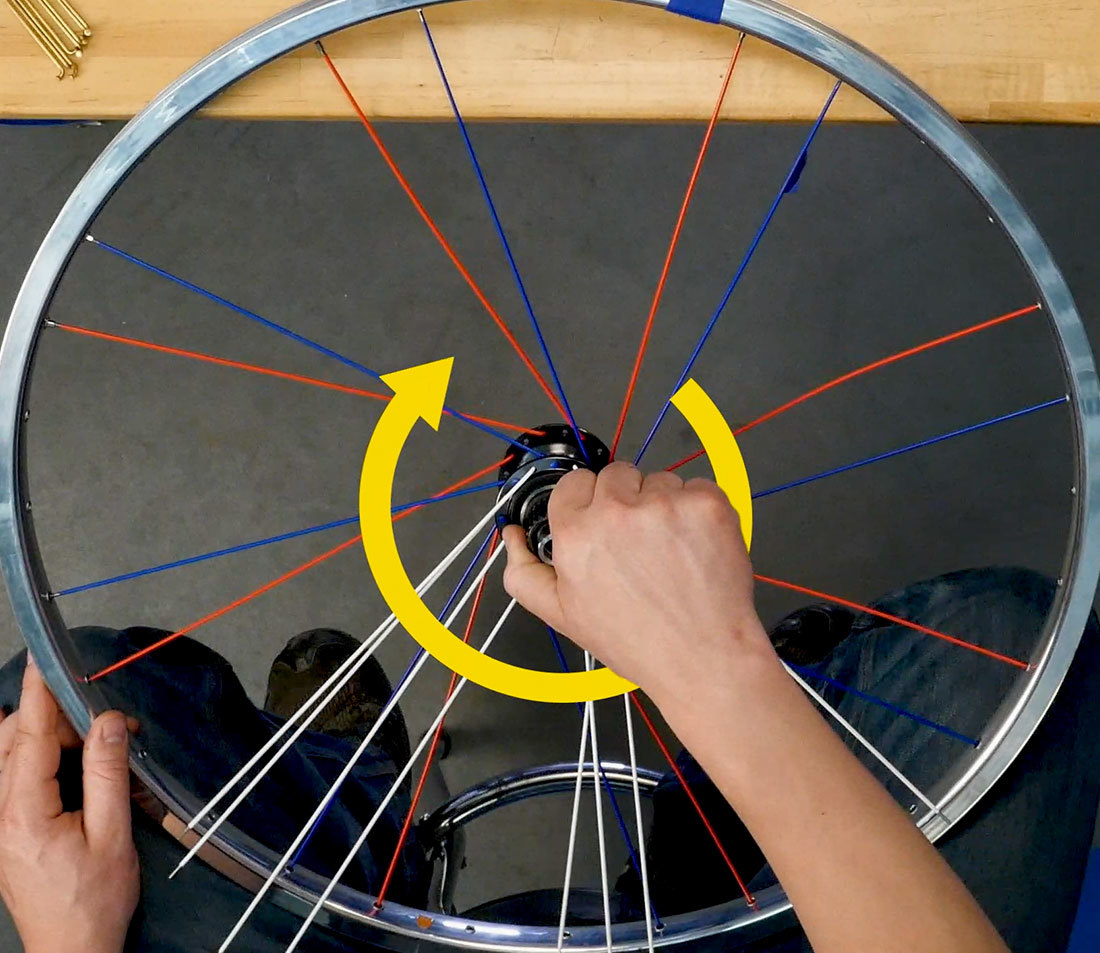
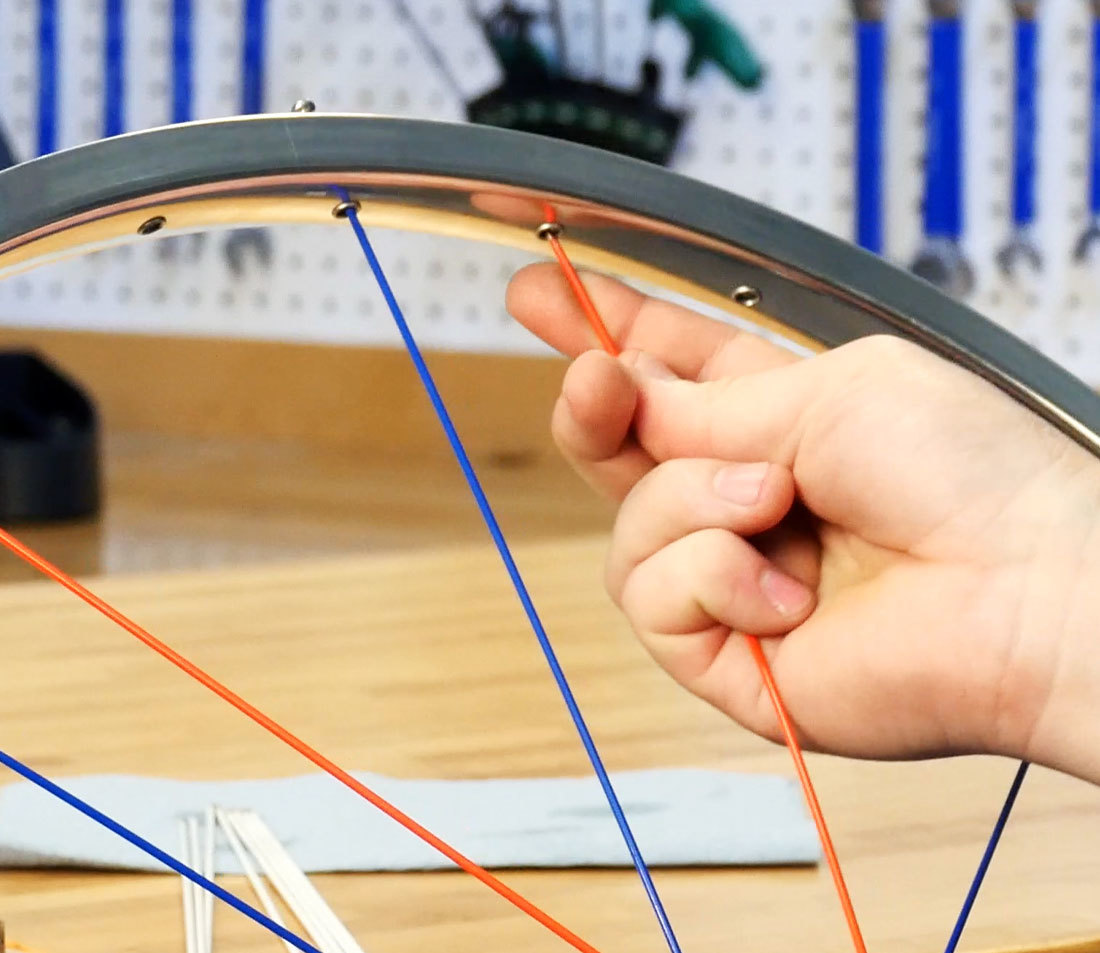
Take any one of the just-installed drive side spokes that are laying flat. Starting from that spoke’s flange hole, count out the spokes it will cross on the way to the rim. Note that the first cross often occurs behind the flange and can be hard to see. As we are making a three-cross wheel, each spoke will cross three spokes on its way to the rim. The spoke goes over the first two spokes that it crosses, under the third spoke, and into the rim hole.
At the rim, count two holes from the last crossed spoke. This is where you will install the spoke.
Lace the remaining seven drive side spokes to the rim, repeating the process of crossing over one, over two, under three, install.
Remember to flex the spokes at the flange when you have completed this side.
You have now completed one side of the wheel! Check your work:
- At the rim, there are three spokes next to one another and then a space
- At the rim, there are two drive side spokes with one non-drive side spoke in between
- The third set of spokes has been interlaced — over one, over two, under three
On to the last set!
Set 4
Before flipping the wheel, drop the remaining spokes into the non-drive side flange from the back. Carefully turn the wheel over and lay all the spokes flat.
Grab any free spoke. This fourth set of spokes will radiate to the left, opposite of the existing non-drive side set. As you move the spoke to the left, count the number of crosses, similar to what you did with the third set — over one, over two, under three, install into the remaining spoke hole. Repeat for all remaining spokes.
If you have been checking your work as you go, the only remaining check is that this fourth set of spokes are interlaced — over one, over two, under three.
You now have a completely laced wheel!
Wheel Tensioning
The wheel is laced, but the spokes are still loose. The next objective is to evenly draw up tension in the wheel. To start, zero out the spoke nipples. Tighten each nipple just to the point where you no longer see any threads. Using a nipple driver such as the ND-1 will make this process a lot easier — otherwise, use a spoke wrench. If you are struggling to zero out the spoke nipples, it may mean your spokes are too short and you may need to re-assess your wheel build.
Next, add some thin lubricant to where the nipple and rim meet. This helps reduce friction and will make tensioning and future adjustments easier. Give the wheel a good spin to push the lubricant into the spaces between the nipple and rim bed.
Starting at the valve of the wheel, give each nipple an equal amount of turns. If your wheel was built with non-differential spoke length (see Determining Spoke Length for Wheel Building for more information) then give the drive side of the rear, or rotor side of a front, an extra two turns.
The idea here is to draw up tension evenly, and it is often best to take your time and go slow, making just one to two turns at a time. As you work, give the spokes a squeeze. You’ll be able to feel when they start gaining a decent amount of tension — not enough to have a durable wheel, but enough to be able to ride.
Once the wheel is relatively tight, check the initial tension with a TM-1 or other spoke tension meter to see where the wheel is at. This will help give an idea of how much more tension will be needed. For an in-depth look at wheel tension see Spoke Tension Measurement and Adjustment.
Wheel Truing
In addition to adding tension, you will likely also need to make corrections to the lateral truing, radial truing, and dishing of our wheel, which will also add tension to the wheel and bring us closer to our end goal.
First, lets check the lateral true of the wheel and correct any deviations — Wheel Truing (Lateral & Radial).
Next check the dish of the wheel — see Wheel Dishing (Centering).
Next, check the radial true of the wheel, correcting any deviations you find.
Once your wheel is true, dished, and tensioned, de-stress (or pre-stress) the wheel to make sure that the nipples are seated in the rim and the spoke heads are seated in the hub.
You can do this a few different ways, but we suggest the squeeze method. Simply squeeze parallel spokes on either side of the wheel. This puts added strain on the spokes and helps mate the elbows of the spokes to the flanges of the hubs, and also helps seat the nipples into the bed of the rim.
Often after this process you will see a slight change in tension and possibly trueness. Address these issues and squeeze again.
Congratulations, you have now built a wheel!
Next article in this series
How Wheel Truing Works View Article
Wheel Truing (Lateral & Radial) View Article
Wheel Dishing (Centering) View Article
Spoke Tension Measurement and Adjustment View Article