Written by Calvin on March 13, 2012/Calvin's Corner
Springtime Attention Brings Problem Prevention
Springtime is nigh upon us, the time when a true cyclist’s heart turns to—what else—bicycle maintenance. With attention from you, plus some elbow grease, your early season rides will be coming up roses.
So, just what occurs during those long winter months while your steed waits patiently, longing for the open road/trail? Like most of the rest of the universe, bikes, left all alone and to their druthers, just prefer to atrophy.
Primarily, for us, the concern is with lubricants, as they tend to disperse and evaporate. Mechanically speaking, nothing much changes on your machine over the long weeks and months. The issues, problems, and poor maintenance performed at the end of fall are still there, lurking and just waiting for you to get back on the saddle.
What should the anxious cyclist be doing when it comes time to actually ride this spring? Well, you should just go and ride, because you paid attention to this article and you will have performed all your pre-ride work BEFORE the first miles/kilometers/leagues of the season are behind you!
Let us begin by splitting bikes here into two groups. Those bikes that have not used the bike all winter, and those that have continued to see riding all through the season.
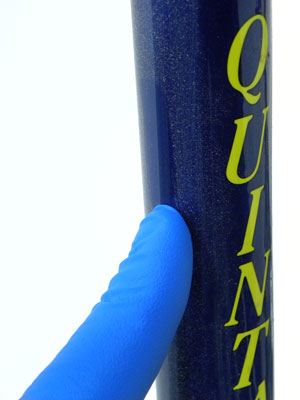 This bike did not pass the "blue glove test." Notice the dust gathered only on one side as it hung from a hook all winter long. Most certainly a garage bike if ever there was.
GARAGE BIKES
These bikes have been sitting in the shed/garage/basement all winter. Perhaps ridden last in the fall, maybe in October, when the leaves were past their color, but before real hard weather hit. So, to wit, here is what to inspect:
TIRES
Pump, pump, pump it up and then take note the pressure. Check again later at night or the next morning for a drop of pressure. This would indicate a slow leak. Also inspect the tire sideways for cracking and degradation of the rubber. Rubber rots, eventually, and now is the time to inspect.
Tubular (glue on) tire people, you grab the side of the tire and push. If you heard any cracking in the glue bond, it has dried and hardened. That’s a tire that needs to be re-glued. Tubeless tires? Again, pump them up and check for a drop in pressure a few hours later.
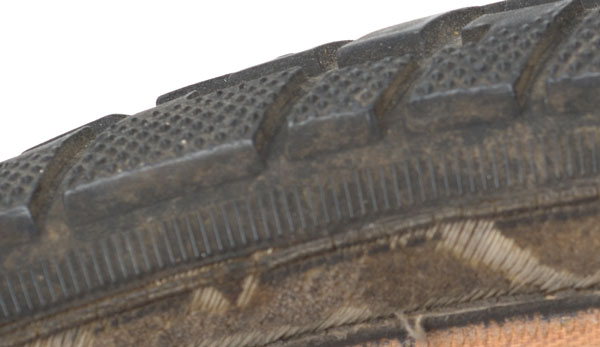 Rotted and cracked sidewalls
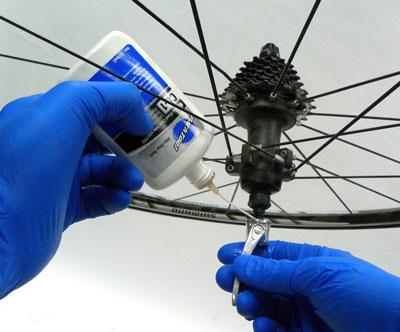 Lubricate the quick-release cam
WHEELS
Spin front and back wheels. The spokes did not lose tension over the winter. If the wheel is out of true now and wobbles, it was so when you put the bike away. The garage-elves did not come with spoke wrenches and mess up the wheel. Correct any truing problems now.
HUBS
Drop the wheels out of the frame and check the hub grease. The axle should not be sticky to turn, indicating dried up grease. For quick-release skewers, while it is out of the bike, put a drop of lubricant in the quick-release cam and work it back and forth.
FRAME & FORK
A spring tune-up gives us a a good opportunity to give the bike a once-over for structural integrity. Thoroughly inspect every tubing joint and intersection. Look for lines that might indicate a crack. If you have any doubt, get the bike to a professional mechanic for his/her opinion.
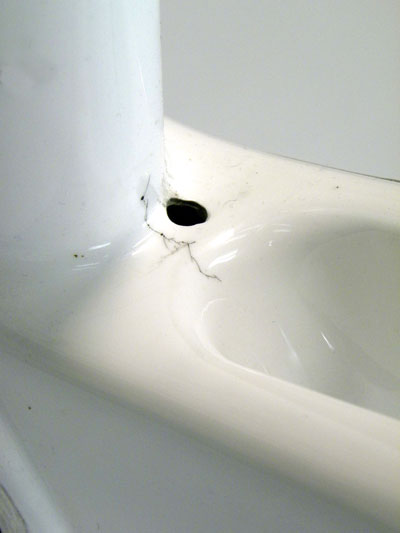 Cracking at the bottom bracket shell
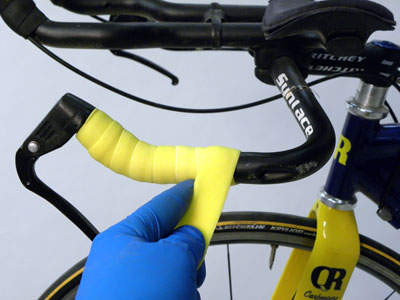 Enough of the black tape, time for some color!
COCKPIT
Here again, nothing should have changed. Stem bolts and handlebar binder bolts have not have lost tension over the months of non-use. Double checking here provides us with an excellent opportunity to use a torque wrench. If the bolts are properly tight, the wrench will show this and you will not just wind up the bolts tighter and tighter.
It is springtime after all, so why not add some color? Drop bar people, get some new bar tape, and hey, why not one of the primary colors for a change, enough of the black! For the upright crowd: inspect the grips. Grab them firmly and twist; they should not easily move.
DRIVETRAIN
Begin by getting the dust off the parts. If the bike has been sitting, a rag and some polish or solvent will be enough. If the chain feels gritty, it should be flushed, dried and re-lubed. In fact, why not just wash the whole thing?
Springtime riding can of course be wet and dirty, and cleaning your chain is a great time to have some fun:
SHIFT LEVER, CABLE & DERAILLEURS
The cables and levers should be given a shot of lubricant. Use a light lubricant and drip into the housing wherever a cable enters or exits. Work the levers to draw in the lube. If the levers feel stiff, lubricate them as well. Here, use an aerosol spray and work it into the spaces and gaps where the lever pivots for shifting.
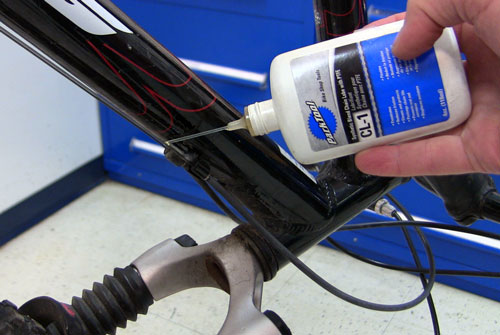
Tilt the bike in your repair stand and let gravity be your friend as you drip lubricant down the cables
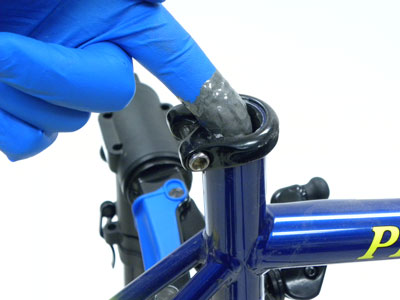
Remove and clean those seat posts, clean inside the seat tube, and then apply fresh goop.
SADDLE & SEAT POST
Everyone, first mark your height with tape, and then loosen the seat post binder bolt and pull out the post. Wipe down inside and re-grease. Better yet, for steel and aluminum posts and frames, use anti-seize, such as ASC-1. However if carbon is involved use a special compound, such as the SAC-2. This will grip the slippery carbon surfaces better and help prevent seizing.
For all parents/guardians, and anyone around kids on any age, double check the saddle height before the first ride on the spring. Kids don’t stop growing over the winter, and the post doesn’t raise itself. If the bike is getting too small, admit it, and go out and buy a bigger one.
SUSPENSION FORKS & FRAMES
The concern here is stiff joints. Bounce on it some, work the lubrication. If you have the right suspension lube, drip some down your seals. Get a suspension pump to double check the pressure.
BRAKE SYSTEMS
Rim brake people, such dual pivot, side pull, center pull and linear pull (V-brake), check the amount of material left on the brake pads. Also check the hardness. Take your thumbnail and press hard into the material. Feel hard, to the point of brittle? Time for new pads, no matter the amount of material left. The pads will not be squishy but you should feel your nail bite into the pads a bit.

Feels hard? Feels brittle? It is, so replace the pads.
This lever seems to be weeping, which will only lead to more tears... from you.
Disc brake people, sight down from above the caliper body at the pad material. Manufacturers have a minimum thickness they specify. If you are in doubt, pull a pad and measure. If it is 1mm or less, it certainly is time to replace.
Like the shift cables, the brake cables will be sticky and slow. Get the bike in a repair stand and tilt it as needed to let gravity work lubricant down the housing.
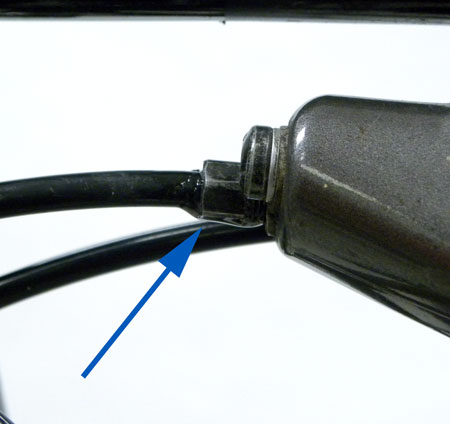
Hydraulic brake people, inspect the tubing where it enters the lever and caliper. Is there any wetness showing there? That is bad, real bad. It is a leak, so get that fixed. It may mean seepage but this is repairable. Tighten down the compression nut, and if that doesn’t work, you may need a new compression “olive” as well.
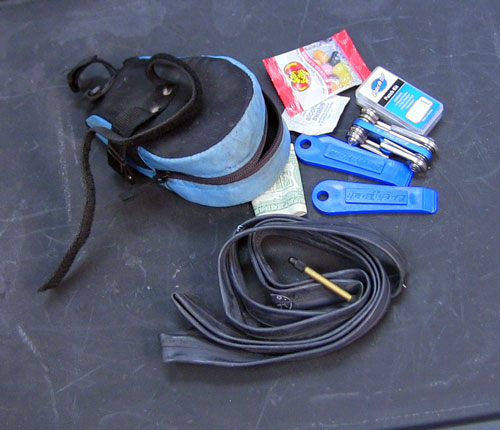 Tire levers, patch kit, spare tube (with cap), some Jelly Belly beans, and a couple of dollars.
SADDLE BAG
Unzip that bag and empty it out, completely out. Take stock of what’s there and what you should have for your riding. Throw out, or at least give to the birds, that old granola bar. Stock a fresh one. Inflate the tubes if you have been carrying them around all year, as rubbing against tools can wear a hole in them. Let it sit fully inflated for a day, then deflate and roll it back up tight. Check the hand pump, still working? Is your pressurized air canister still punctured? Tire levers, still two of them, not broken? Rescue tool in working order? Patch kit? Did you open the tube of glue? If so, better check that it is not all dried out.
WINTER BIKES
Okay, you have some work to do. Discounting some parts of the US Southwest, there can be a lot of rain, muck, snow and slush that your two wheels are parting. The mud, ice, snow, slush and the grit and salt they carry up to the component parts can grind a bike to death.
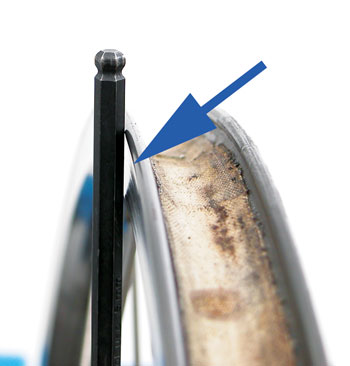 A rim worn dangerously thin at the braking surface
Count on pretty much a complete overhaul, and begin with that bottom bracket. Pull cranks and pull seals on the bearings when possible. Flush and add new grease. Now is a good time for new cables and housing as well. The grit of the winter muck working into the housing and cables is not easily removed.
All other inspections above apply as well, and you pretty much should figure on new brake pads each spring. Winter riders with rim brakes should inspect the rim surface for grinding. As you brake, the muck literally grinds off braking sidewall material, and you will get a dished or concave surface. Replace the wheel at the first sign of this wear.