Written by Calvin on July 30, 2014/Calvin's Corner
Wheel Tension App Overview
Wheel truing can be great fun. It provides us chance to focus on something that should be simple, something that bends to our will, so to speak. Get a cup of good coffee, sit yourself in front of a truing stand, and meditate on making a perfect wheel (figure 1).
 Figure 1. Some computer interfacing can make you a better mechanic
There are of course many tools that can help you make better wheels. Truing stands, spoke wrenches, dishing tools, and a Park Tool TM-1 Tension Meter will make things go right. With the TM-1, you can know the tightness of the spokes overall (average spoke tension) as well as know the relative spoke tension (how tight each spoke is relative to the other spokes in the wheel).
Wheel Tension Balance Web App
This article will address the use of a new and completely free tool, namely the Wheel Tension App. The WTA app is designed to provide backup and support to the TM-1. This web app provides you an easy and fast way to convert your wheel’s TM-1 readings into a kgf reading. Additionally, the WTA provides a visual diagram of the relative spoke tension using a “radar chart” (figure 2).
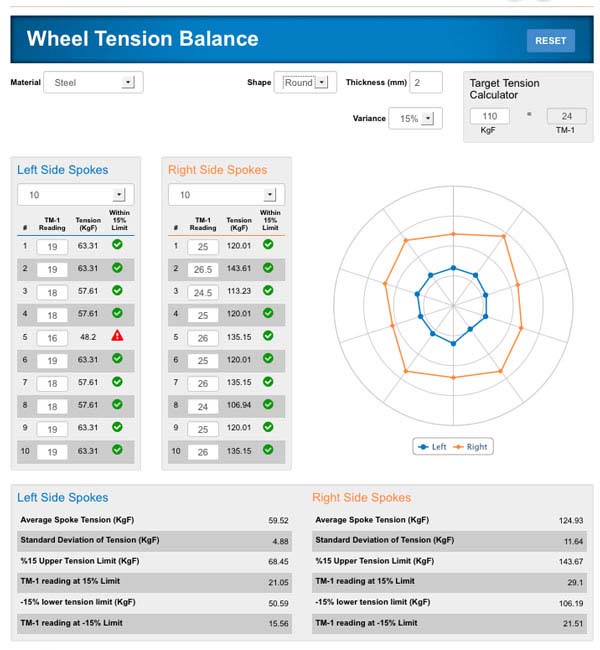 Figure 2. The WTA used on a 20 spoke rear wheel
If you have never used a TM-1 Tension Meter before, this tool basically flexes a wheel spoke between steel studs using a calibrated spring. A scale gives you a reading of the amount the spoke deflects. This deflection reading is correlated to, but is not the same thing as, the force pulling or tensioning the spoke. See more of the TM-1 use at Wheel Tension Measurement.
To know the amount of force, you use the chart that comes with the tool. Different diameter spokes will have different reading for the same amount of pulling force. So to know the tension on an entire wheel means lots of writing things down from columns, and then adding them up and dividing.
Any math is too much math for most people. But now, we have the WTA to do all that figuring for you. The concept of this app is based on an Excel spreadsheet once offered in previous Calvin’s Corner, here at the Park Tool website. This earlier attempt required downloading a file and running it off your hard drive. The file contained what are called “macros,” and it became impossible to keep up with all the changes in computer operating systems. We abandoned that version in favor of the WTA.
This updated and improved WTA is much cleaner and easier to use compared to the previous version. The WTA app also features a nice blue button called Instructions. Find it. Click it. Read it. This page will focus on why to used this web app. See the “how” to use the WTA at the a fore mentioned blue button.
It is important to understand what the WTA is showing you. This app does not graph out the “trueness” or run-out of the wheel rim. In fact, when learning how to use the WTA, the wheel should be running straight and round. What the WTA does is organize the TM-1 data on wheel spoke tension into a usable format.
Although personally I find it very entertaining, you do not really need to measure the spoke tension of every wheel you see. There are however some good reasons you may want to use the WTA. For the home mechanic, new to working on wheels and truing wheels, it can help make sense of what is going on with a wheel. It will help build confidence.
For professional mechanics and wheel builders, it can provide confirmation you have produced a good wheel. Additionally, it provides you can give to the customer. When correctly used, this data can provide a deeper understanding of what is going on, just like game stats provide a deeper understanding of a baseball game.
Improving Your Wheel Work With Data
With some practice, many people can true (straighten) a wheel spinning so it will not strike the frame or rim caliper brake pads. Spoke nipples are turned to move sections of the rim left or right as needed. When the wheel looks like it is not wobbling and spins straight, most people will sit back and admire their handiwork. Done, finished, let’s ride.
But wait, there’s more! We can take that wheel and make it better. However, to understand how we need to review some wheel theory.
When we ride, we are stressing the wheel rim and spokes. Just riding along, as is said, will cause a change in spoke tension every time that wheel goes around. So consider riding only one mile. Your spokes are seeing 745 revolutions on a typical bicycle wheel (465 per kilometer). Now consider your afternoon ride, that’s like, well, you do the math. We can say each spoke gets stressed a lot for a season of riding.
To keep the wheel spinning nicely for a longer time and over all sorts of terrain, it is best to balance the spoke tension. Many novice mechanics (and not-so-novice) assume that when the wheel is running without wobble left to right, the spokes must be all the same relative tension. That is simply not correct.
Why is that? Even a brand new wheel and even with good quality rims, the wheel builder or mechanic can unwittingly produce a wheel that spins straight, but the spokes are quite different in tension, some being tighter and some looser. This is something that we can improve. We call this “balancing” the tension. However, first understand that spokes are balanced to other same-side spokes. We would like to have left side spokes relatively close in tension to all left side spoke, and all right side spokes close in tension to right side spokes. You will have tension imbalances when one spoke is pulled tight while neighboring same-side spokes are relatively loose. Ideally, we want a situation of “sharing the load,” with all spokes pulling their weight, more or less, equally.
Why this desire for relative even spoke tension (balancing)? A spoke that is looser relative to its neighbors will tend to loosen even more during use, and this will result in the wheel coming out of true. However, spokes that are overly tight can stress the rim, and this can result in a crack at the nipple hole. Wheels with even spoke tension will stay true longer, and as a bonus, your spoke life will be maximized.
Have a look at the example below in Figure 3. It is a 24-hole rear wheel, with a light rim. For this user, we are trying to hold tight balance tolerances, so we selected the plus or minus 10% option. The spokes are tightly, but there is a balance issue on the right side at the fourth spoke, counting from the valve hole. Spoke #4 is too tight, and spoke #5 is too loose. We are trying to transfer some of the static load of #4 over to #5. The idea here is to loosen #4 a bit. However, just loosening #4 will cause the wheel to come out of true, so we must also tighten #5 to pull it back straight.
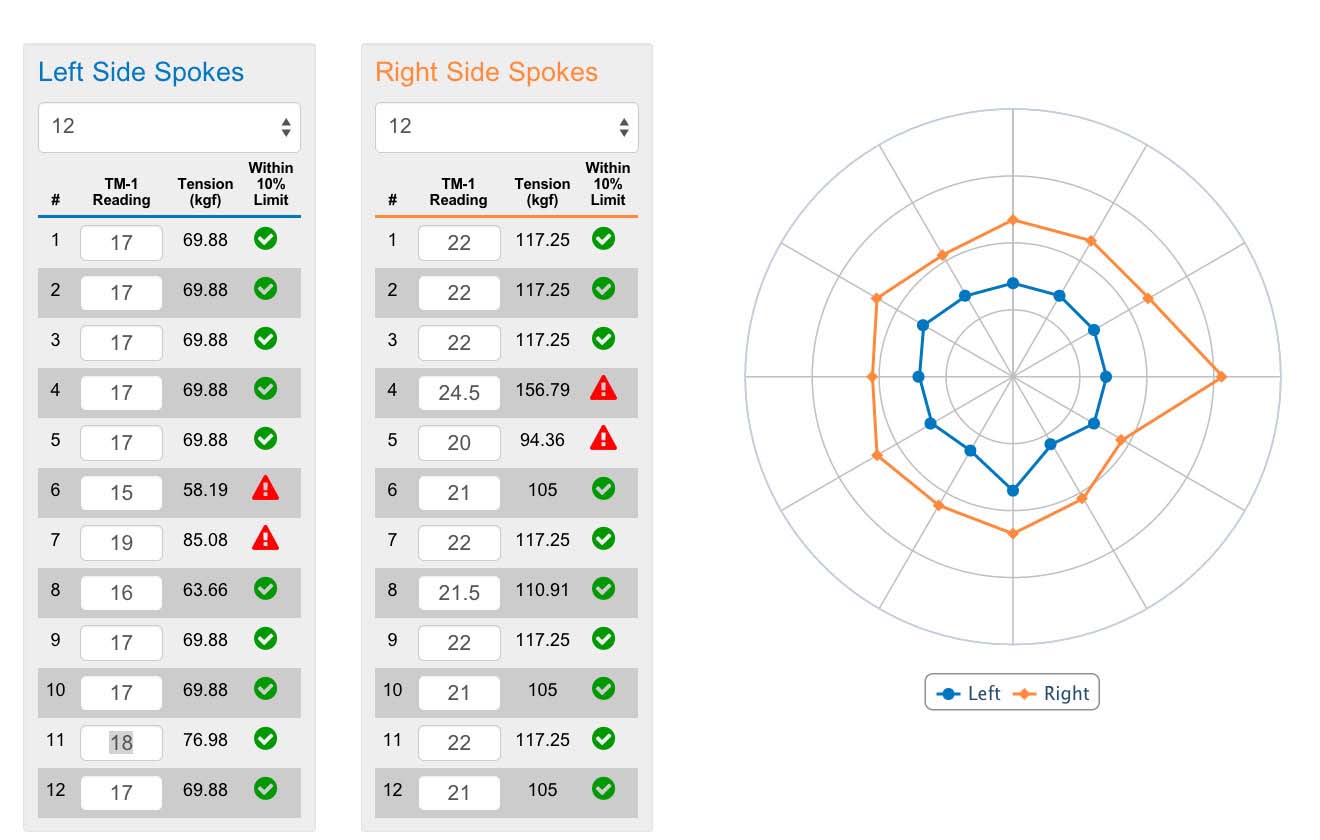 Figure 3. A 24-hole rear wheel that could use tension balancing
On the left side of this same wheel, we have two places that are out our desired tolerance. Spoke #4 will need stress transferred to #5. Then on the left, spoke #7 will need loosening. This must be offset by tightening possibly #6 or #8, or perhaps a little of each. The idea is to maintain good true, but achieve balanced and even tension while you do this.
WARNING: As entertaining as the WTA is, remember we need to eventually go ride the bike. For the professional, you must give back the customers’ wheel. It will never be perfect, and it doesn’t need to be. Keep in mind that rim hoops are made from rolled aluminum extrusions. A straight piece of metal is pushed through rollers to bend it in a circle. It is then joined by pins or by welding. The hoop ends up with internal stress even before the spokes are put in to the hub. Carbon Fiber rims also are not made perfectly. You often have a trade off between a nicely balanced spoke tension, and a perfectly straight spinning wheel.
To have a better grasp of why this spoke tension balancing is a good thing to do, let’s have a look at a common wheel stresses. Below we will review Radial Loads, Torsional Loads at the hub, and Air Pressure. Just plain old smashing the wheel will be covered last.
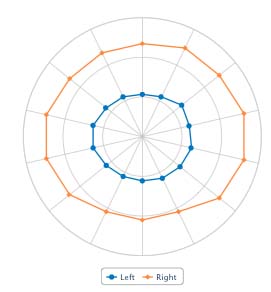 Figure 4. Rear wheel under radial load
Effect of Radial Load
Rims get a downward load at the hub just by sitting on the bike and riding. This stress tends to flatten the rim slightly at the bottom, close to the 6:00 position. Because of this flattening, the bottom few spokes will drop slightly in tension. However, at the same time, the spokes to the left and right side of the bottom, at the 3:00 and 9:00 positions, rise slightly in tension. The spokes at the 12:00 position do not gain tension (figure 4).
Remember, every time the wheel rotates, each spoke goes through this cycle of getting looser and tighter. This loosening effect of simply riding is an example of why balancing is useful for the wheel. Like all fasteners, the tendency is that a loose bolt and nut will get even looser during the stress of use. If a spoke were relatively loose compared to other spokes, this spoke will then get even looser as you roll along.
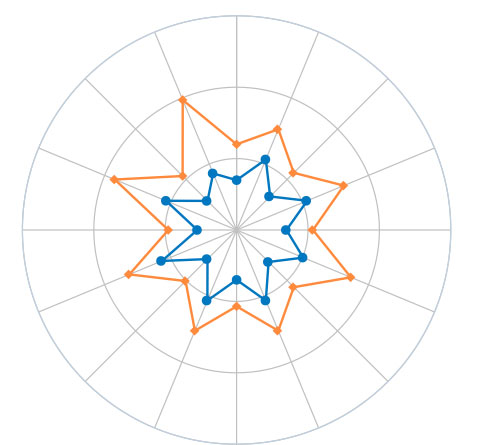 Figure 5. Radar chart illustrating the effect of a torsionally rotated rear hub
Effect of Torsion Applied at Hub
When we ride, the chain pulls on the rear cogs and this rotates the rear hub, which moves the spokes, and eventually all this rotates the rim and tire. This twisting or rotational force at the hub is transmitted through the spokes. Most wheels are laced with “tangent spoking,” where they leave the hub at an angle. Spoke radiating to the back are called “trailing” or “pulling spokes.” Spokes radiating forward are “leading” or “pushing spokes.” When the hub is twisted during pedaling, it pulls on the “pulling” spokes and also relieves tension on the “pushing” spokes. The resulting WTA radar chart takes on a star shape when this is measured (figure 5).
The points of the star shape in figure 5 are the pulling spokes, which jumped up in tension. The inward points are the pushing spokes, showing a drop in tension. The harder you push the cranks, the more dramatic the effect. Remember this occurs twice per crank revolution, once for each power stroke.
A similar torsion or twisting load is applied through the spokes by rotor disc braking. The load and stress on spokes from a rotor disc during braking can be much greater compared to the stress of pedaling. The rim caliper brakes, however, do not apply braking force through the spokes in the same way.
Effect of Air Pressure
There is another force acting on rims we may not think about. Inflated tires squeeze the rim and this can slightly lower the overall spoke tension. The effect is more severe if rim is light weight with a narrow profile and the tire is run at high pressure. In figure 6, a light weight road wheel is shown with and without tire pressure. The tension pattern is basically the same, but there is a slight reduction in overall tension. The MTB wheels are typically run lower pressure and there is very little tension reduction. Also, on deep sidewall rims, there is less of this effects because they are more rigid in the direction of stress.
Do not, however, add extra tension beyond normal manufacturer’s recommendations to account this drop. This effect if being discussed only to show you there are several things acting to lower your wheel tension as you ride.
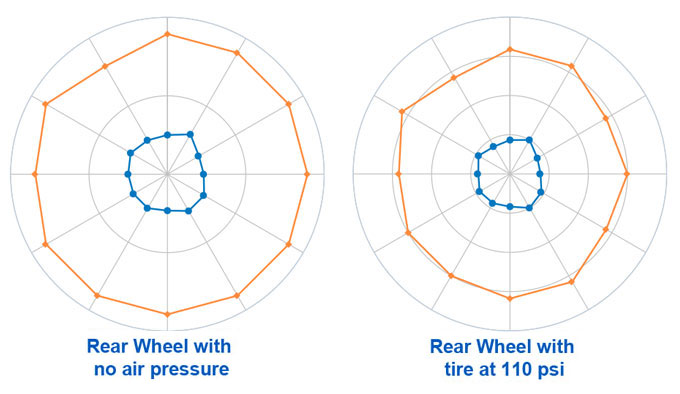 Figure 6. The same wheel shown with and without tire pressure
Diagnostic Use of the WTA
The WTA can also be useful when diagnosing rim and wheel problems. In these cases you may want to begin by running the numbers on the WTA before grabbing a spoke wrench. View the chart as you inspect the rim movement. The wobble or run out along with the WTA will tell you a story of what has happened to this wheel.
Take for example the rear wheel below that was badly out of true (figure 7), wobbling back and forth nearly 1/2″ (12mm). The WTA on this wheel shows some problems. However, inspecting the rim movement of the rim combined with the changes in relative spoke tension tells us this rim has been bent. The rim was moving to the left at spoke #5.This section of rim needs to be moved back to the right. Normally, tightening the right spoke #5 would help accomplish this, as would loosening left side spoke #5. But check the WTA chart. Right side #5 is already very tight, and left side #5 is loose. Adjusting these spokes are very unlikely to help at all. This section of rim has been bent, deformed probably by impact.
However, not all wheels that wobble have a bent rim. The disc wheel below was again a rear wheel, and about 1/2″ (12mm) lateral runout (figure 8). The WTA chart looks horrible at first glance. However, it is necessary to consider the location and direction of the wobble. The rim pulls toward the left at spoke #2. However, notice that left side spoke #2 is also spiked in tension. It makes sense it would move left. Then the rim moves toward the right at spoke #6, and then left at #9, and then right again at #10. The rim movements match what we expect with the spoke tension chart. Loosen up this entire wheel and start over with even tension. The rim hoop is probably fine, it just needs some attention.
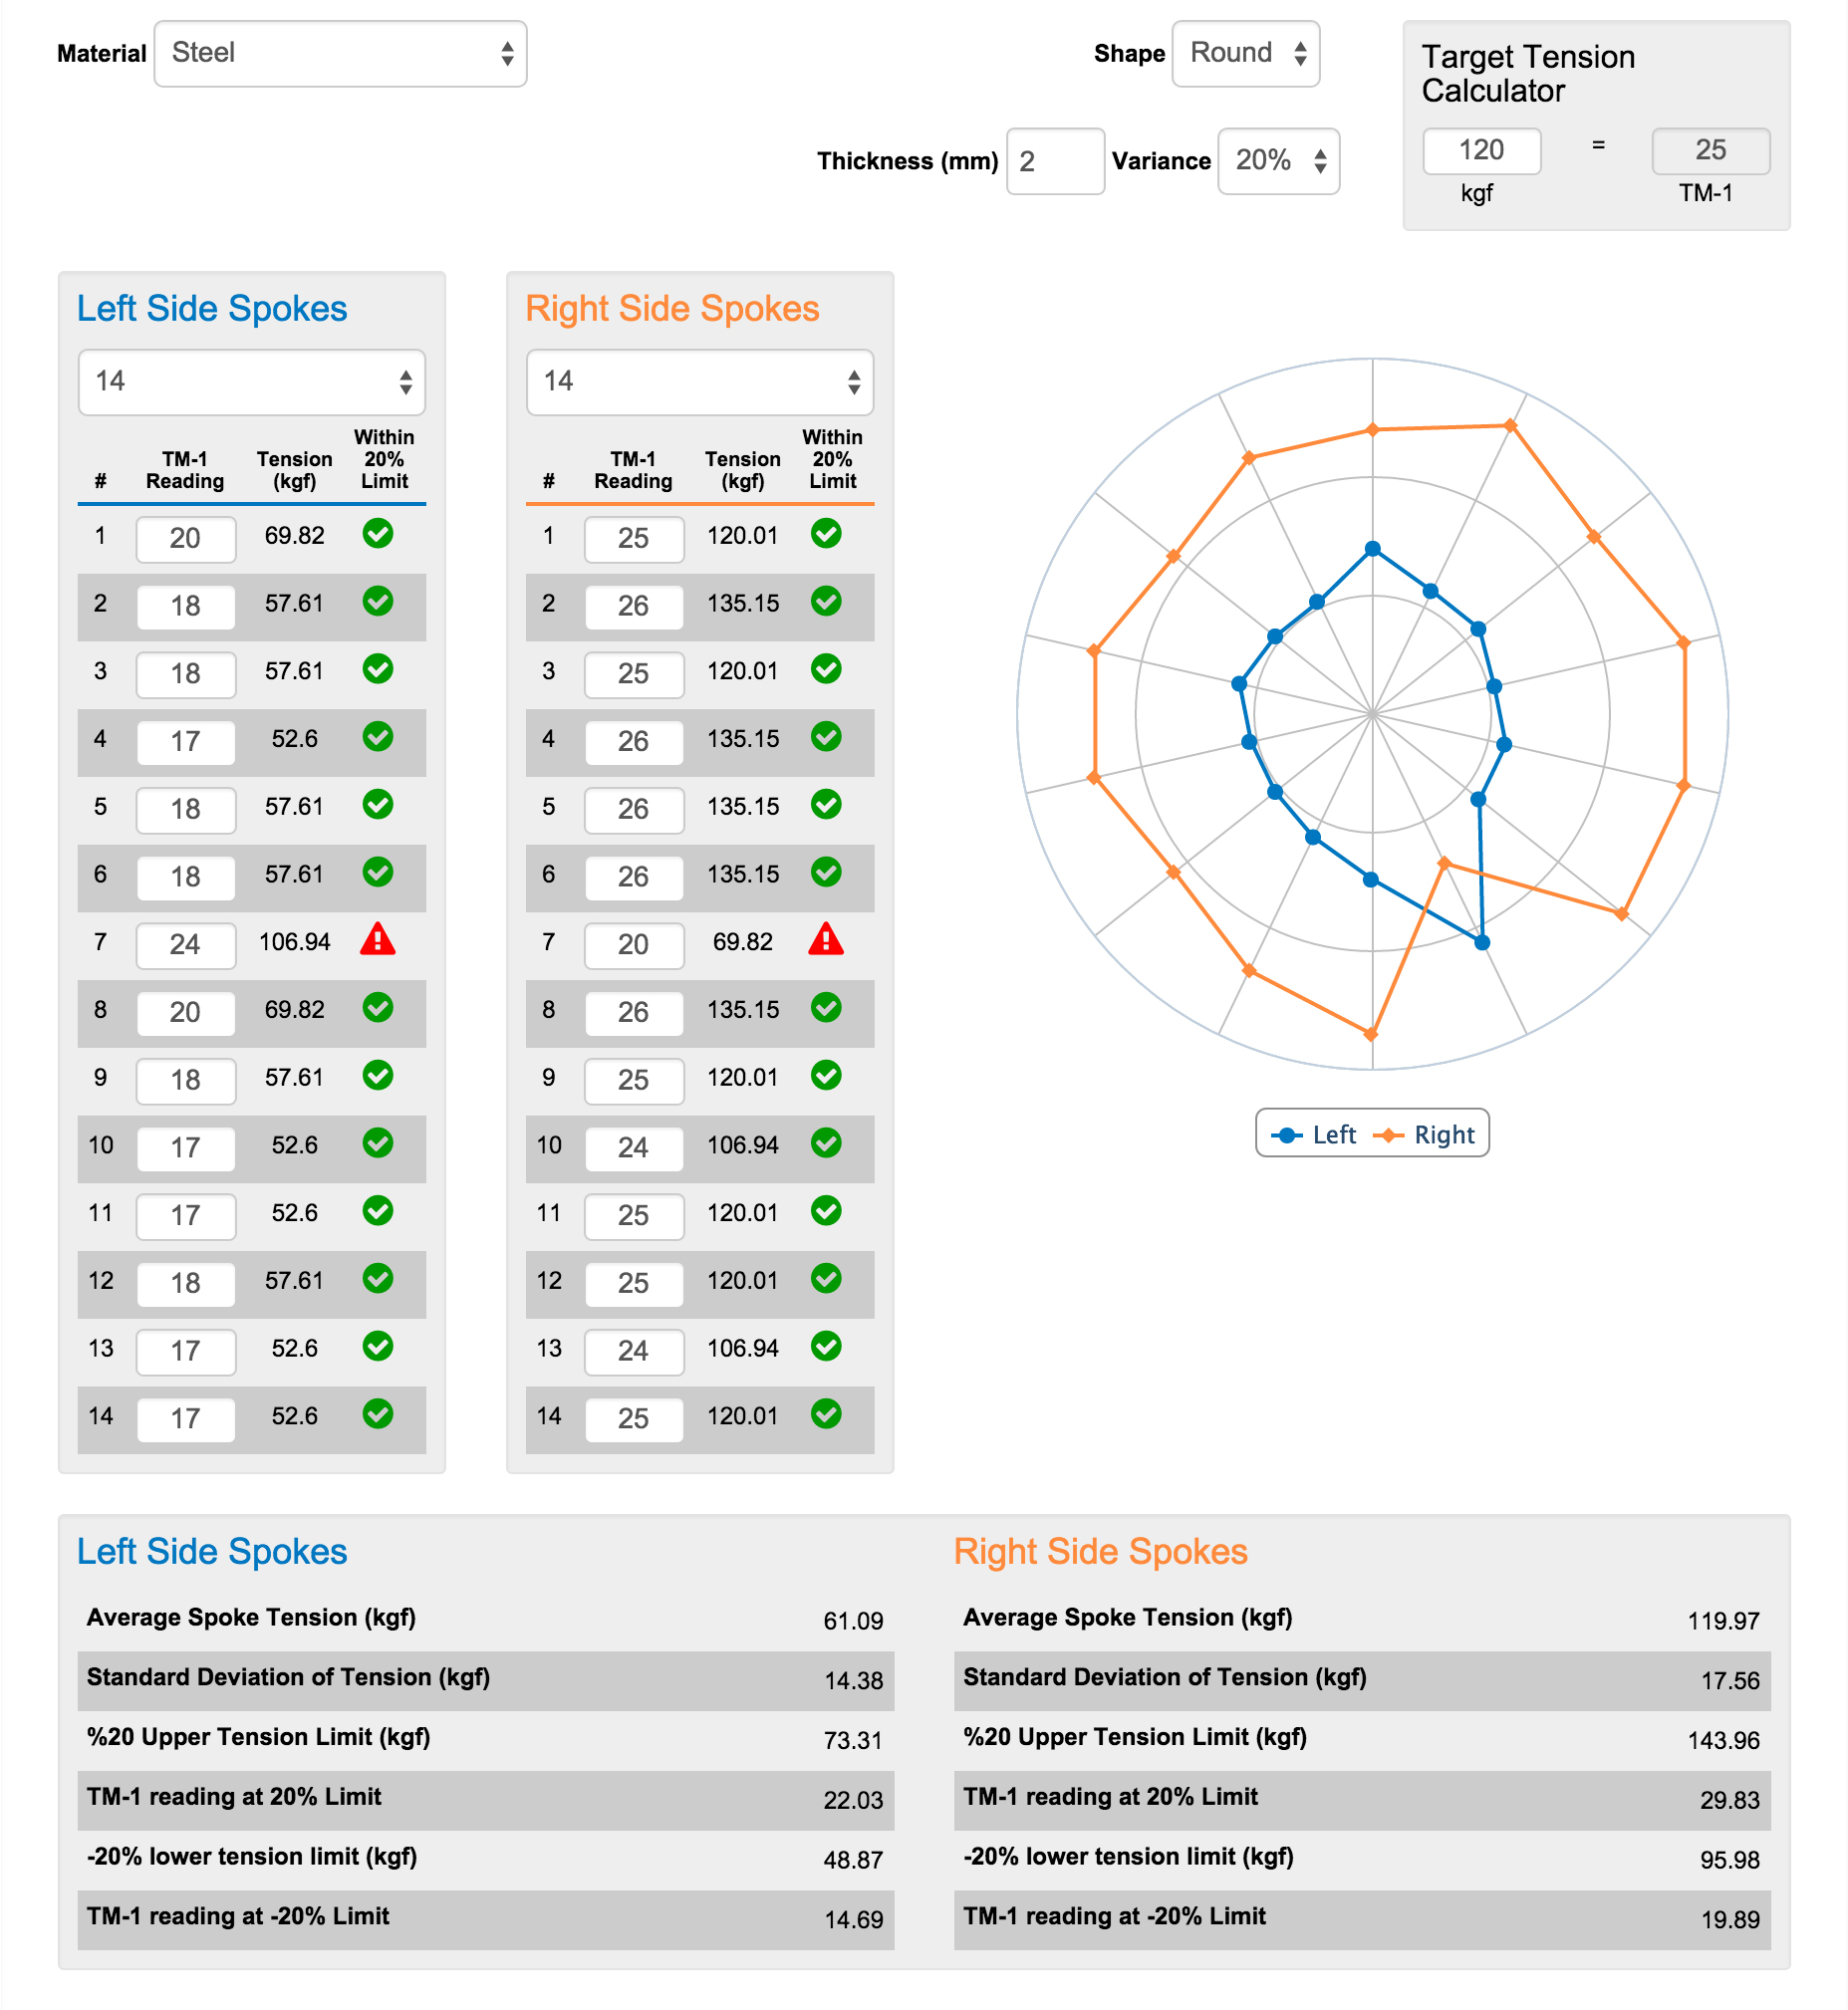
Figure 7. Rear wheel with bent rim
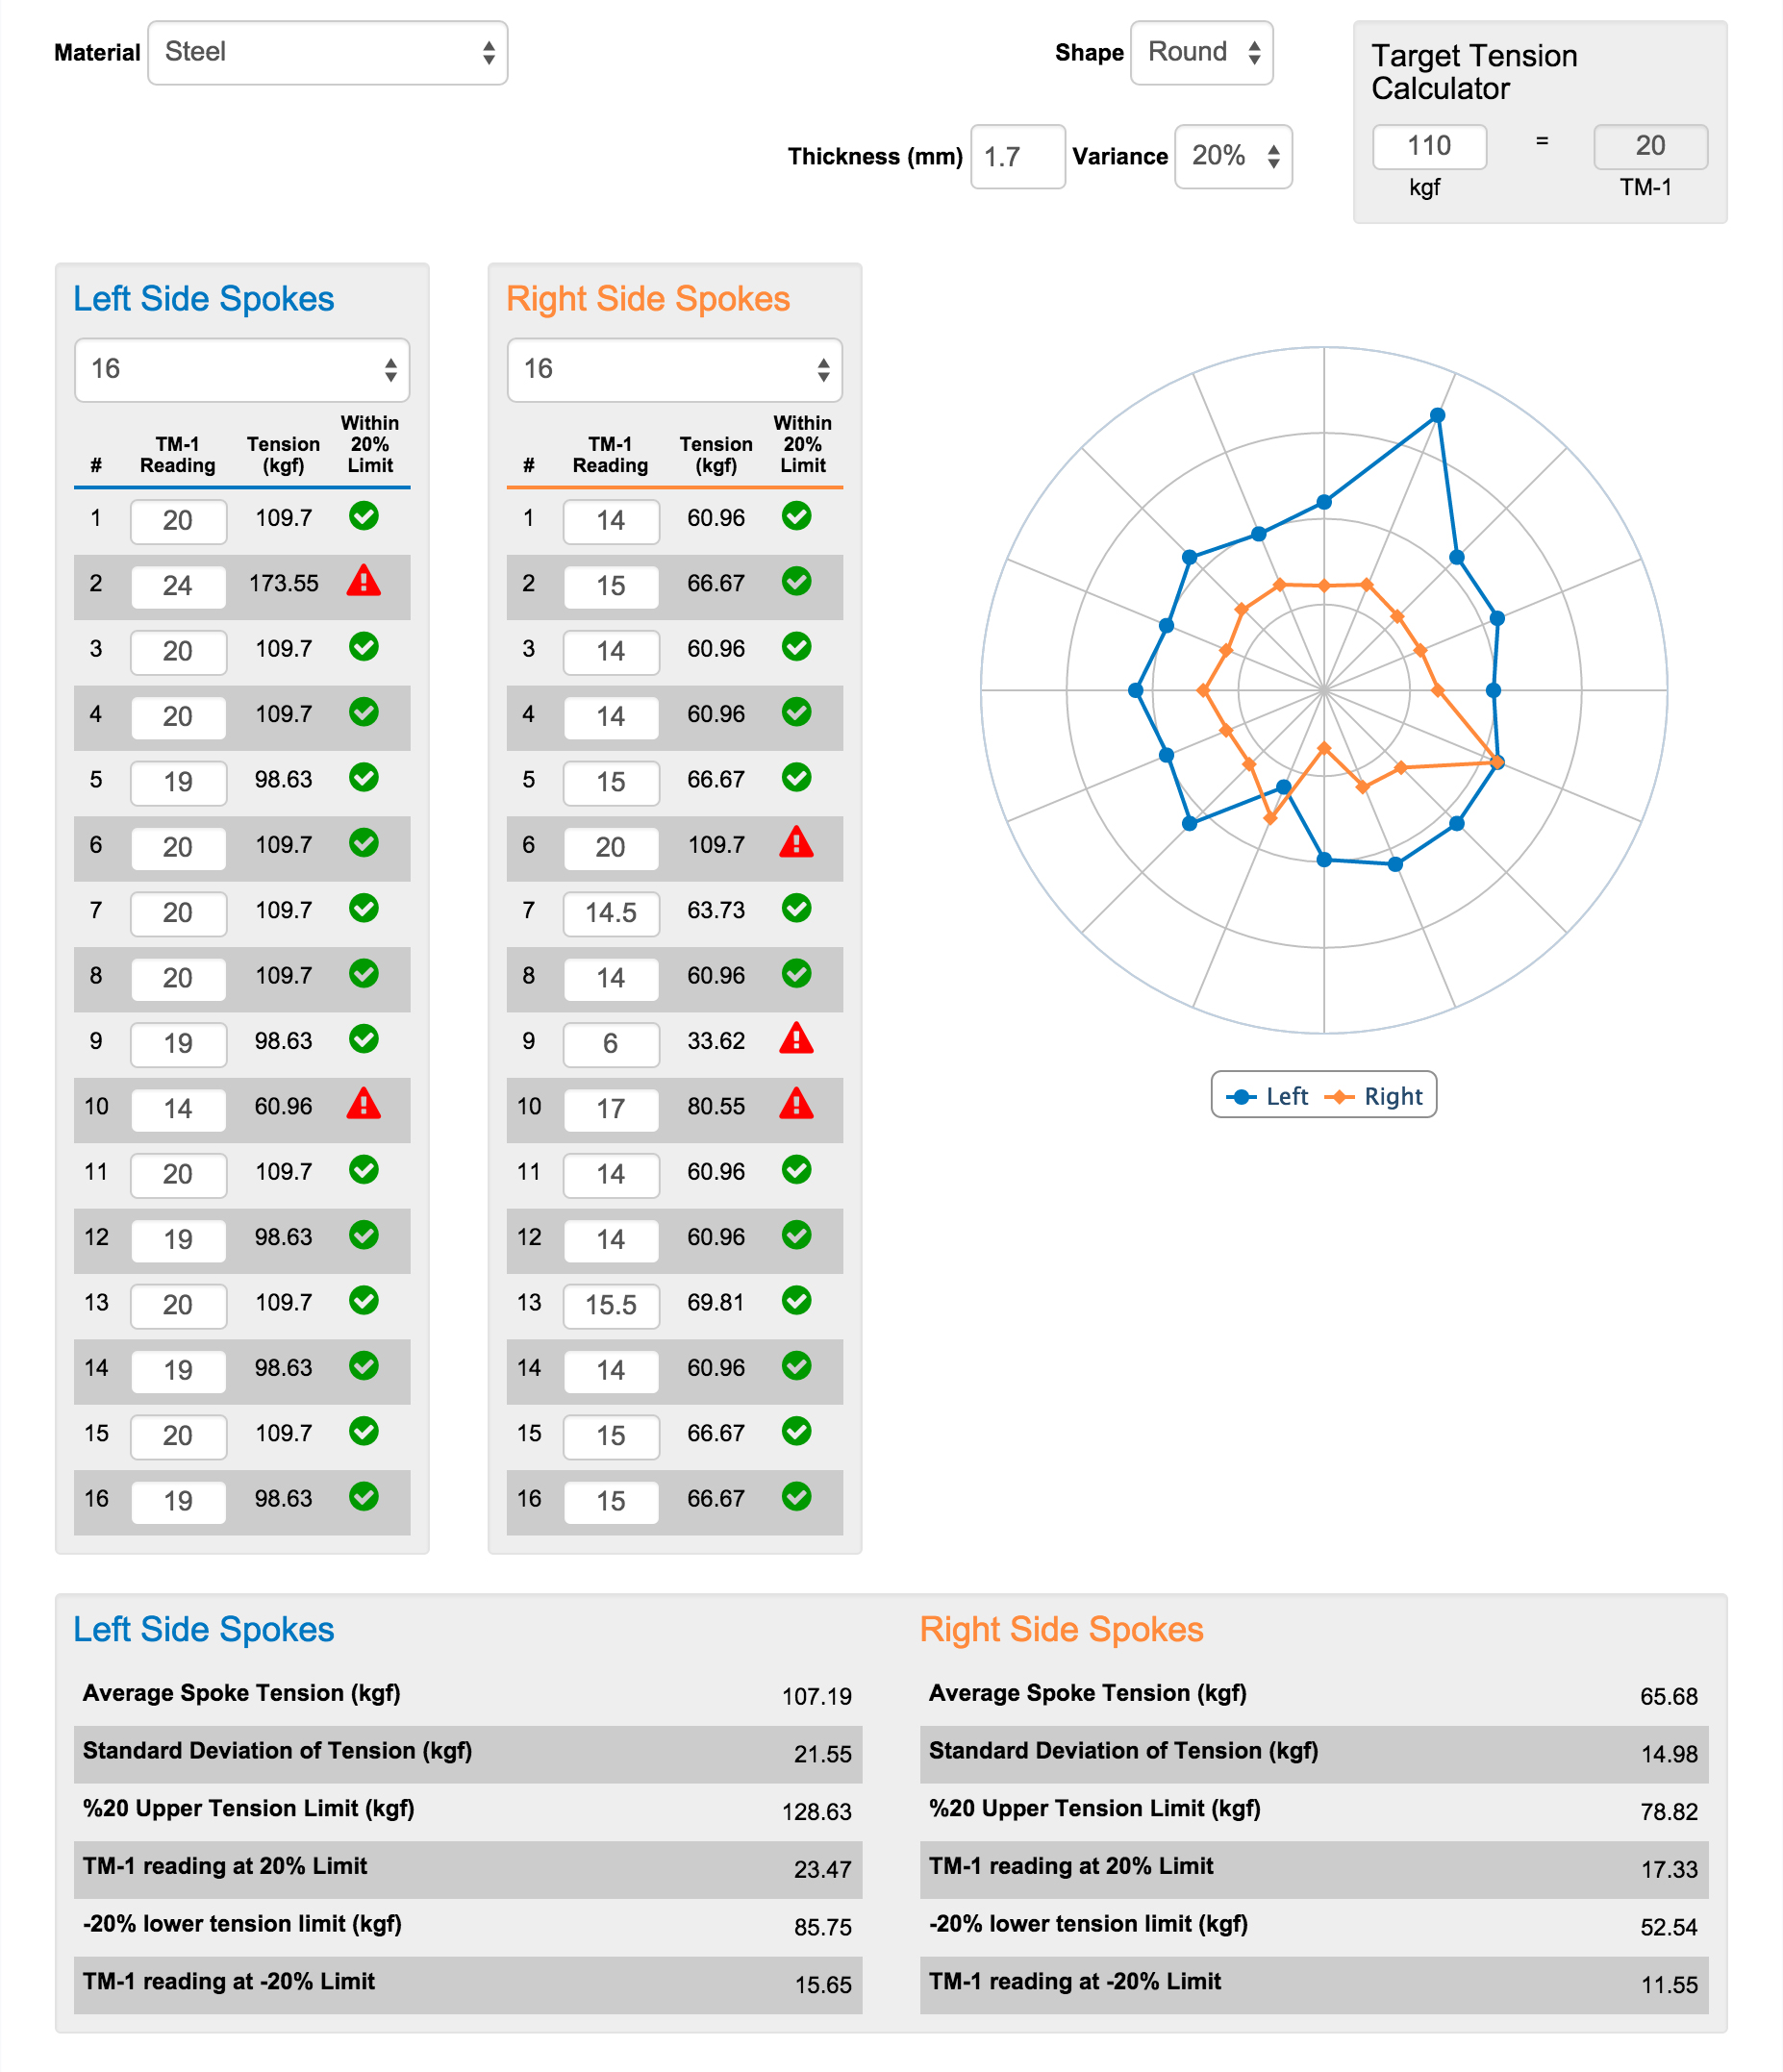
Figure 8. Disc wheel in need of TLC
Broken Spoke and Tension Balance
With enough use and riding, spokes can eventually fail and break. This can occur from stress fatigue. Going around and around too many times under load just takes it out of a spoke. Or, a spoke can break from a derailleur or stick getting in the wheel (regarding the former, please double check your limit screw settings). When one spoke fails it will affect the entire wheel to some degree. The area of rim at the spoke failure will come out of true and move laterally as the spoke is now effectively at 0 kgf. Figure 9 below illustrates broken right side spoke at #9, now at 0 kgf. This wheel was originally well balanced. The two neighboring spokes, right side #10 and right side #8, went up in tension because there was no longer pulling at right side #9. However, the entire right side tension has changed, showing an ovalizing of the pattern, with tension increasing opposite the breakage. Corresponding to this effect is the ovalizing of the left side, but it is at a 90-degree offset. The left spoke right at the area of right side #8 rose in tension because the rim is also now pulling away from the hub. The wheel pulls to the left at the area of spoke #8, but also pulls to the right at right spoke #16, which have increased in tension as a result of the broke #8. Put in a new spoke, and pull it up to the average tension, then fine tune the wheel.
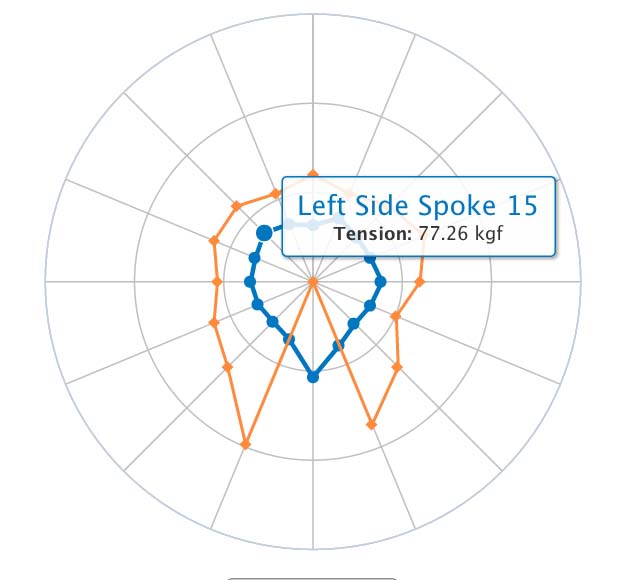
Figure 9. Wheel tension from broken spoke #8 on the right side

Figure 10. Radial rim deformity and damage at spokes #8 and #9
Radial Rim Damage and Tension Balance
A slight amount of rim flex and distortion are common just from the weight of the cyclist. However, when you see a rim that has struck something head-on, such as a curb, road pothole, or most anything solid, it can deform and bend the rim. In this case the hoop will show a “flat spot,” where the rim drops radially toward the hub. Here, the WTA shows lower tension on both the left and right side in flatted area (figure 10). If the hoop was is good shape, we would expect this section to be a “high spot,” with this section of rim pulling away from the hub. We might at first think we can fix this damaged rim by loosening these spokes in the effected area. But the spokes are already relatively low there, and loosening further is unlikely to have any effect. The rim metal is bent and spoke tension cannot push the hoop back into shape.
Folded Wheels and Tension Balance
If the rim has experienced a major lateral impact, it may fold or “taco,” taking the shape (somewhat) of a hard shell taco. This is bad for the rider and wheel owner, but it does provide an interesting phenomenon in tension (figure 11). There is a similar pattern on each side, but offset by 90 degrees. Right side spokes #2, #3. #4, and then #11, #12, and #13 are tight. However, away from these spokes the tension quickly falls off, with spokes #6, #7, #8, #9, and then #15, #16, and #17 effectively 0 kgf. The pattern repeats on the left side, but here the tight spokes are #16, #17, #18, and then #7, #8 and #9.
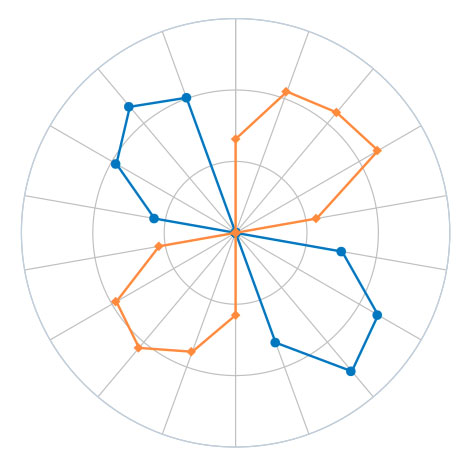
Figure 11. The folded or "taco" rim pattern, not a "lucky four-leaf clover" for the rider
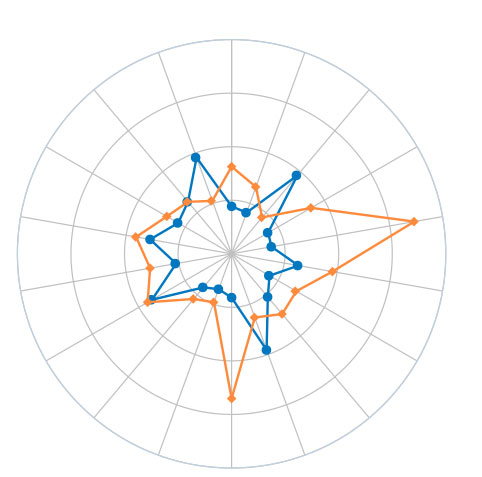
Figure 12. The same tacoed wheel as Figure 8 after "re-bending" and repairing by truing
It is claimed by some people that this “taco” can be fixed by re-bending the wheel. Well, you can try to re-bend it all you want, but you will not be returning the hoop back to its original shape. There is limited degree of “repairability” here, but this commonly leads to horribly unbalanced spoke tension. The wheel will appear “usable” for a while but it will not hold it shape for long. The wheel from figure 11 was pushed and re-bent back into shape. After the re-bending, the wheel was approximately 7mm out of lateral true, which was unacceptable for use. With more corrections by truing and using spoke tension, the lateral true was improved to about 1mm lateral error, good enough to for common everyday use. Although we might have thought we fixed this for our friend, this wheel will not be staying straight very long. The WTA graph shows the story.
Conclusion
The WTA is a system for you to manually record spoke tension. It provides Kilogram force (kgf) reading easier than using the chart that comes with the TM-1. The WTA will organize your TM-1 measurements into a useful format. With some learning on your part, the WTA can get you a better appreciation and understanding of what is going on tension wise in your wheels. Take the time to crunch the numbers.